---
title: ChronoSync Step-by-Step User Tutorial
description: A step-by-step ChronoSync user guide covering registration, login, schedule creation, academic system and ICS import, manual events, holiday adjustments, sharing and export, team collaboration, empty classroom lookup, and profile settings. Designed for Shandong Normal University students and staff to quickly get started with schedules and team scheduling.
---
Welcome to ChronoSync! 🎉
ChronoSync is available at [`https://sxtj.hxcn.space`](https://sxtj.hxcn.space) and supports Windows, macOS, Linux, Android, and iOS. This tutorial covers the features you'll use day to day: personal schedules, team collaboration, empty classroom lookup, and profile settings. If you're new here, follow along from the top. If you've already registered, jump straight to the section you need.
This tutorial is for:
- **Regular users** — creating schedules, importing courses, adding events manually, checking empty classrooms, and exporting or sharing your schedule.
- **Team managers** — club leaders, shift schedulers, event organizers, and anyone who needs to create teams, add members, view team schedules, filter by time, and coordinate day-to-day collaboration.
Admin panel, deployment, and development topics are out of scope for this guide.
---
## Table of contents
- [Part 1: Quick start](#part-1-quick-start)
- [1. Register an account](#1-register-an-account)
- [2. Log in to the platform](#2-log-in-to-the-platform)
- [3. Get to know the navigation](#3-get-to-know-the-navigation)
- [Part 2: My Schedule](#part-2-my-schedule)
- [1. Create or switch schedules](#1-create-or-switch-schedules)
- [2. Switch between the four views](#2-switch-between-the-four-views)
- [3. Import a schedule](#3-import-a-schedule)
- [3.1 Import from the academic system](#31-import-from-the-academic-system)
- [3.2 Import from an ICS file](#32-import-from-an-ics-file)
- [4. Add, edit, and delete events manually](#4-add-edit-and-delete-events-manually)
- [5. Holiday adjustments](#5-holiday-adjustments)
- [6. Share and export your schedule](#6-share-and-export-your-schedule)
- [6.1 Export as a PNG image](#61-export-as-a-png-image)
- [6.2 Export as an ICS file](#62-export-as-an-ics-file)
- [6.3 Generate a share link](#63-generate-a-share-link)
- [6.4 Import someone else's shared schedule](#64-import-someone-elses-shared-schedule)
- [7. Schedule settings](#7-schedule-settings)
- [8. Personalization](#8-personalization)
- [Part 3: Team collaboration](#part-3-team-collaboration)
- [1. Team cards at a glance](#1-team-cards-at-a-glance)
- [2. For regular team members](#2-for-regular-team-members)
- [2.1 Join a team](#21-join-a-team)
- [2.2 View the team schedule](#22-view-the-team-schedule)
- [2.3 Use filters to find a time](#23-use-filters-to-find-a-time)
- [2.4 Leave a team](#24-leave-a-team)
- [3. For team admins](#3-for-team-admins)
- [3.1 Create a team](#31-create-a-team)
- [3.2 Manage team details and team code](#32-manage-team-details-and-team-code)
- [3.3 Add and remove members](#33-add-and-remove-members)
- [3.4 Team admin permission boundaries](#34-team-admin-permission-boundaries)
- [4. Team owner-only actions](#4-team-owner-only-actions)
- [4.1 Assign or revoke team admin status](#41-assign-or-revoke-team-admin-status)
- [4.2 Transfer team ownership](#42-transfer-team-ownership)
- [4.3 Disband a team](#43-disband-a-team)
- [Part 4: Empty classrooms](#part-4-empty-classrooms)
- [Part 5: Profile settings](#part-5-profile-settings)
- [1. Edit your profile](#1-edit-your-profile)
- [2. Change your avatar](#2-change-your-avatar)
- [3. Bind or change your email](#3-bind-or-change-your-email)
- [4. Change your password](#4-change-your-password)
- [5. View login history](#5-view-login-history)
---
## Part 1: Quick start
### 1. Register an account
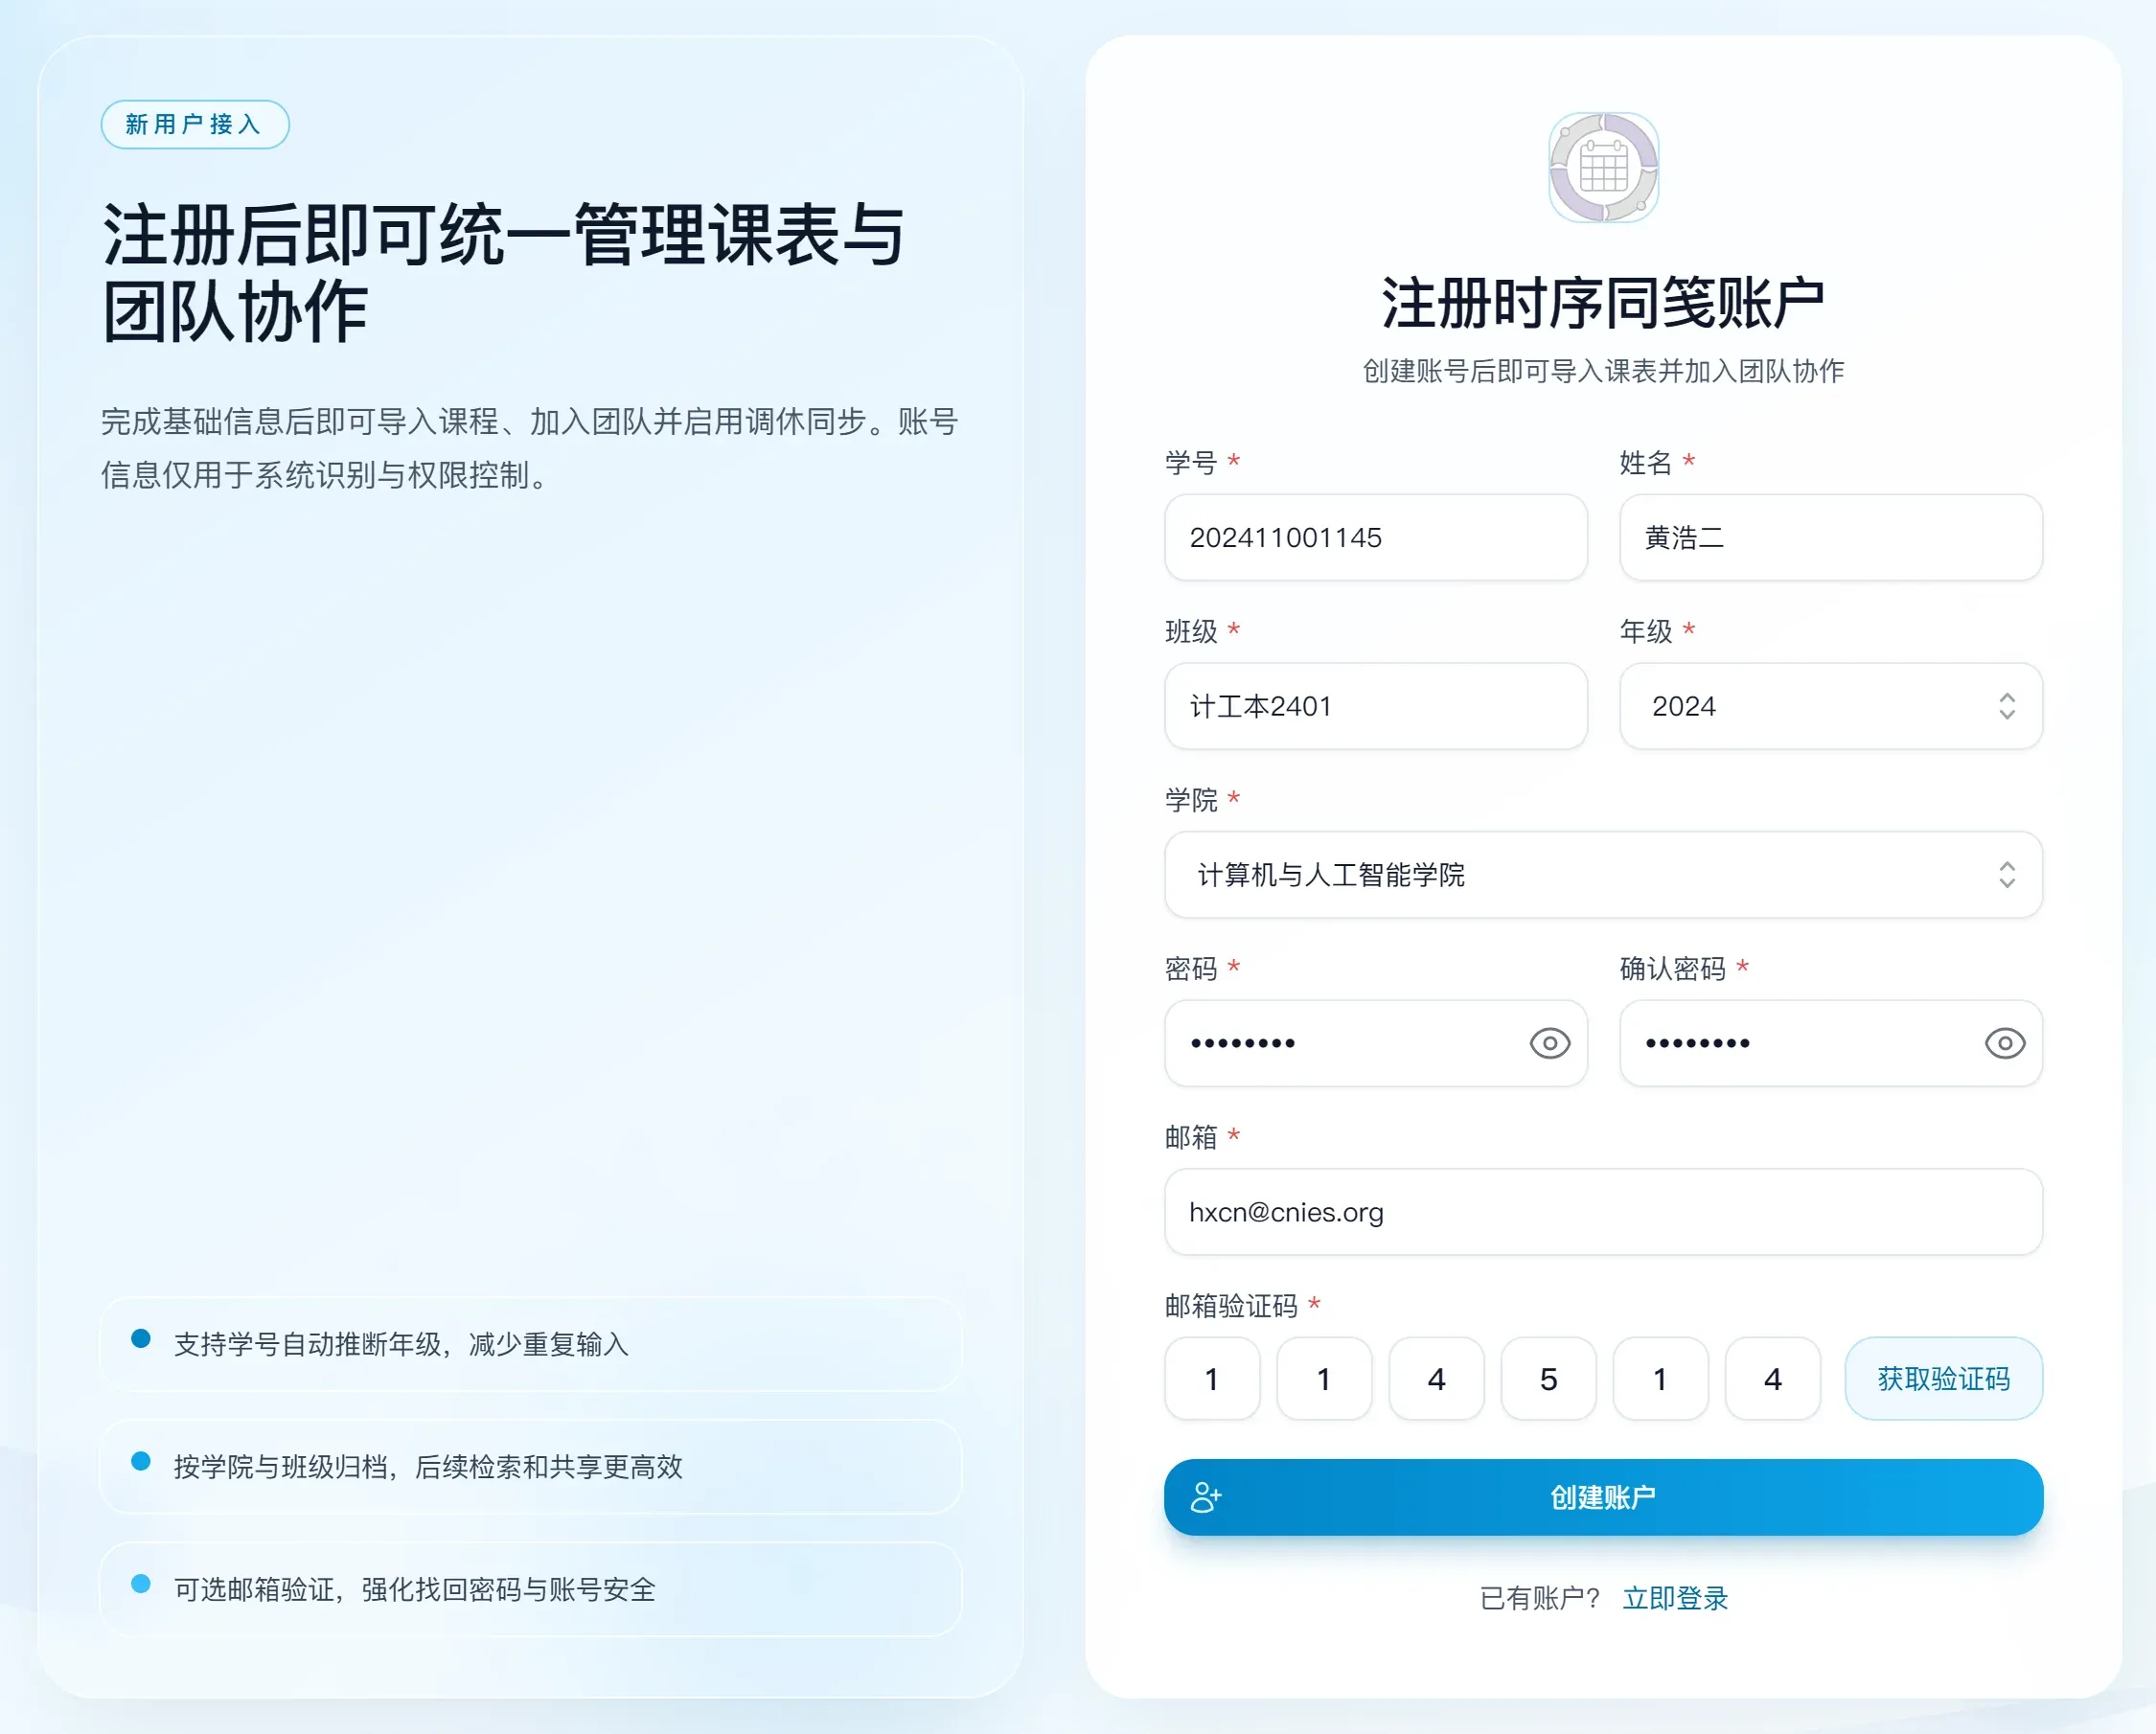
You'll need to register the first time you use ChronoSync.
1. Open the ChronoSync website at [`https://sxtj.hxcn.space`](https://sxtj.hxcn.space) in your browser.
2. Click the "Register" button in the top-right corner or anywhere on the page that shows the registration entry.
3. Fill in your student ID, name, class, and password as prompted, then enter your email and the verification code. Binding your email now makes password recovery easier later.
4. Click the **"Register"** button to finish.
 ### 2. Log in to the platform
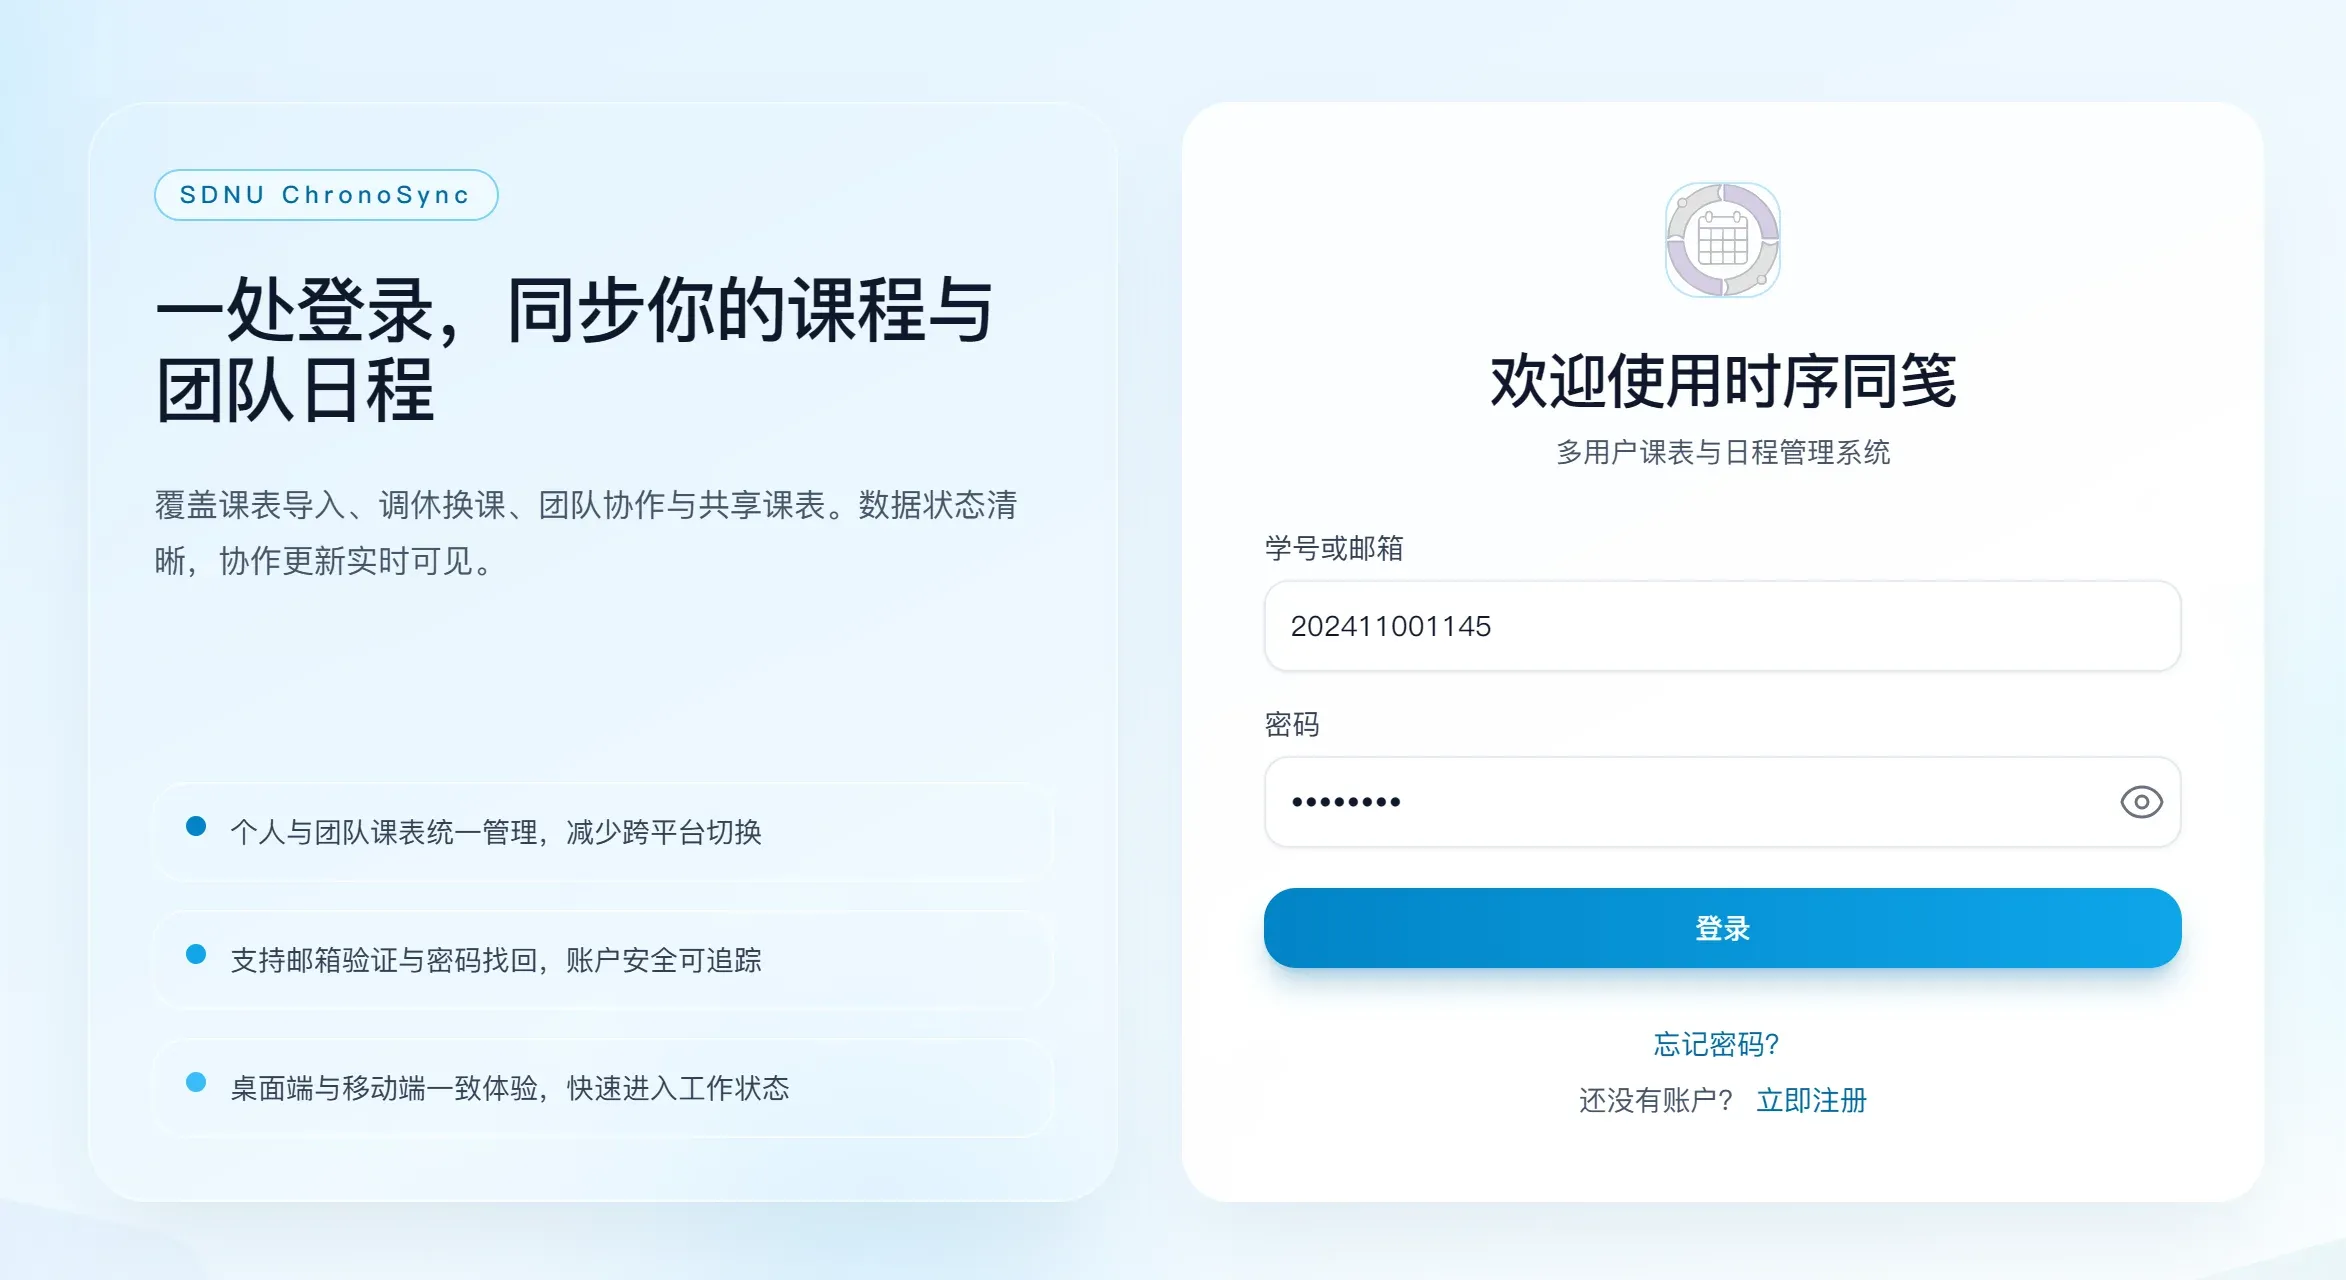
1. Enter your student ID and password.
2. Click "Log in" to enter the dashboard.
3. After logging in, the most-used pages are typically "My Schedule", "Team view", "Empty classrooms", and "Profile".
### 2. Log in to the platform
1. Enter your student ID and password.
2. Click "Log in" to enter the dashboard.
3. After logging in, the most-used pages are typically "My Schedule", "Team view", "Empty classrooms", and "Profile".
 ### 3. Get to know the navigation
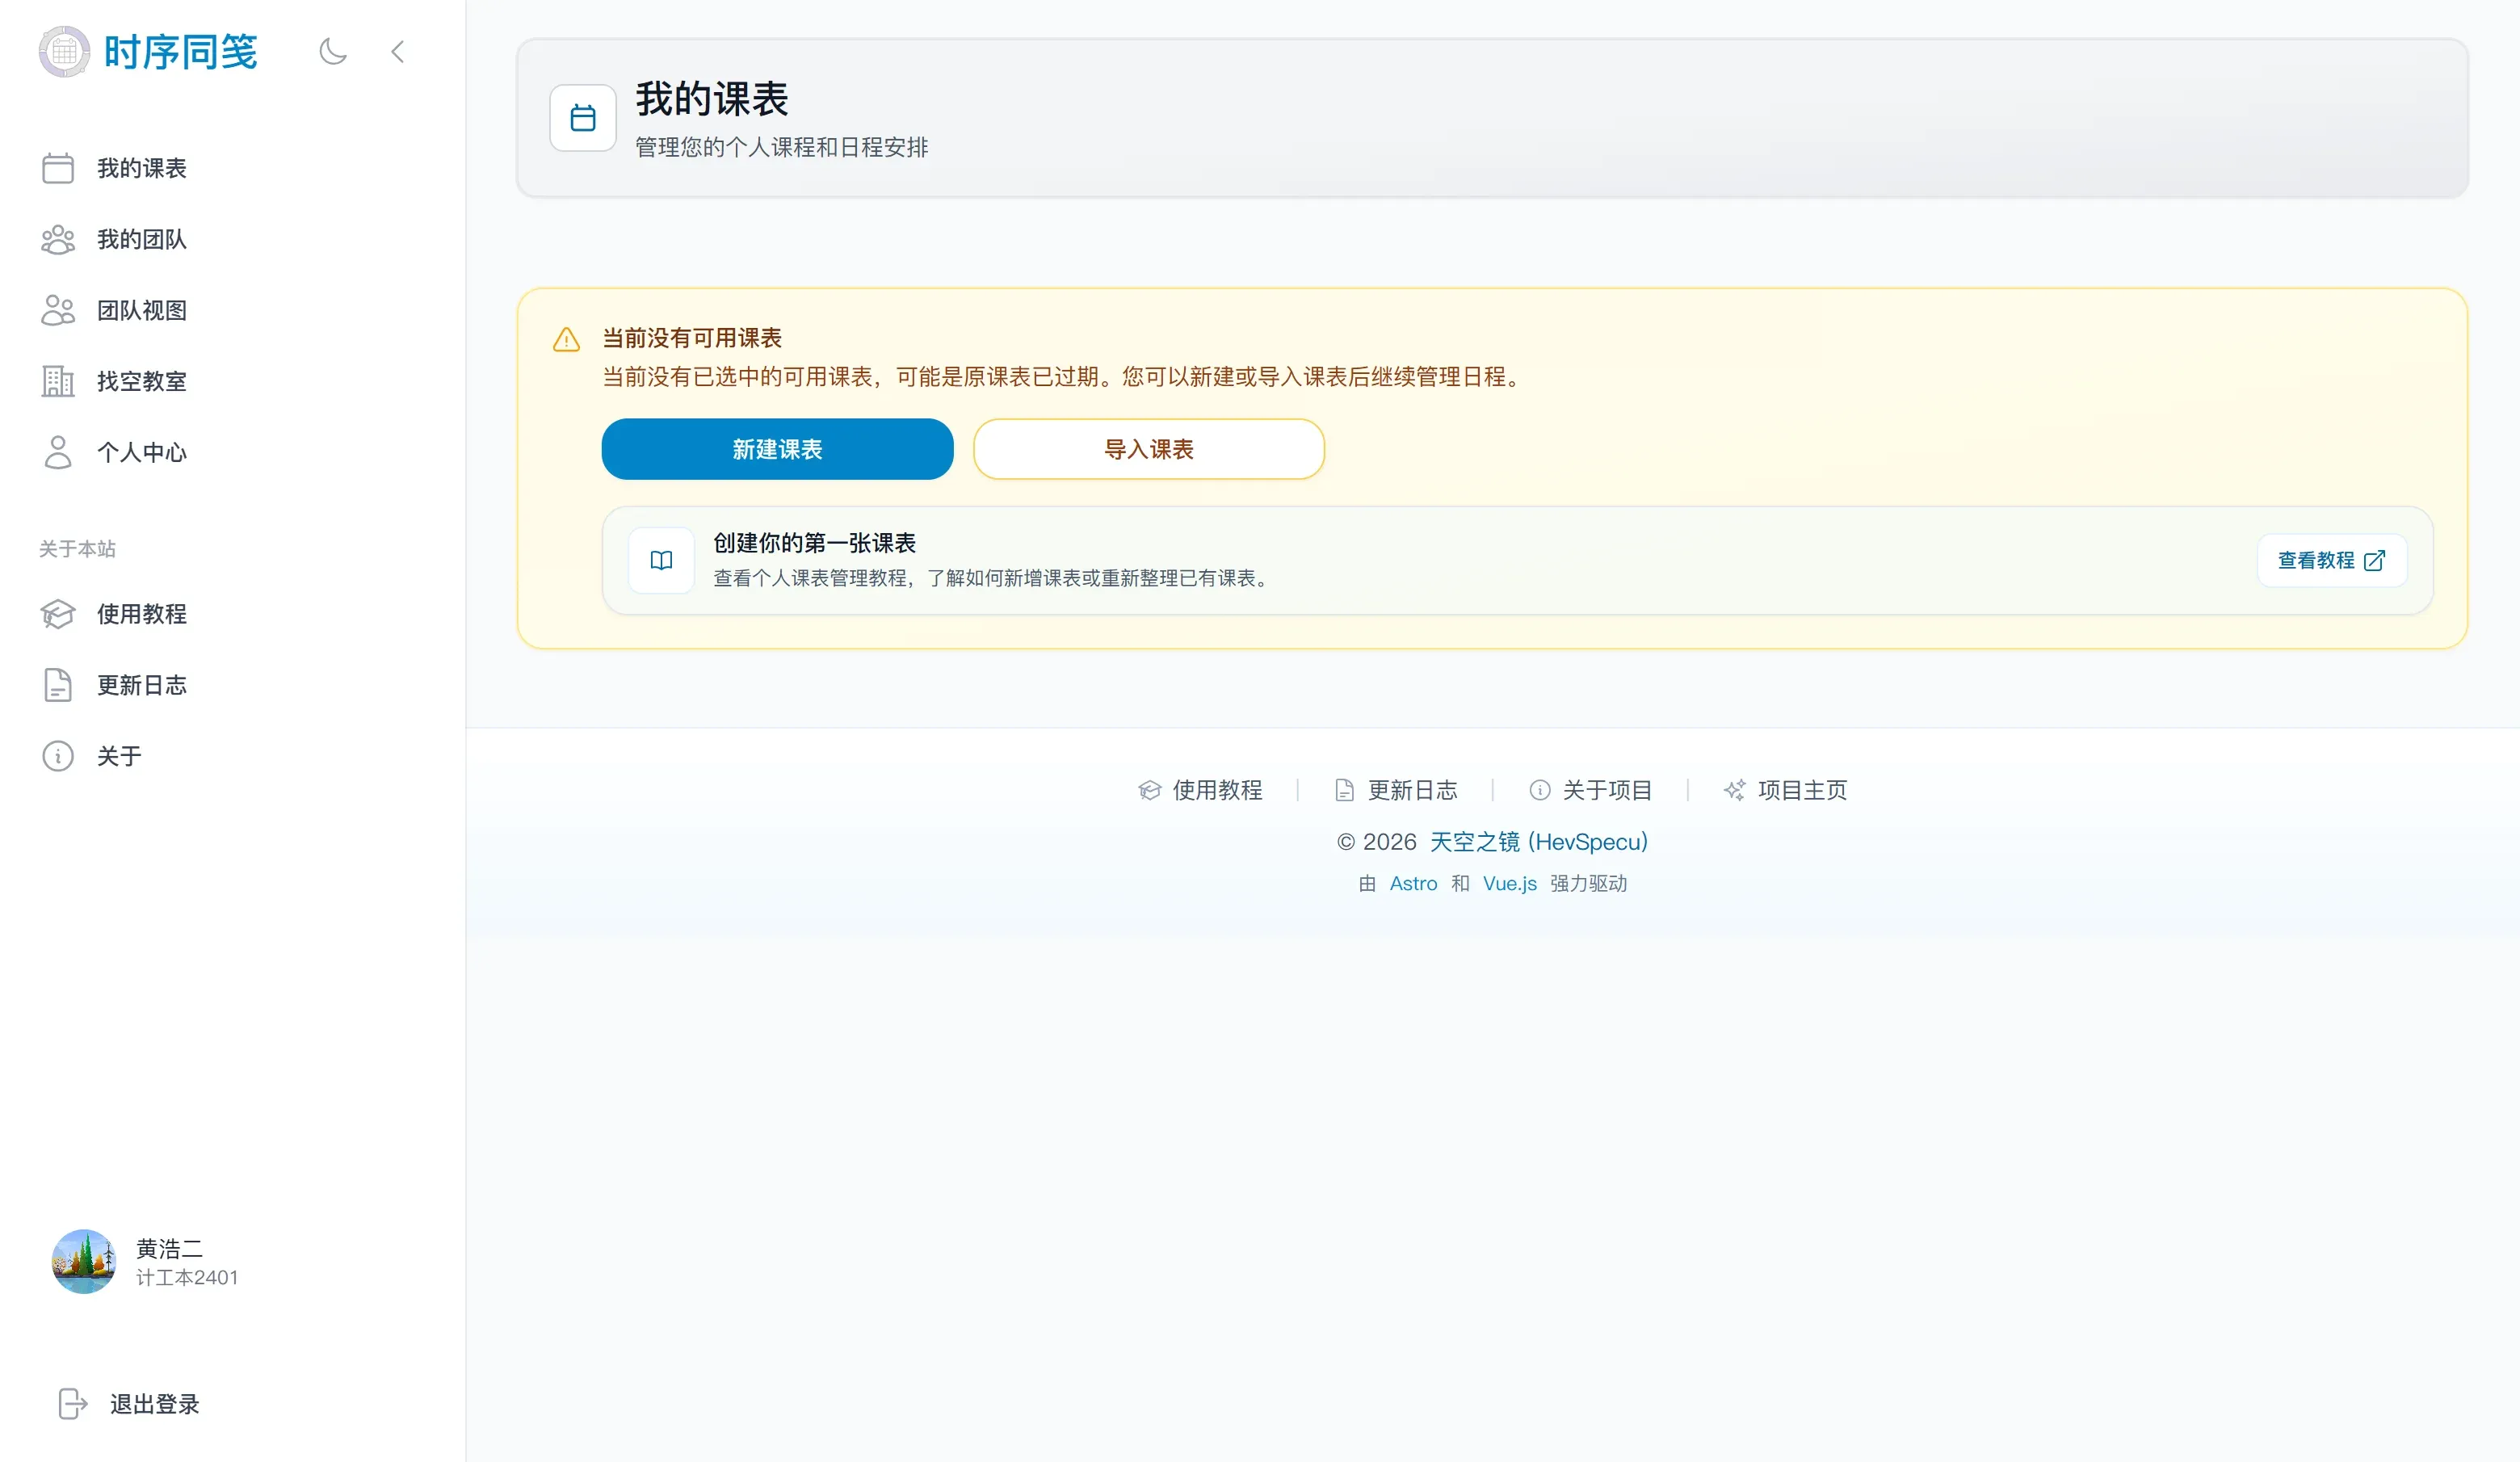
Once you've logged in, here are the main entry points:
- `My Schedule` — your personal schedule, imports, holiday adjustments, sharing, and personalization all live here.
- `Team view` — see aggregated schedules for team members.
- `Empty classrooms` — log into the academic system independently to look up free classrooms.
- `Profile` — your profile info, email, password, and login history.
### 3. Get to know the navigation
Once you've logged in, here are the main entry points:
- `My Schedule` — your personal schedule, imports, holiday adjustments, sharing, and personalization all live here.
- `Team view` — see aggregated schedules for team members.
- `Empty classrooms` — log into the academic system independently to look up free classrooms.
- `Profile` — your profile info, email, password, and login history.
 ---
## Part 2: My Schedule
### 1. Create or switch schedules
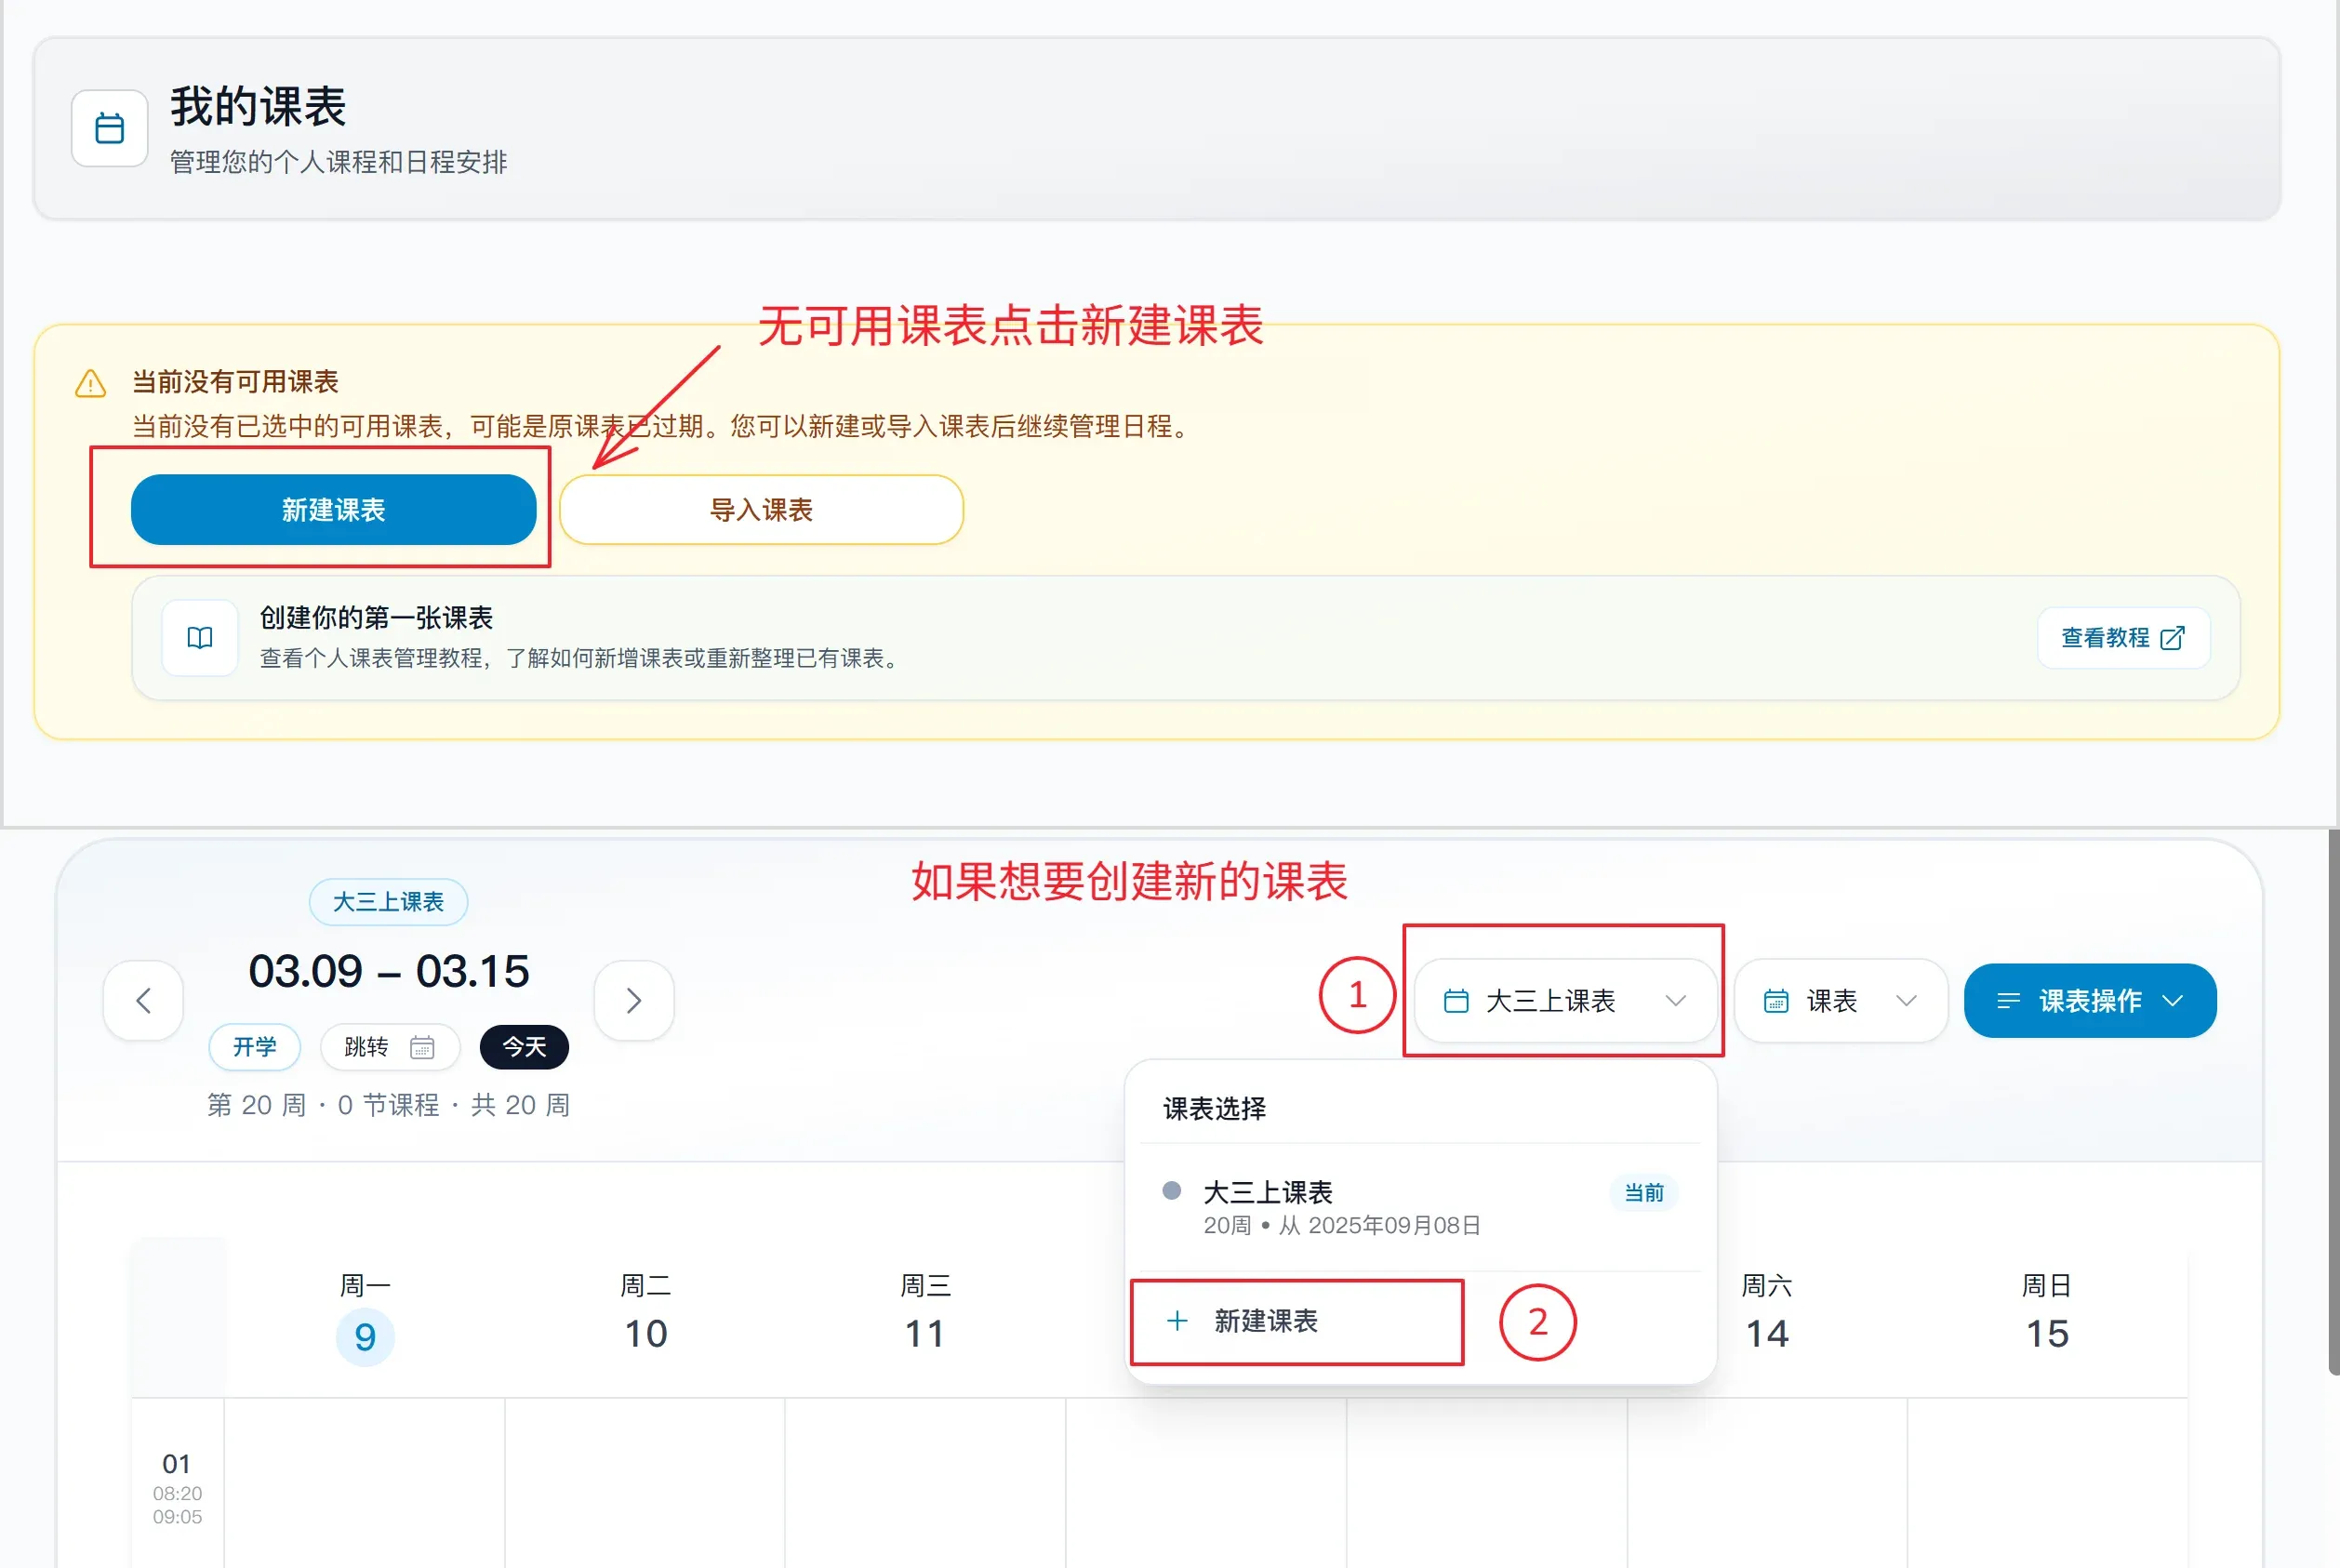
When you open "My Schedule", the current schedule name appears at the top. From there you can switch to another existing schedule or create a new one.
To create a new schedule:
1. Select "New schedule".
---
## Part 2: My Schedule
### 1. Create or switch schedules
When you open "My Schedule", the current schedule name appears at the top. From there you can switch to another existing schedule or create a new one.
To create a new schedule:
1. Select "New schedule".
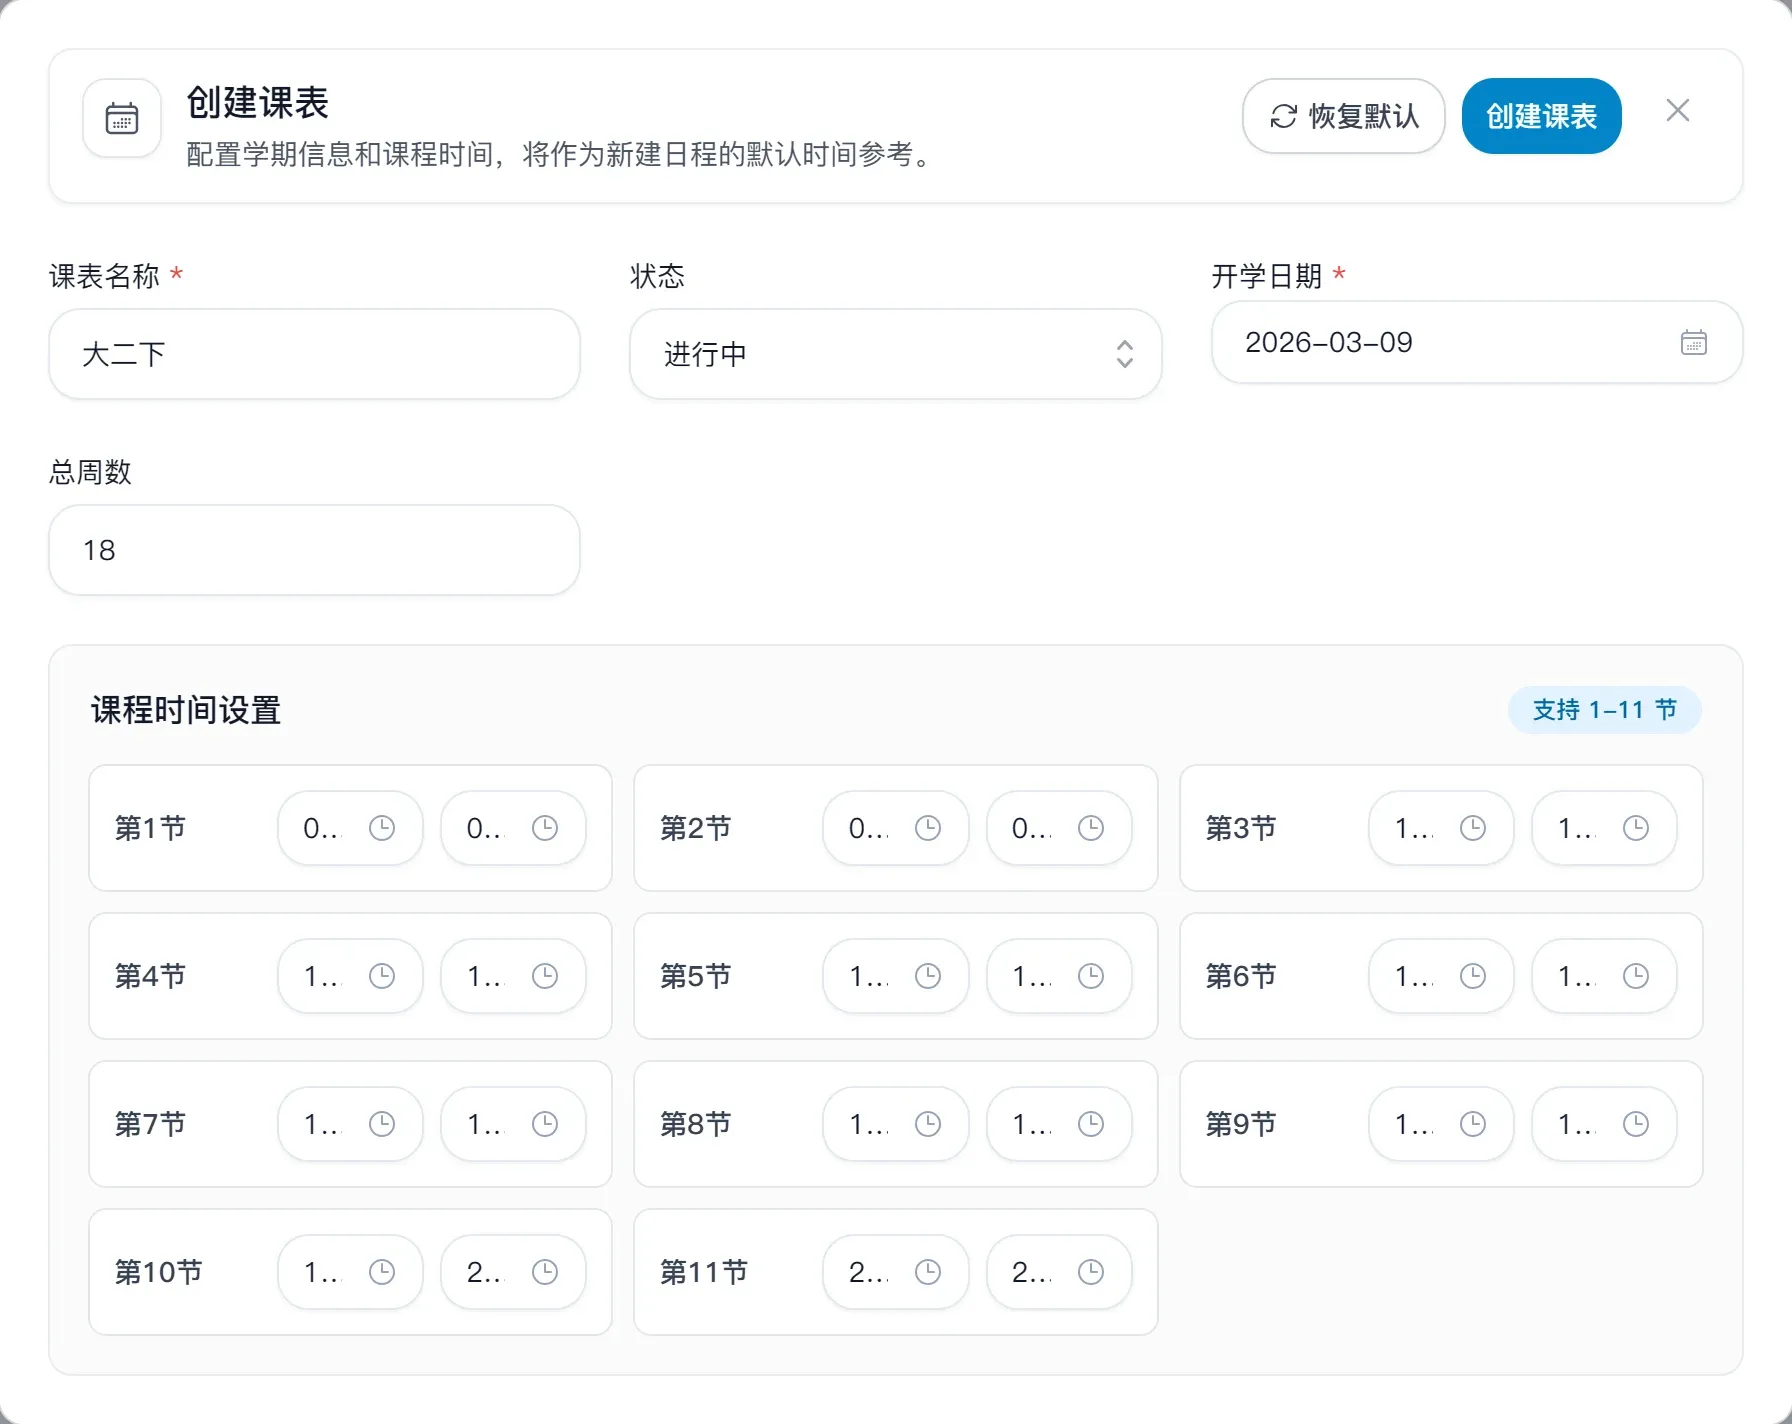
 2. Fill in the following:
- Schedule name
- Status: Active / Ended / Hidden
- Start date **— the Monday of the first week of classes (e.g., for the 2026 spring semester, set this to 2026-03-09)**
- Total weeks
- Class period settings (supports periods 1–11)
2. Fill in the following:
- Schedule name
- Status: Active / Ended / Hidden
- Start date **— the Monday of the first week of classes (e.g., for the 2026 spring semester, set this to 2026-03-09)**
- Total weeks
- Class period settings (supports periods 1–11)
 3. Click "Create schedule".
A few notes:
- Schedules marked `Hidden` or `Ended` are not visible to team members, so they don't work well as an active team schedule.
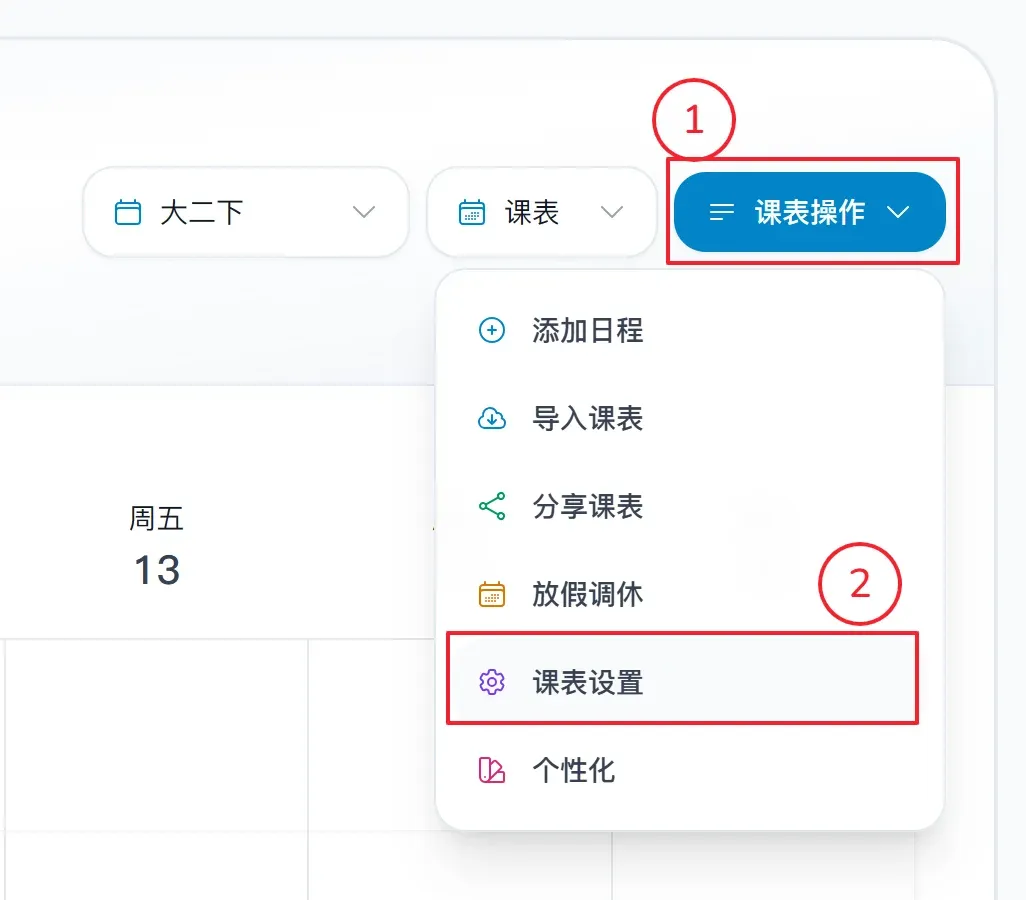
- To edit a schedule's name, semester info, or class times later, use the "Schedule settings" option under "Schedule operations".
3. Click "Create schedule".
A few notes:
- Schedules marked `Hidden` or `Ended` are not visible to team members, so they don't work well as an active team schedule.
- To edit a schedule's name, semester info, or class times later, use the "Schedule settings" option under "Schedule operations".
 ### 2. Switch between the four views
The view menu at the top center of "My Schedule" offers four ways to look at your schedule:
- `Schedule` — the classic weekly schedule view, best for seeing your full week at a glance.
- `Calendar` — monthly calendar with day selection linked to that day's events, best for browsing by date.
- `Gantt` — full-week timeline view, best for seeing how the day's classes are distributed.
- `Weekly list` — day-by-day list view, best for a quick scan of today and upcoming classes.
Common controls:
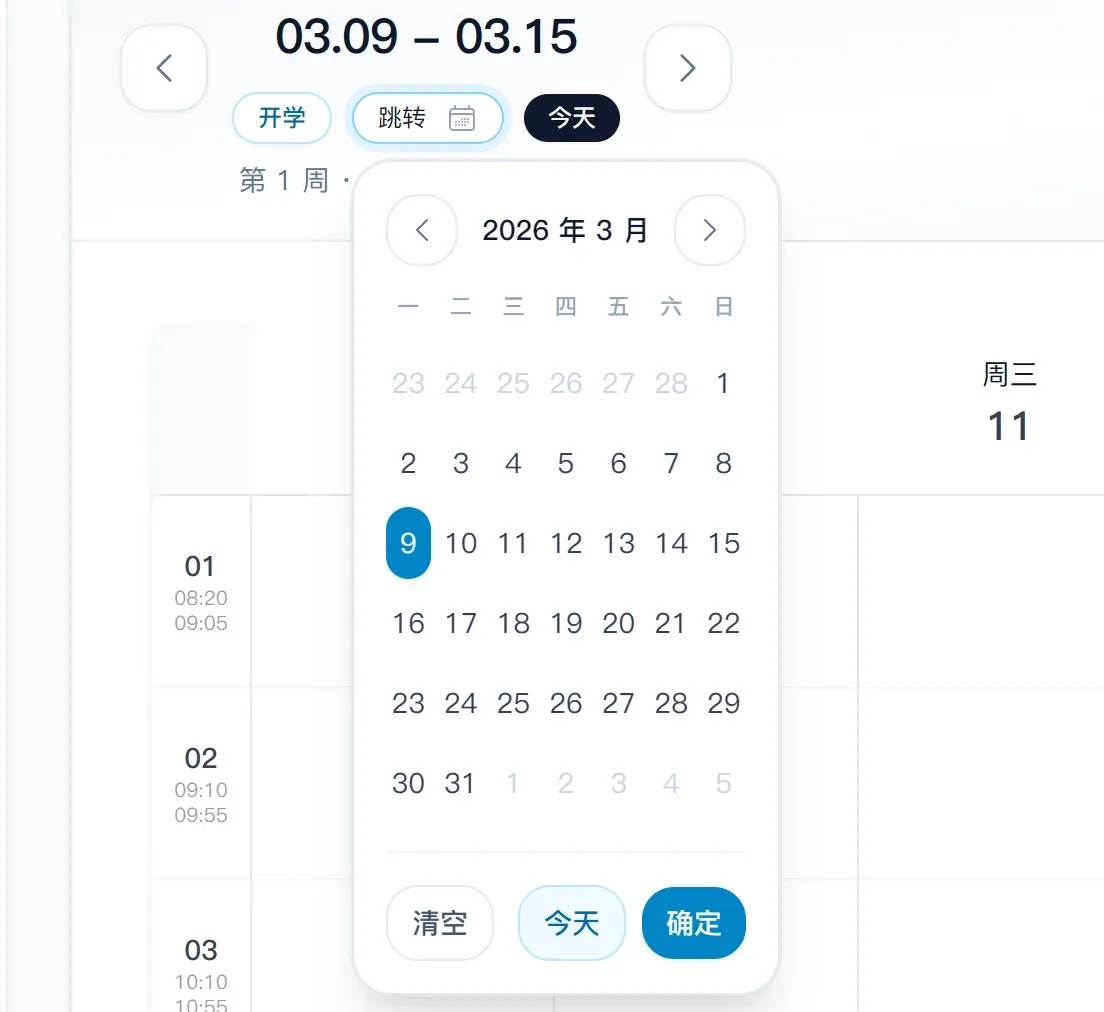
- Left/right arrows — move to the previous/next week or month.
- `Start of term` — jump back to the beginning of the semester.
- `Today` — jump straight to today.
- Date button — open a date picker to jump to any date directly.
### 2. Switch between the four views
The view menu at the top center of "My Schedule" offers four ways to look at your schedule:
- `Schedule` — the classic weekly schedule view, best for seeing your full week at a glance.
- `Calendar` — monthly calendar with day selection linked to that day's events, best for browsing by date.
- `Gantt` — full-week timeline view, best for seeing how the day's classes are distributed.
- `Weekly list` — day-by-day list view, best for a quick scan of today and upcoming classes.
Common controls:
- Left/right arrows — move to the previous/next week or month.
- `Start of term` — jump back to the beginning of the semester.
- `Today` — jump straight to today.
- Date button — open a date picker to jump to any date directly.
 ### 3. Import a schedule
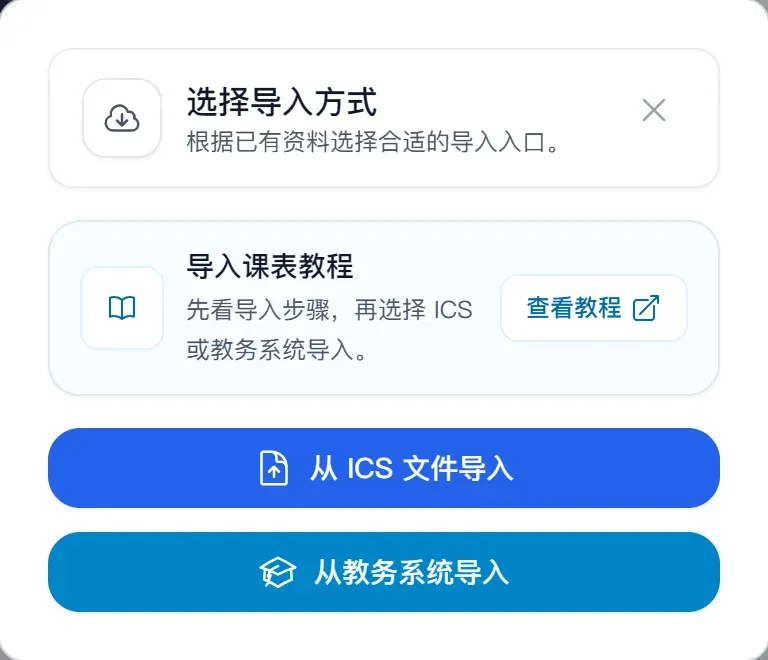
Import, holiday adjustments, and sharing features now live under the **"Schedule operations"** menu at the top — the old "More" button from previous versions is gone.
To get to the import options:
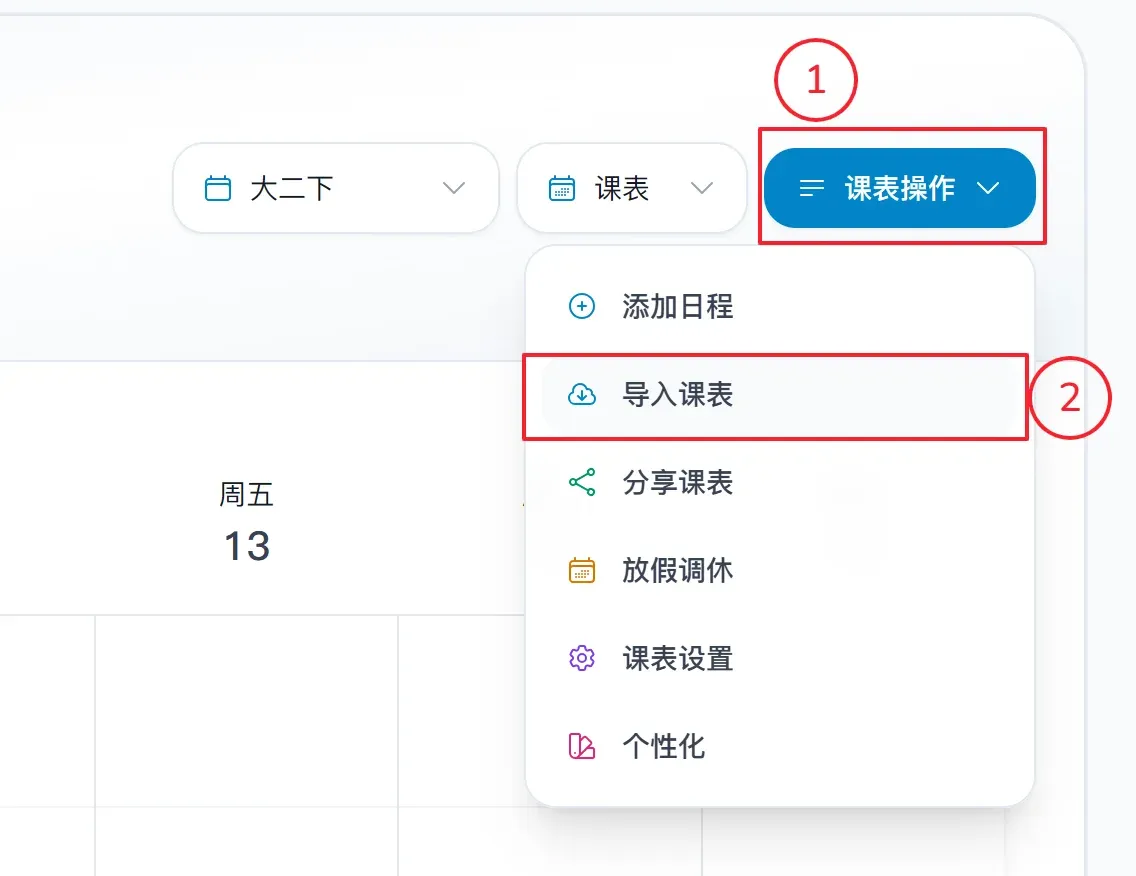
1. Open "My Schedule".
2. Click "Schedule operations" at the top.
3. Select "Import schedule".
4. Choose your import method.
### 3. Import a schedule
Import, holiday adjustments, and sharing features now live under the **"Schedule operations"** menu at the top — the old "More" button from previous versions is gone.
To get to the import options:
1. Open "My Schedule".
2. Click "Schedule operations" at the top.
3. Select "Import schedule".
4. Choose your import method.
 #### 3.1 Import from the academic system
This is the method most people will want.
Steps:
1. Click "Schedule operations" → "Import schedule" → "Import from academic system".
2. Enter your academic system student ID, password, and verification code.
3. Choose the import target:
- Import into the current schedule
- Create a new schedule
- Import into another existing schedule
4. If you choose "Create new schedule", you'll also need to fill in:
- New schedule name
- Start date (the Monday of the first week)
5. Click "Import now".
6. After a successful import, the page displays the parsed name, class, grade, and major, and writes the courses into the target schedule.
#### 3.1 Import from the academic system
This is the method most people will want.
Steps:
1. Click "Schedule operations" → "Import schedule" → "Import from academic system".
2. Enter your academic system student ID, password, and verification code.
3. Choose the import target:
- Import into the current schedule
- Create a new schedule
- Import into another existing schedule
4. If you choose "Create new schedule", you'll also need to fill in:
- New schedule name
- Start date (the Monday of the first week)
5. Click "Import now".
6. After a successful import, the page displays the parsed name, class, grade, and major, and writes the courses into the target schedule.
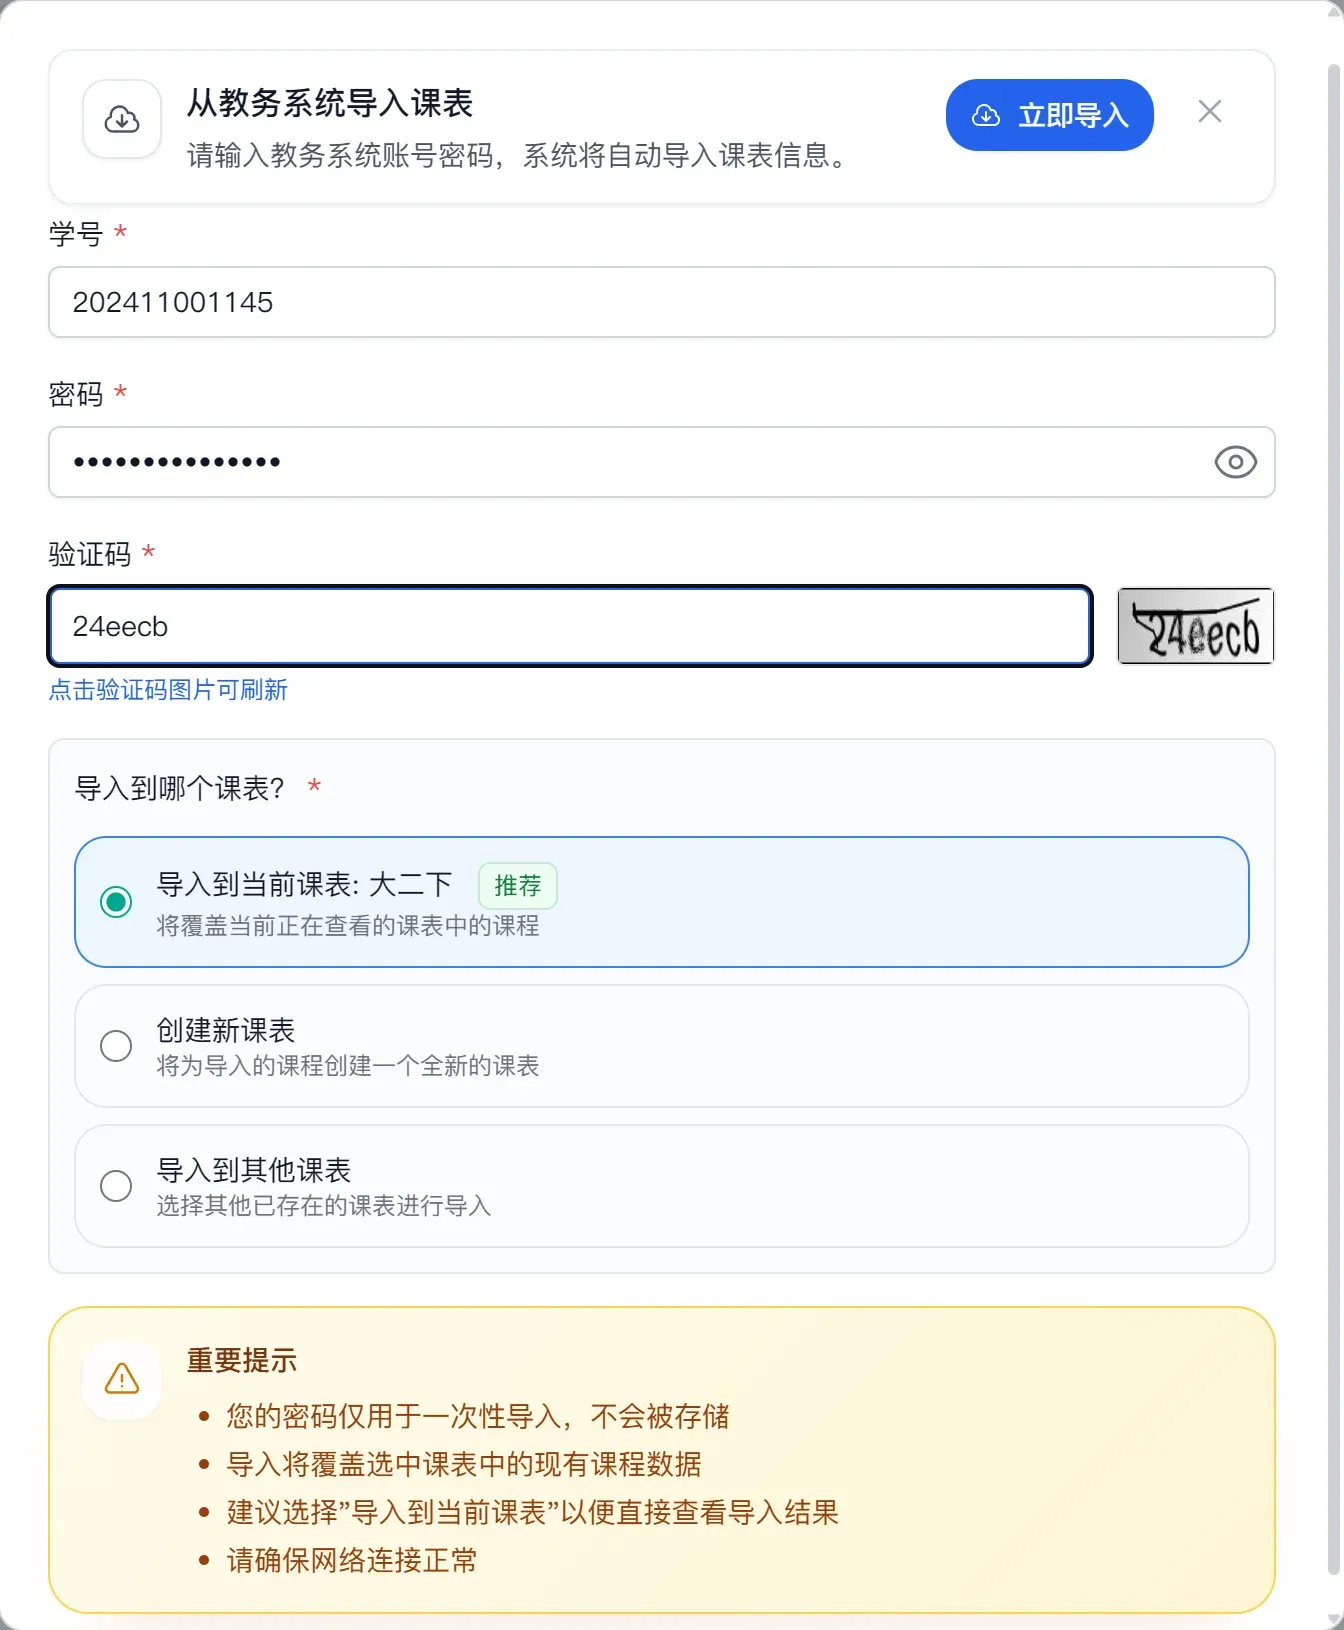 Things to keep in mind:
- Your academic system password is used for this import only and **is not stored** by the platform.
- Importing overwrites any existing courses in the target schedule.
- You can click the verification code image to refresh it.
#### 3.2 Import from an ICS file
If you already have a schedule or events in another calendar app, you can import an `.ics` file directly.
Steps:
1. Click "Schedule operations" → "Import schedule".
2. Select "Import from ICS file".
3. Choose a local `.ics` file.
4. The system parses it automatically and writes the events into the current schedule.
### 4. Add, edit, and delete events manually
#### Adding an event
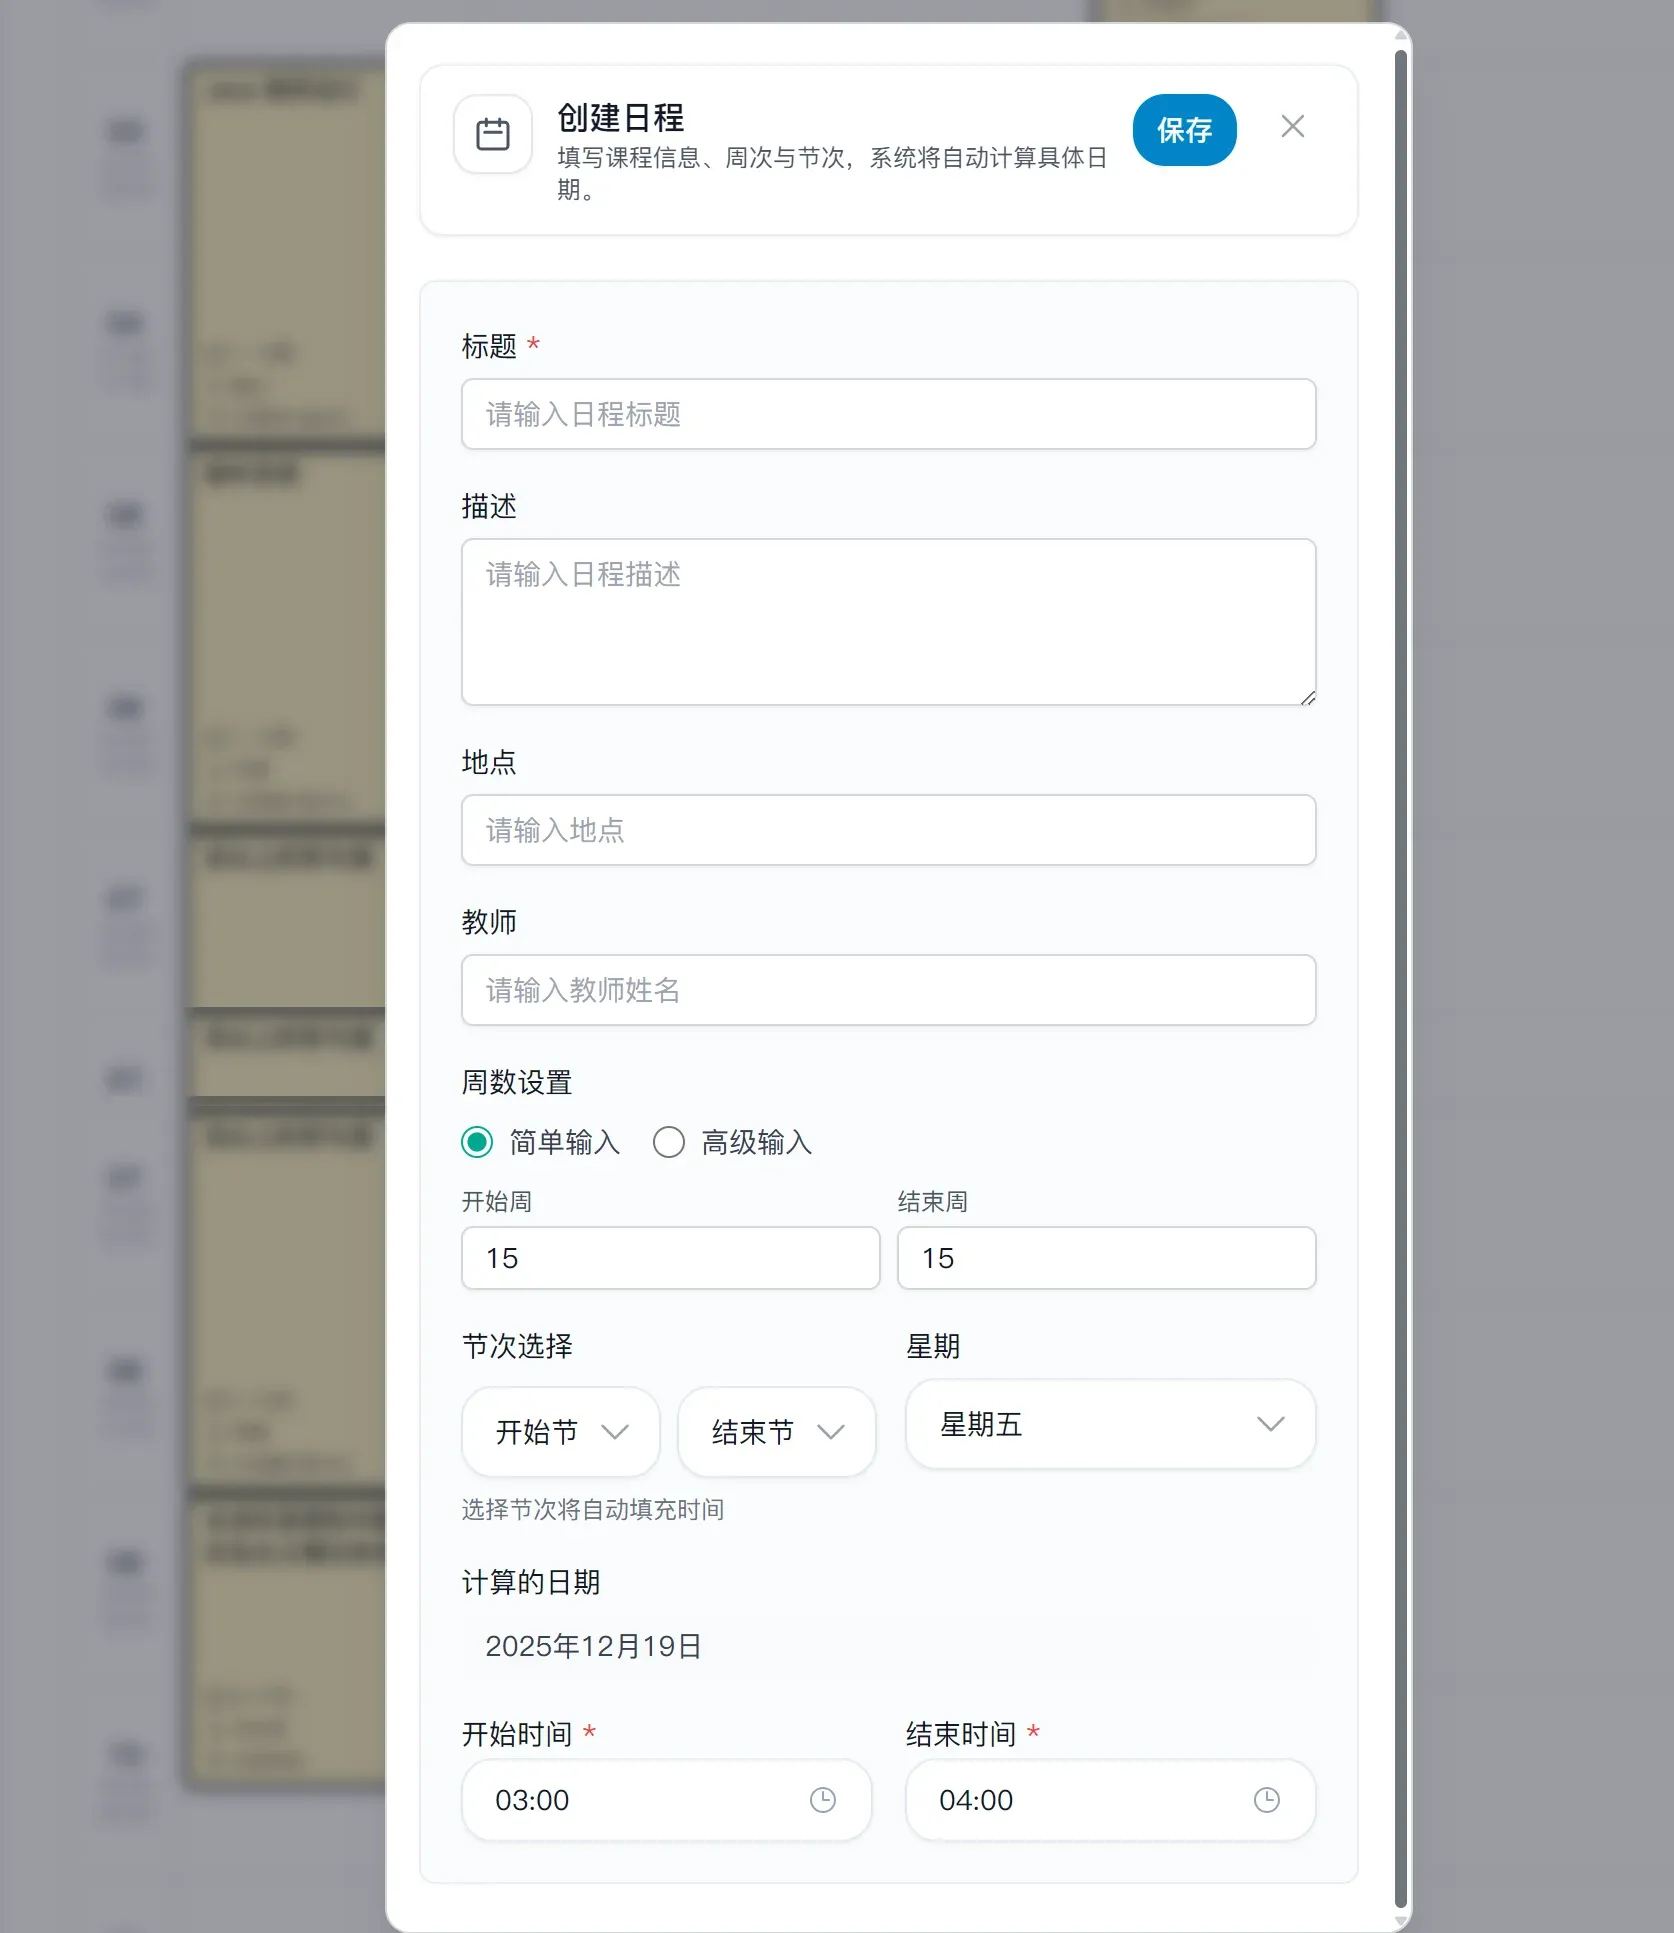
There are two common ways to add an event:
- Click "Schedule operations" → "Add event"
- Click directly on a blank date or blank time slot in the schedule area
Fill in:
- Event or course name
- Location
- Day of the week
- Period or time
- Week range
The event appears in the current view immediately after you save.
Things to keep in mind:
- Your academic system password is used for this import only and **is not stored** by the platform.
- Importing overwrites any existing courses in the target schedule.
- You can click the verification code image to refresh it.
#### 3.2 Import from an ICS file
If you already have a schedule or events in another calendar app, you can import an `.ics` file directly.
Steps:
1. Click "Schedule operations" → "Import schedule".
2. Select "Import from ICS file".
3. Choose a local `.ics` file.
4. The system parses it automatically and writes the events into the current schedule.
### 4. Add, edit, and delete events manually
#### Adding an event
There are two common ways to add an event:
- Click "Schedule operations" → "Add event"
- Click directly on a blank date or blank time slot in the schedule area
Fill in:
- Event or course name
- Location
- Day of the week
- Period or time
- Week range
The event appears in the current view immediately after you save.
 #### Editing or deleting an event
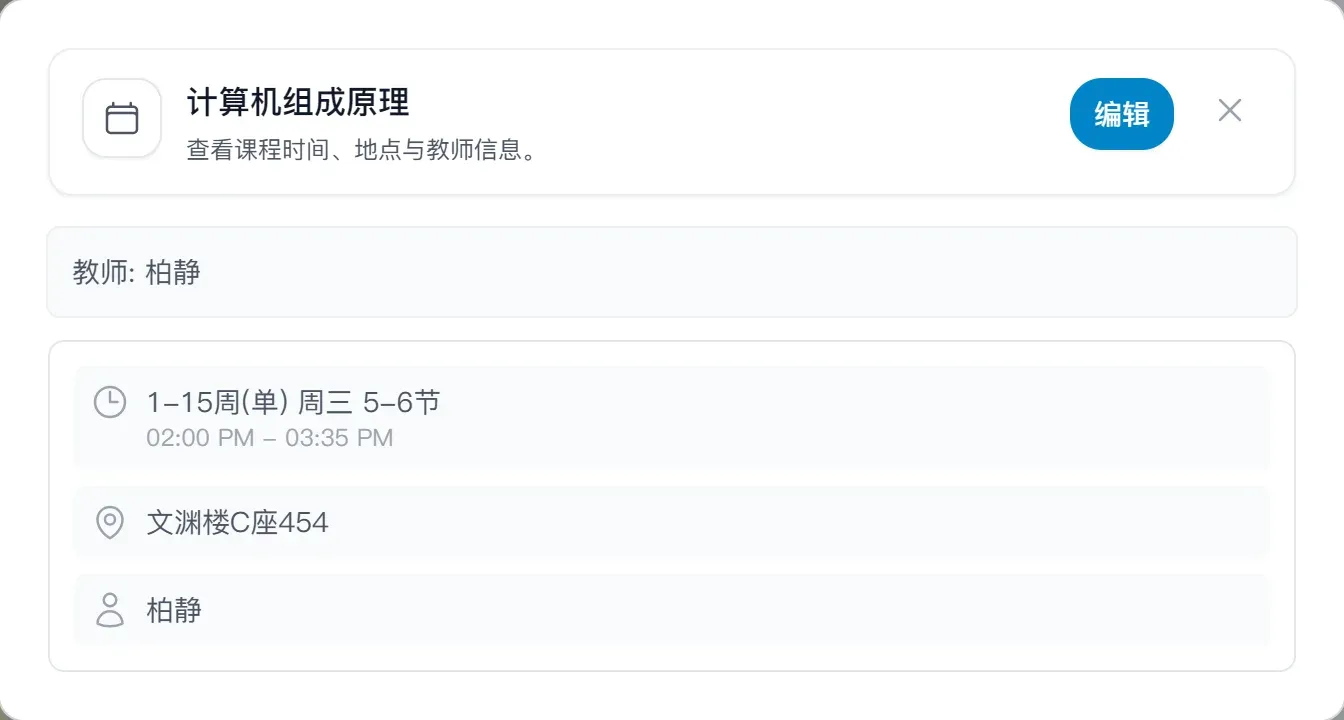
1. Click an existing event in the schedule, calendar, Gantt, or weekly list view.
2. The event detail popup opens.
3. From there you can edit the event and save your changes, or delete it outright.
#### Editing or deleting an event
1. Click an existing event in the schedule, calendar, Gantt, or weekly list view.
2. The event detail popup opens.
3. From there you can edit the event and save your changes, or delete it outright.
 ### 5. Holiday adjustments
Dealing with a public holiday or a last-minute schedule change from the school? The holiday adjustment feature handles it.
To get started:
1. Click "Schedule operations".
2. Select "Holiday adjustments".
Two modes are available:
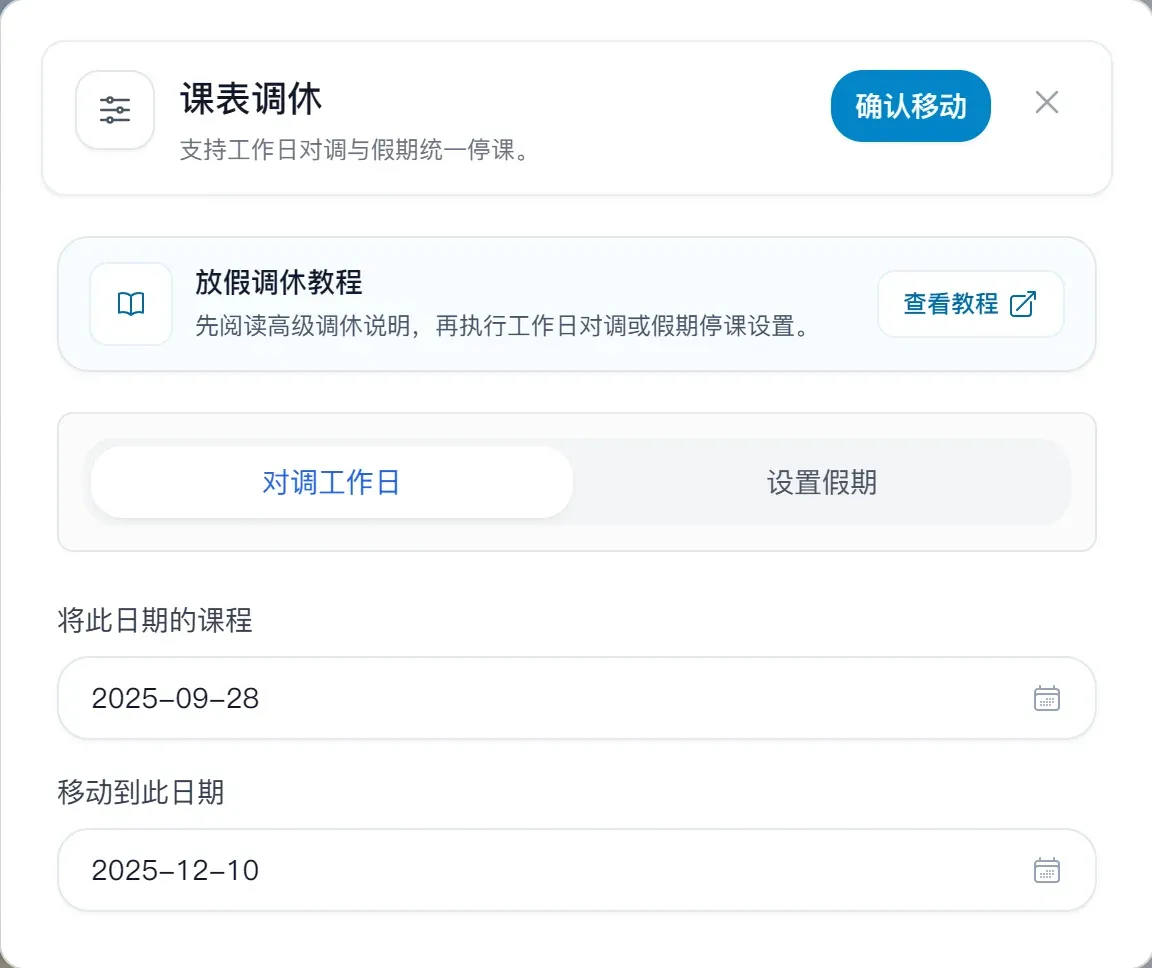
#### Swap workdays
Use this when you need to move all courses from one day to another.
1. Select "Swap workdays".
2. Under "Courses on this date", pick the original date.
3. Under "Move to this date", pick the target date.
4. Click to confirm.
For example: move all of next Thursday's courses to this Saturday.
### 5. Holiday adjustments
Dealing with a public holiday or a last-minute schedule change from the school? The holiday adjustment feature handles it.
To get started:
1. Click "Schedule operations".
2. Select "Holiday adjustments".
Two modes are available:
#### Swap workdays
Use this when you need to move all courses from one day to another.
1. Select "Swap workdays".
2. Under "Courses on this date", pick the original date.
3. Under "Move to this date", pick the target date.
4. Click to confirm.
For example: move all of next Thursday's courses to this Saturday.
 #### Set a holiday
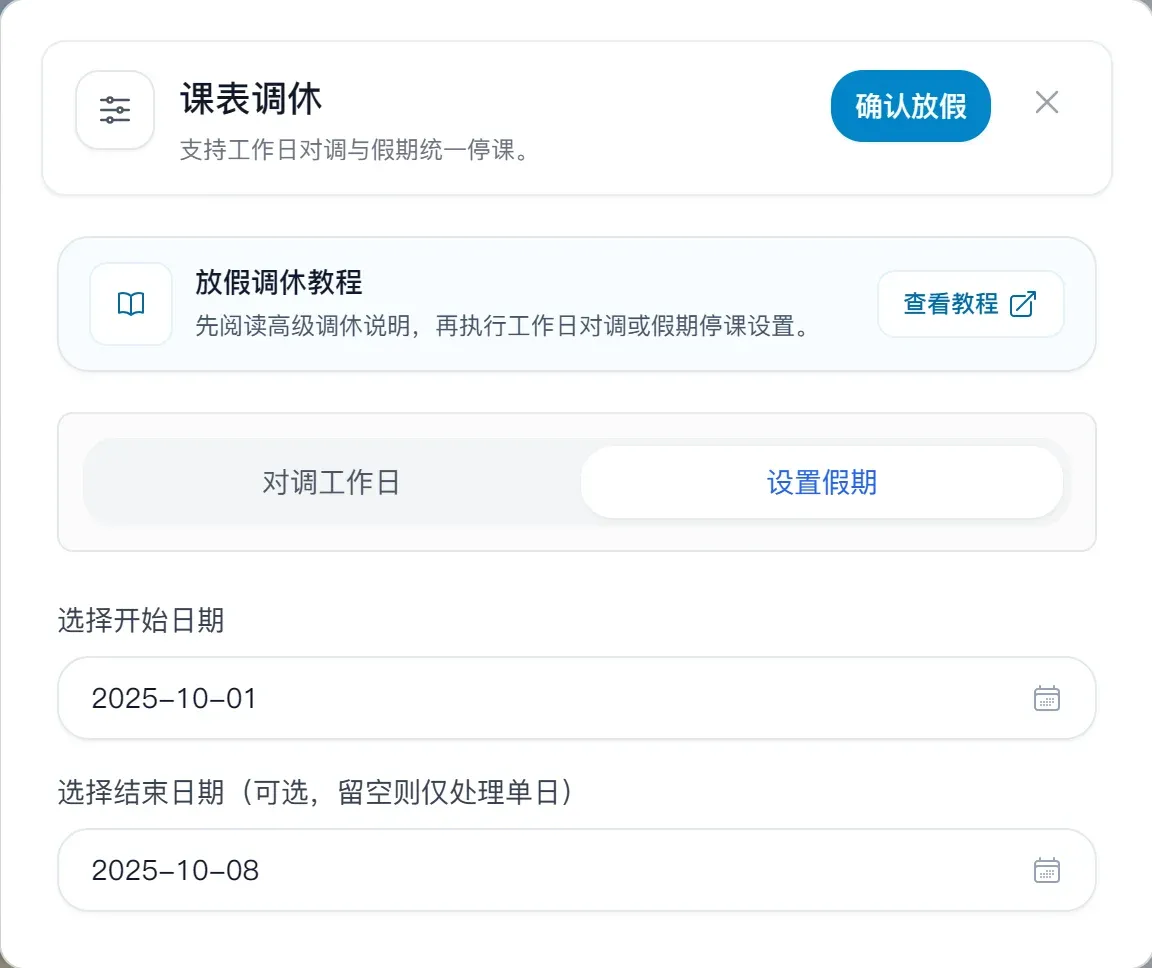
When a day is a holiday, all courses on that day are hidden automatically. Before setting a holiday, make sure you've **already done any course swaps** you need.
1. Select "Set holiday".
2. Choose the start date.
3. Optionally fill in an end date.
4. Leaving the end date blank means classes are canceled for that one day only; filling it in means classes are canceled for the whole date range.
5. Click to confirm.
For example: set October 1 through October 8 as the National Day holiday.
#### Set a holiday
When a day is a holiday, all courses on that day are hidden automatically. Before setting a holiday, make sure you've **already done any course swaps** you need.
1. Select "Set holiday".
2. Choose the start date.
3. Optionally fill in an end date.
4. Leaving the end date blank means classes are canceled for that one day only; filling it in means classes are canceled for the whole date range.
5. Click to confirm.
For example: set October 1 through October 8 as the National Day holiday.
 ### 6. Share and export your schedule
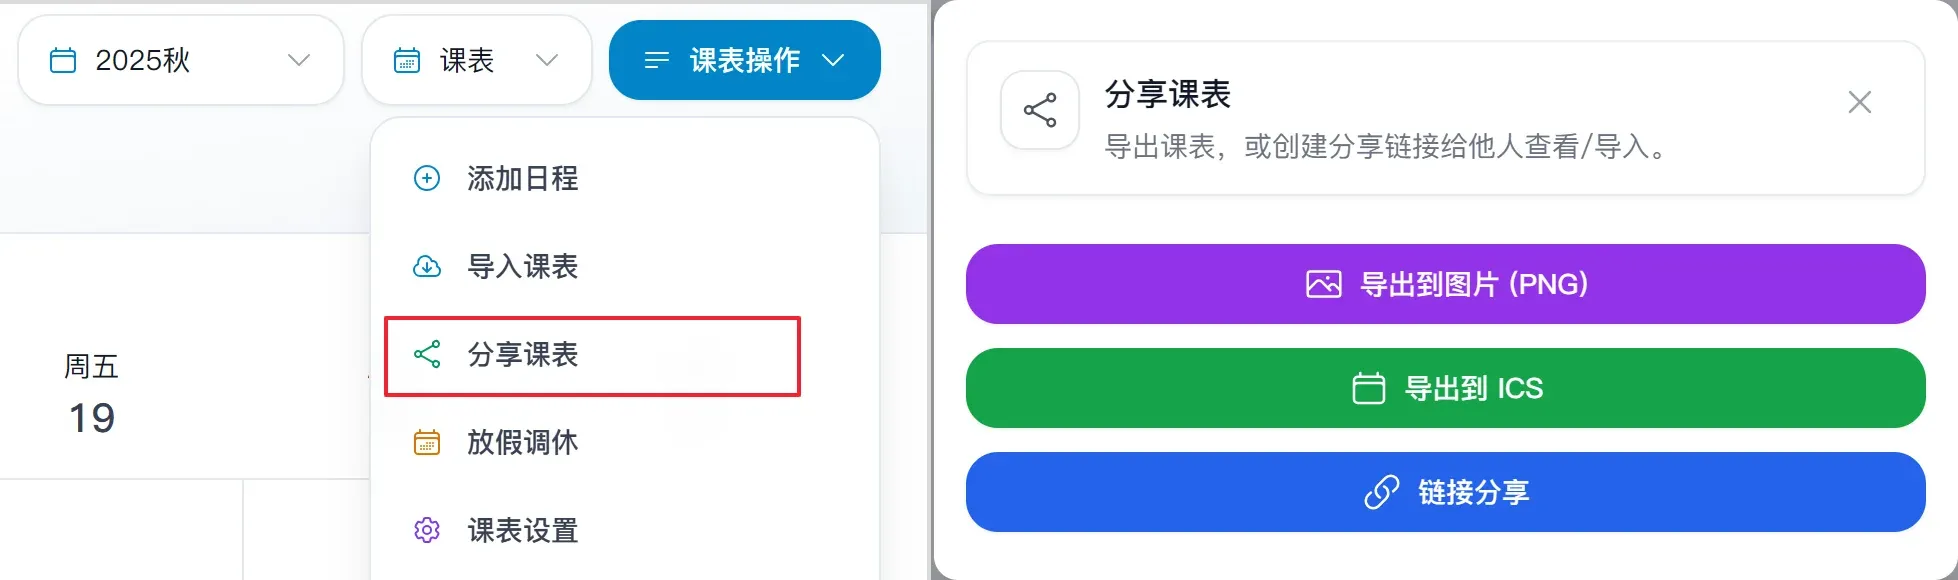
Want to share your schedule with a friend or view it on another device?
1. Click "Schedule operations".
2. Select "Share schedule".
You'll see three options:
- Export to image (PNG)
- Export to ICS
- Share via link
### 6. Share and export your schedule
Want to share your schedule with a friend or view it on another device?
1. Click "Schedule operations".
2. Select "Share schedule".
You'll see three options:
- Export to image (PNG)
- Export to ICS
- Share via link
 #### 6.1 Export as a PNG image
1. Select **"Export to image (PNG)"**.
2. The system generates an image of your current schedule.
3. Handy for sending to classmates who don't use the platform, printing, or posting in a group chat.

#### 6.2 Export as an ICS file
1. In the "Share schedule" dialog, click "Export to ICS".
2. The system downloads a standard `.ics` file.
3. You can import it into your phone's calendar, Apple Calendar, Google Calendar, and other apps.
#### 6.3 Generate a share link
You can now generate a share link directly — no need to rely on images and ICS files alone.
Steps:
1. In the "Share schedule" dialog, click "Share via link".
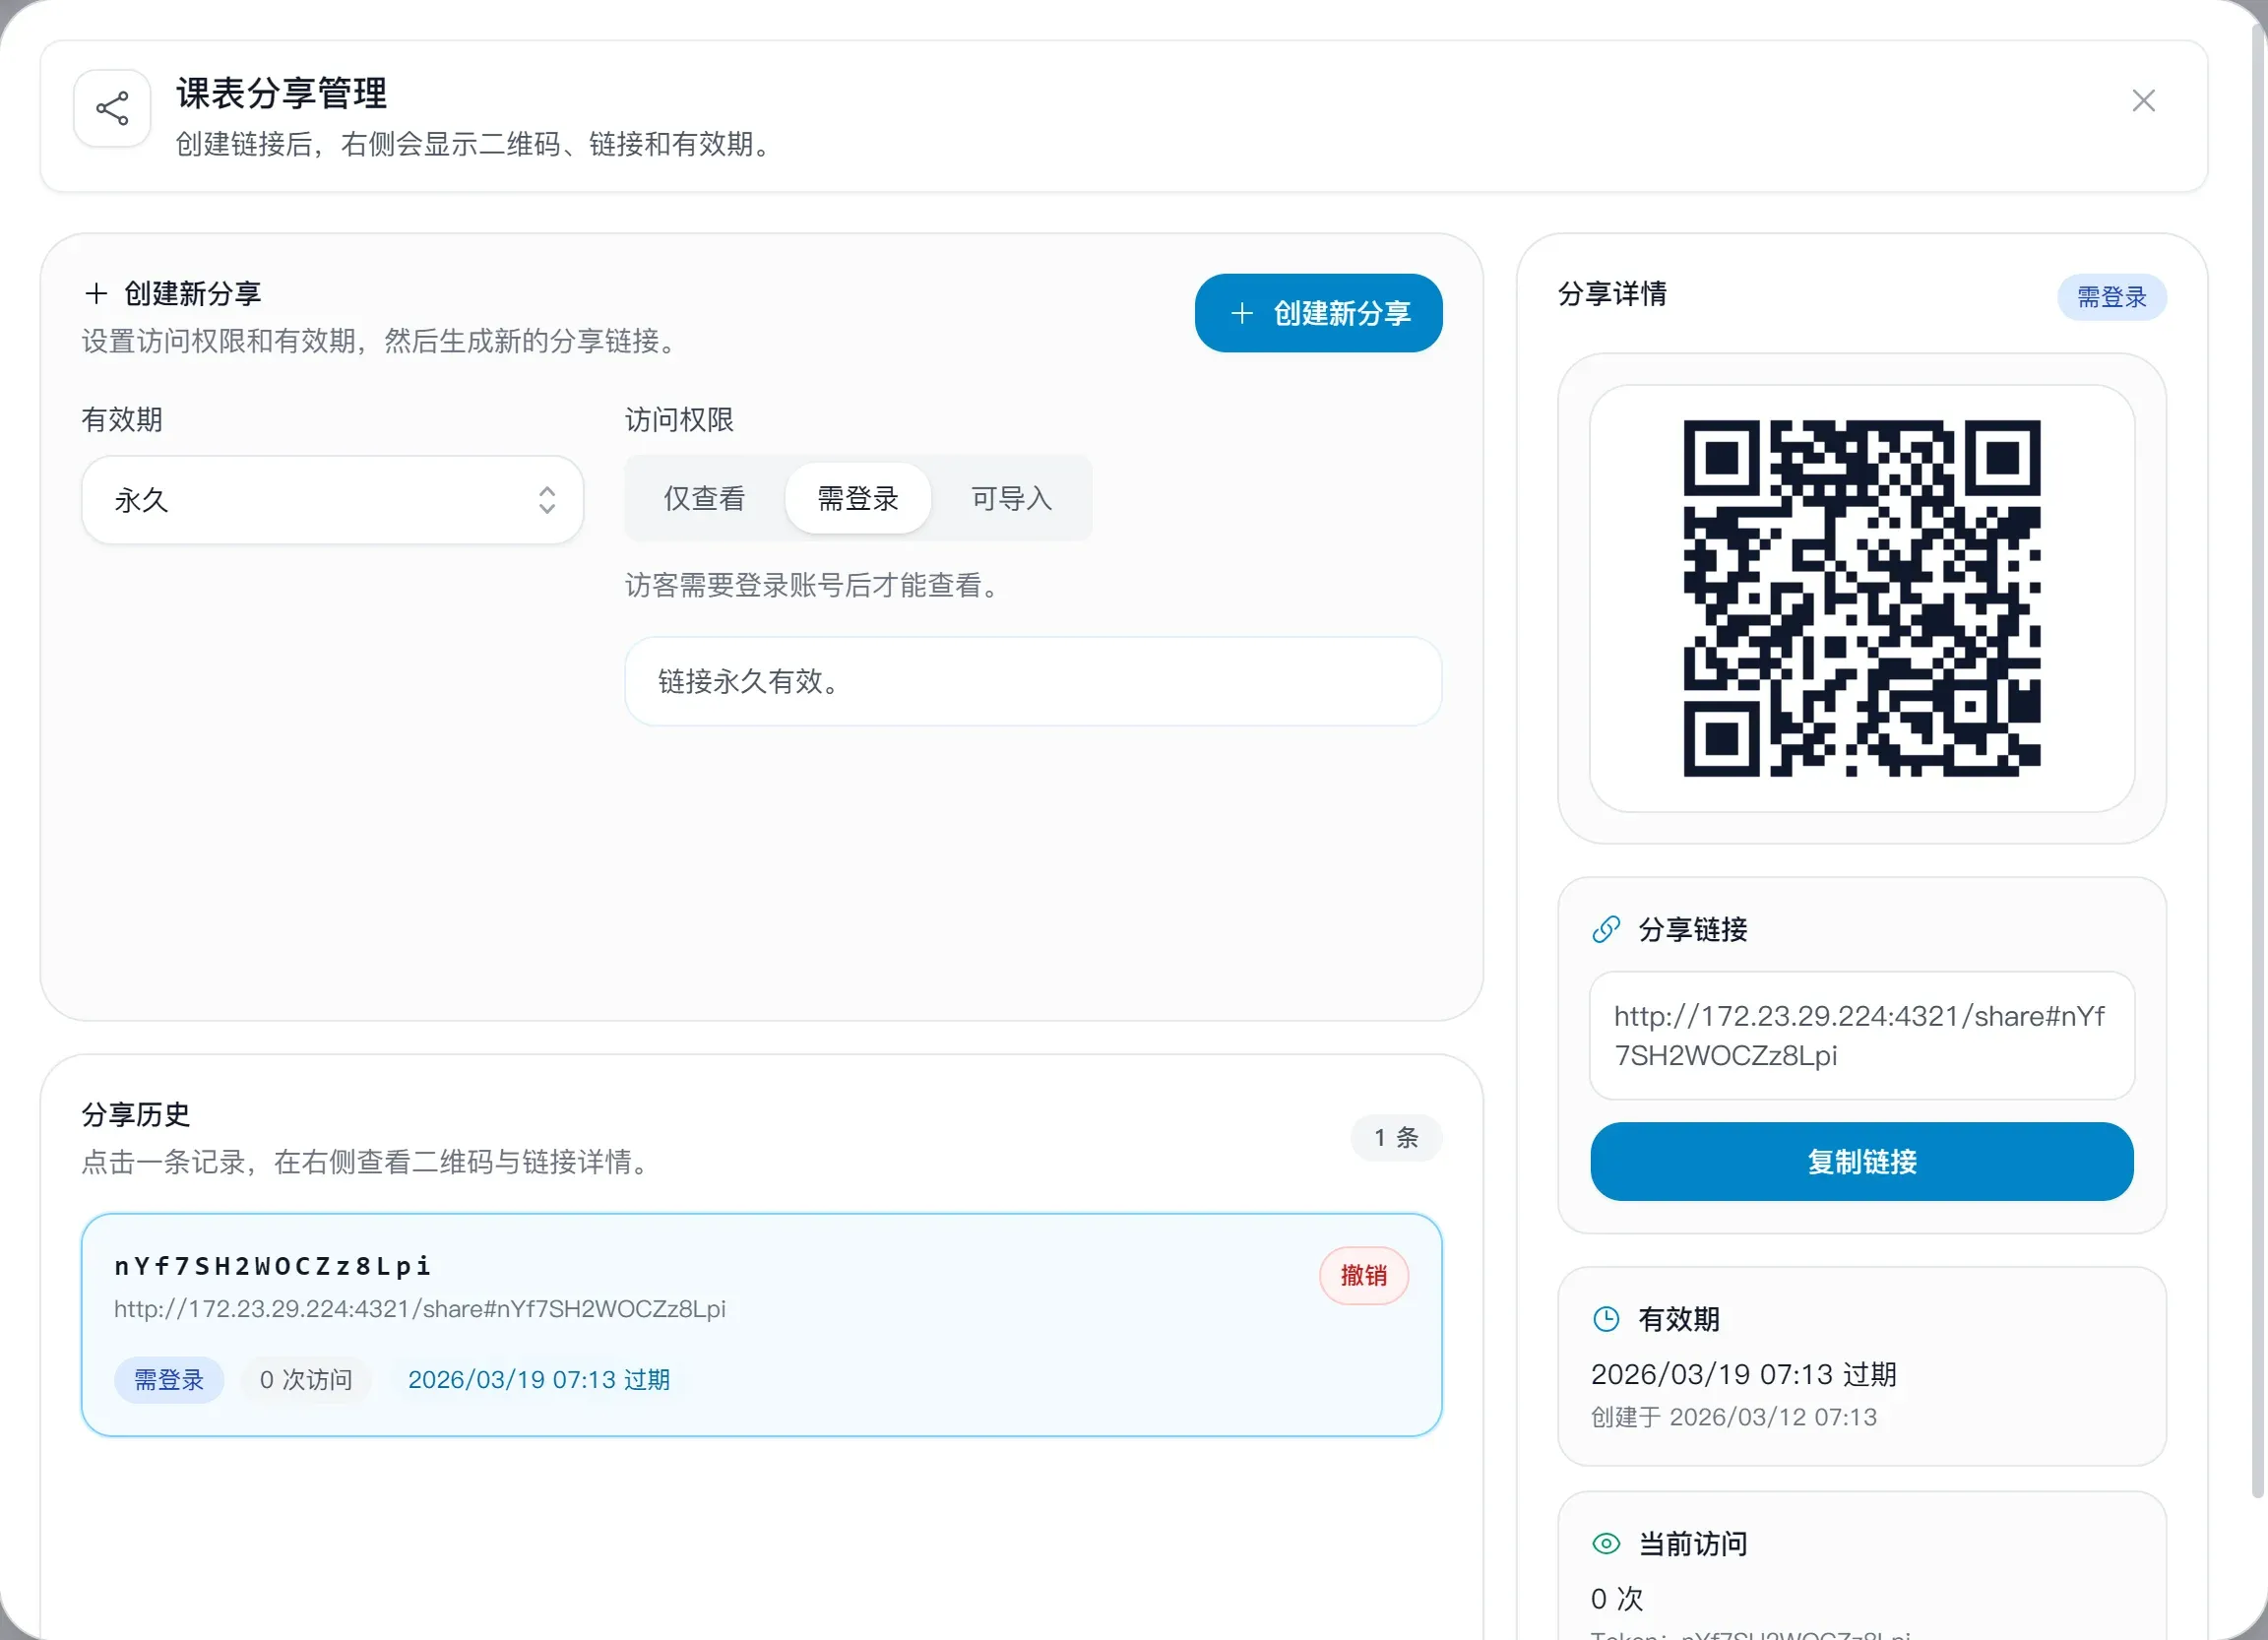
2. The "Schedule share management" panel opens.
3. Configure the share parameters:
- Validity: 1 day, 7 days, 30 days, permanent, expires when the schedule ends, custom number of days, or custom date
- Access permission:
- `View only` — visitors can only view the schedule
- `Login required` — visitors must log in to view
- `Importable` — logged-in visitors can import the schedule into their own account
4. Click "Create new share".
5. Once created, the right side shows:
- QR code
- Share link
- Validity period
- Current visit count
6. To disable an existing share, click "Revoke" in the history list.
#### 6.1 Export as a PNG image
1. Select **"Export to image (PNG)"**.
2. The system generates an image of your current schedule.
3. Handy for sending to classmates who don't use the platform, printing, or posting in a group chat.

#### 6.2 Export as an ICS file
1. In the "Share schedule" dialog, click "Export to ICS".
2. The system downloads a standard `.ics` file.
3. You can import it into your phone's calendar, Apple Calendar, Google Calendar, and other apps.
#### 6.3 Generate a share link
You can now generate a share link directly — no need to rely on images and ICS files alone.
Steps:
1. In the "Share schedule" dialog, click "Share via link".
2. The "Schedule share management" panel opens.
3. Configure the share parameters:
- Validity: 1 day, 7 days, 30 days, permanent, expires when the schedule ends, custom number of days, or custom date
- Access permission:
- `View only` — visitors can only view the schedule
- `Login required` — visitors must log in to view
- `Importable` — logged-in visitors can import the schedule into their own account
4. Click "Create new share".
5. Once created, the right side shows:
- QR code
- Share link
- Validity period
- Current visit count
6. To disable an existing share, click "Revoke" in the history list.
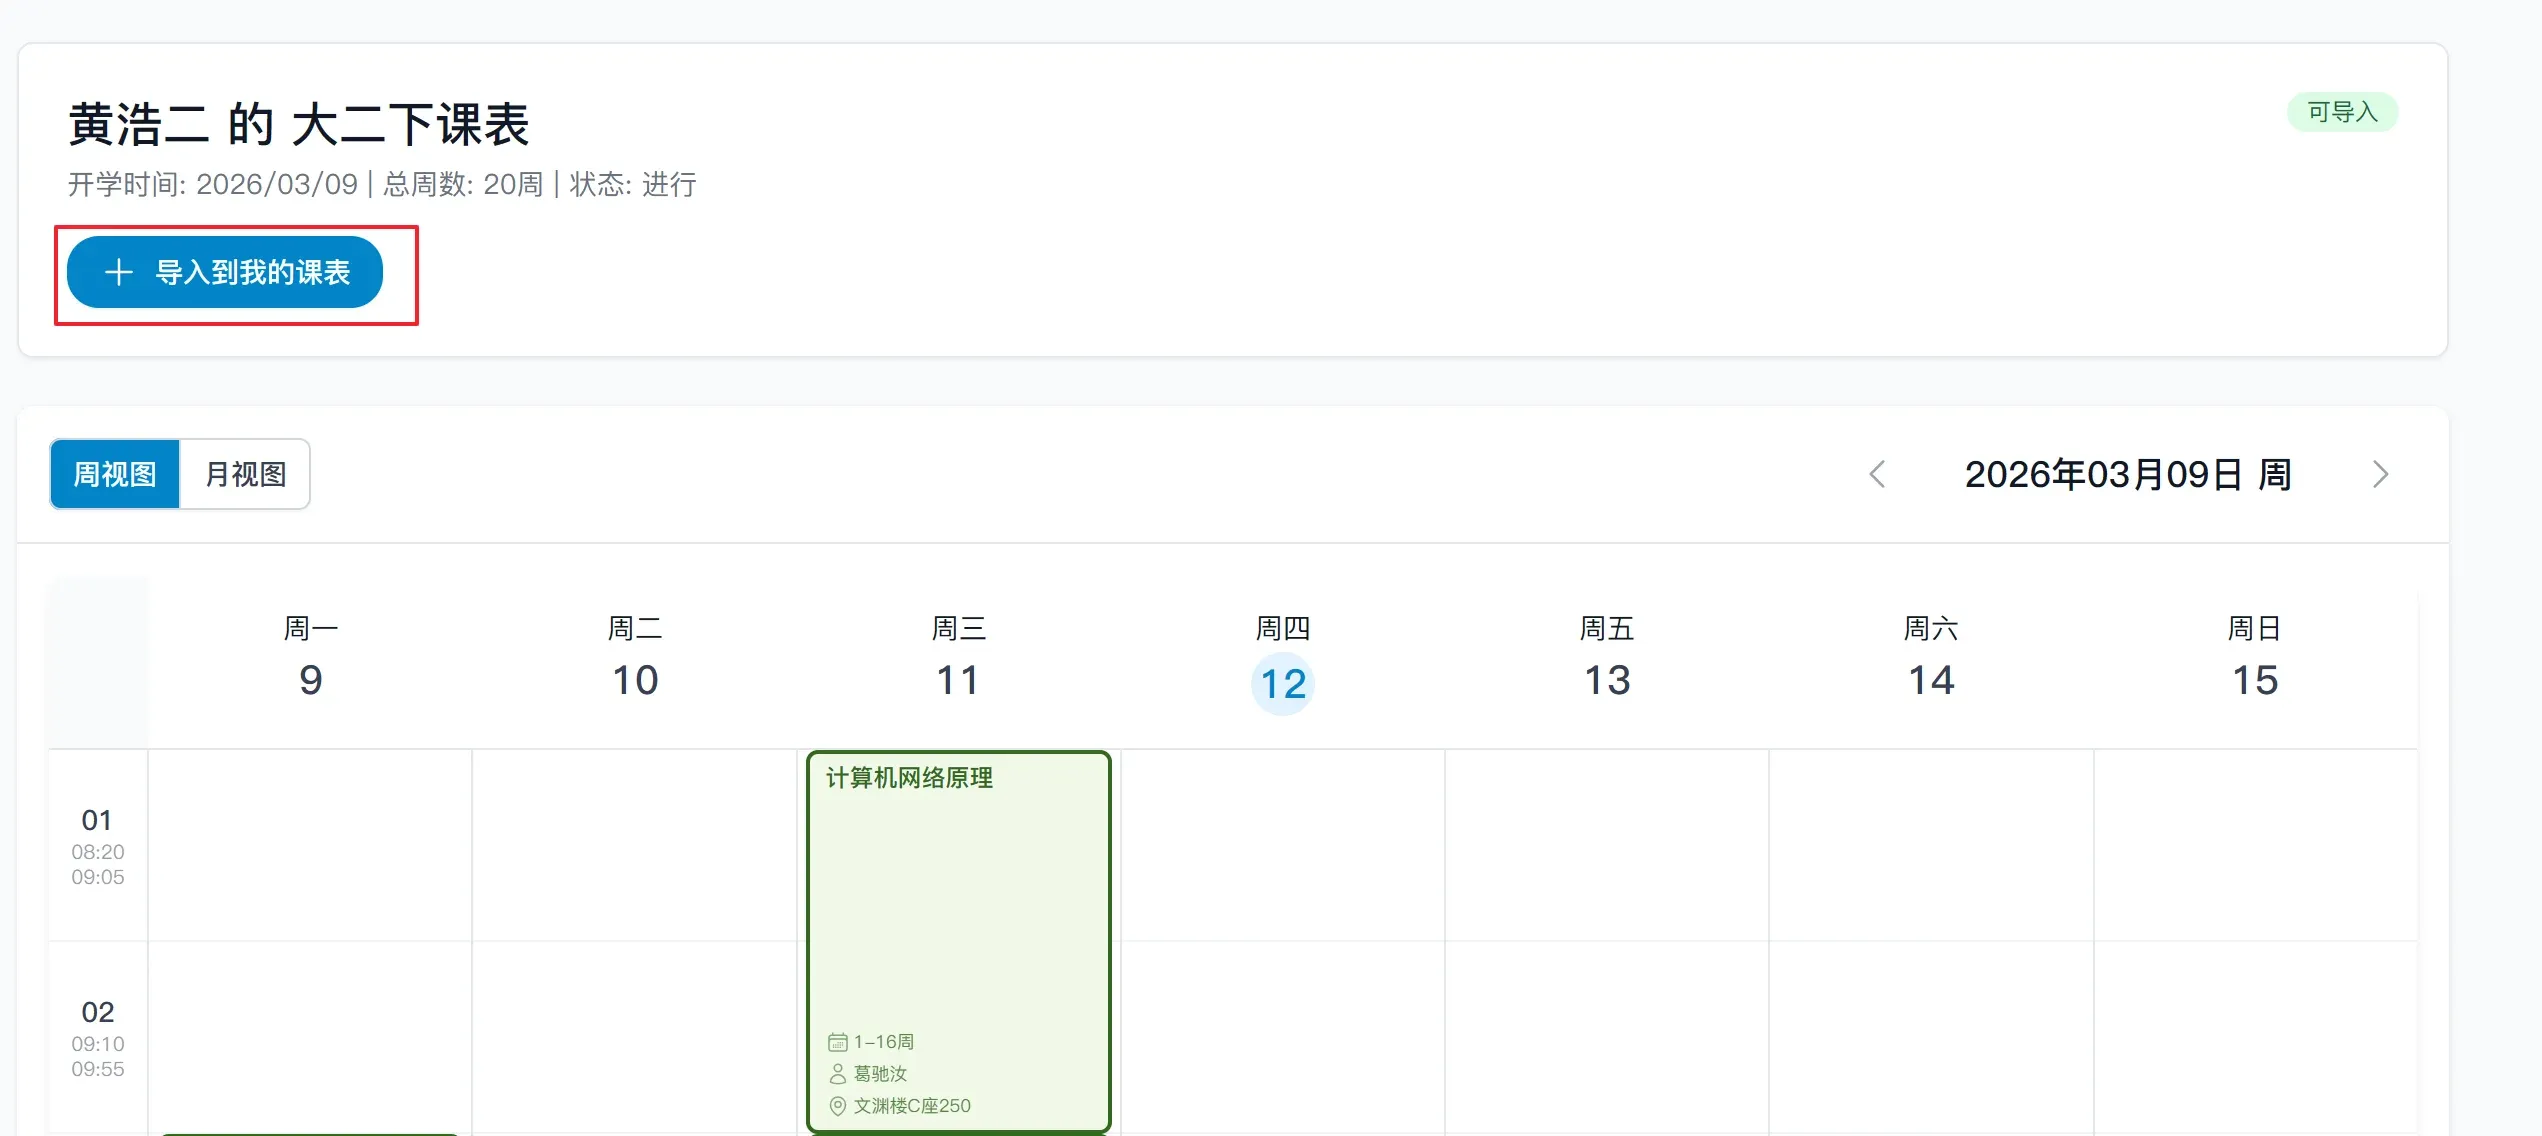
 #### 6.4 Import someone else's shared schedule
When someone shares a link with "Importable" permission, you can:
1. Open the share link.
2. If the link requires login, log into your own account first.
3. On the share page, click "Import to my schedule".
4. Enter a name for the imported schedule.
5. Click import.
The share page currently supports weekly and monthly browsing views.
#### 6.4 Import someone else's shared schedule
When someone shares a link with "Importable" permission, you can:
1. Open the share link.
2. If the link requires login, log into your own account first.
3. On the share page, click "Import to my schedule".
4. Enter a name for the imported schedule.
5. Click import.
The share page currently supports weekly and monthly browsing views.
 ### 7. Schedule settings
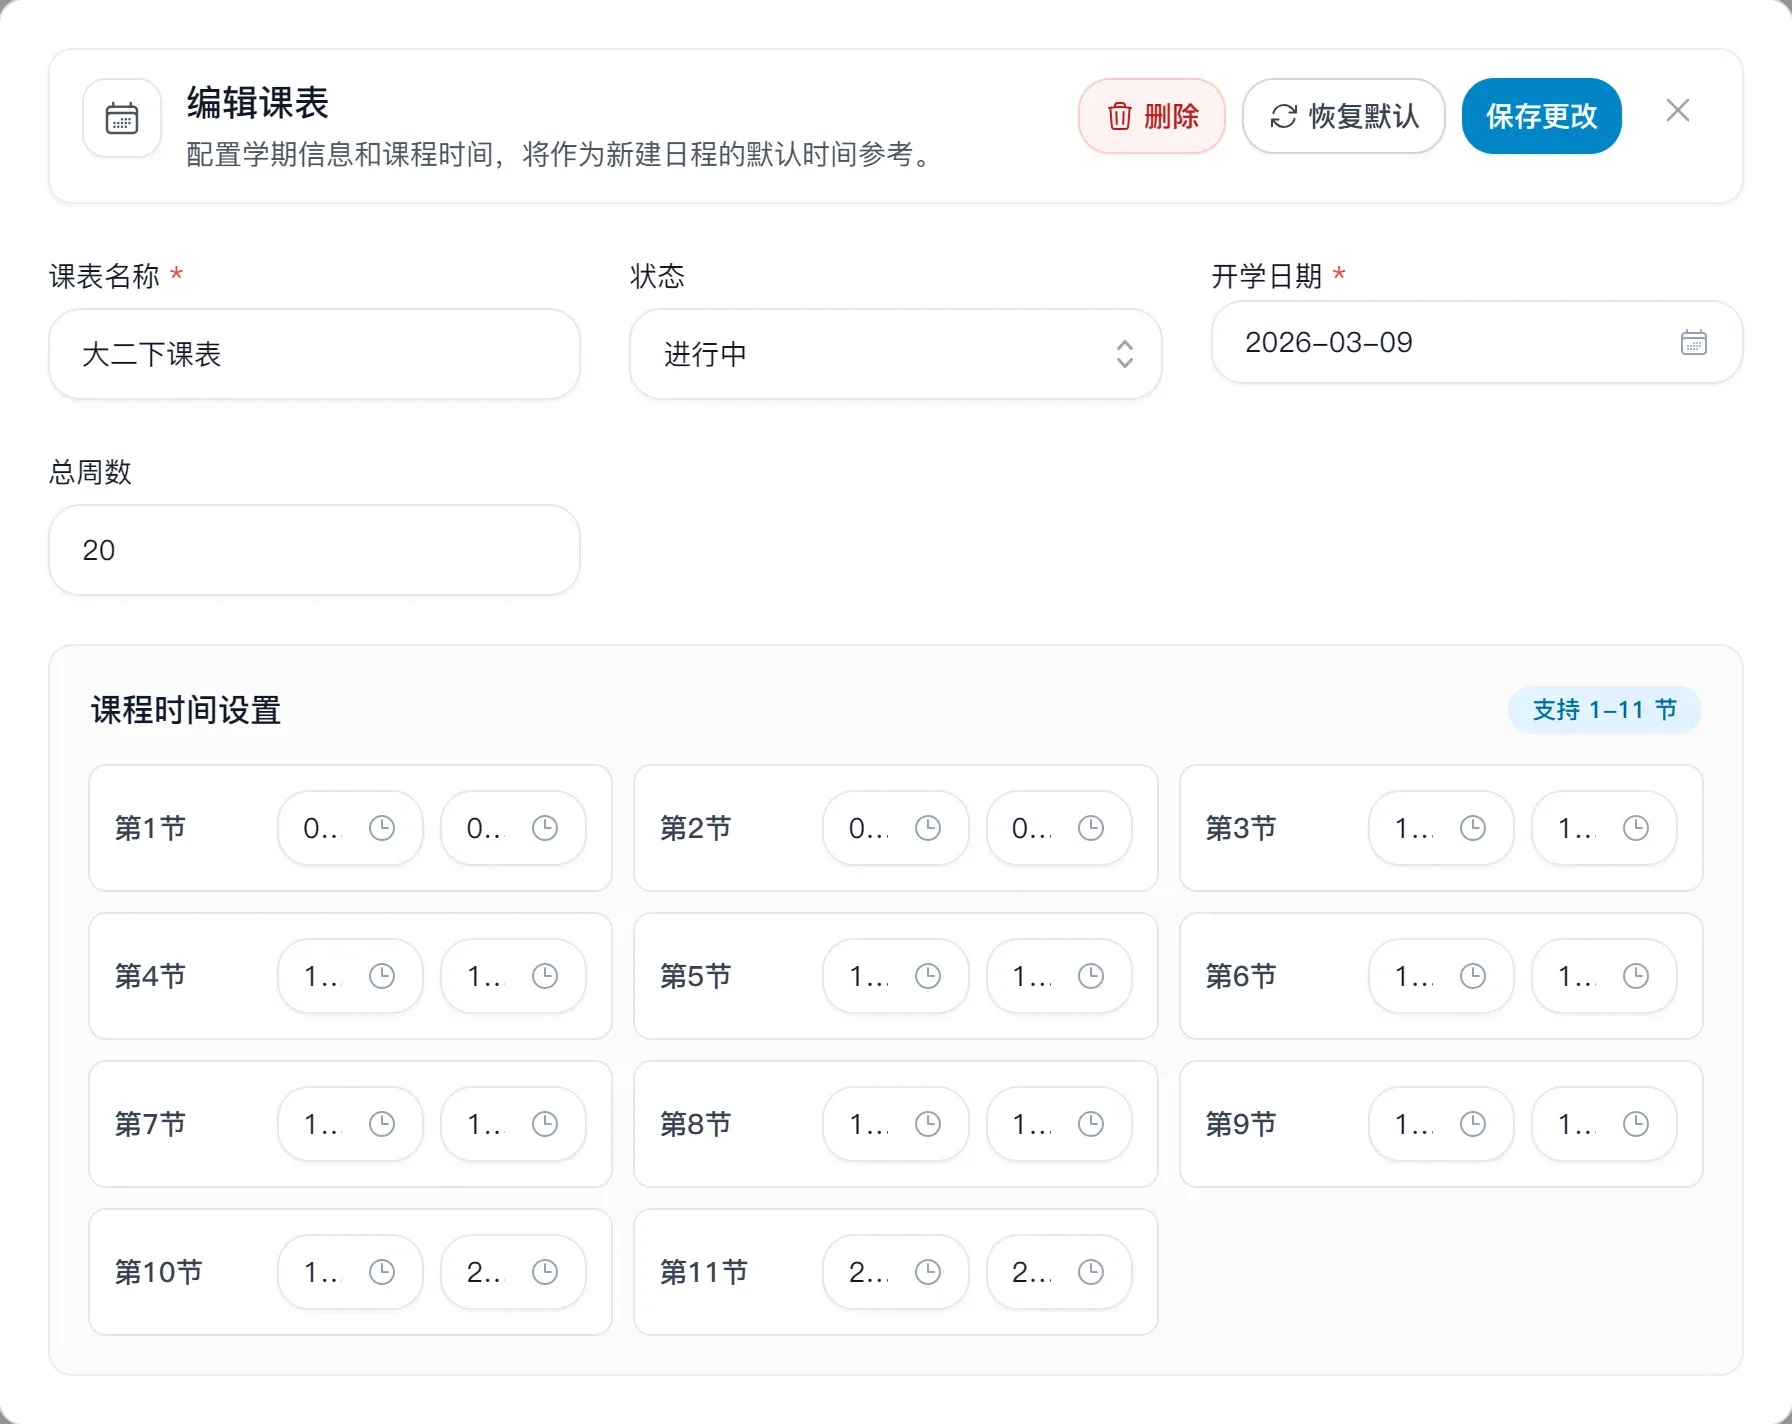
Entry point: `Schedule operations` → `Schedule settings`
You can edit:
- Schedule name
- Status (Active / Ended / Hidden)
- Start date
- Total weeks
- Class period times for periods 1–11
### 7. Schedule settings
Entry point: `Schedule operations` → `Schedule settings`
You can edit:
- Schedule name
- Status (Active / Ended / Hidden)
- Start date
- Total weeks
- Class period times for periods 1–11
 ### 8. Personalization
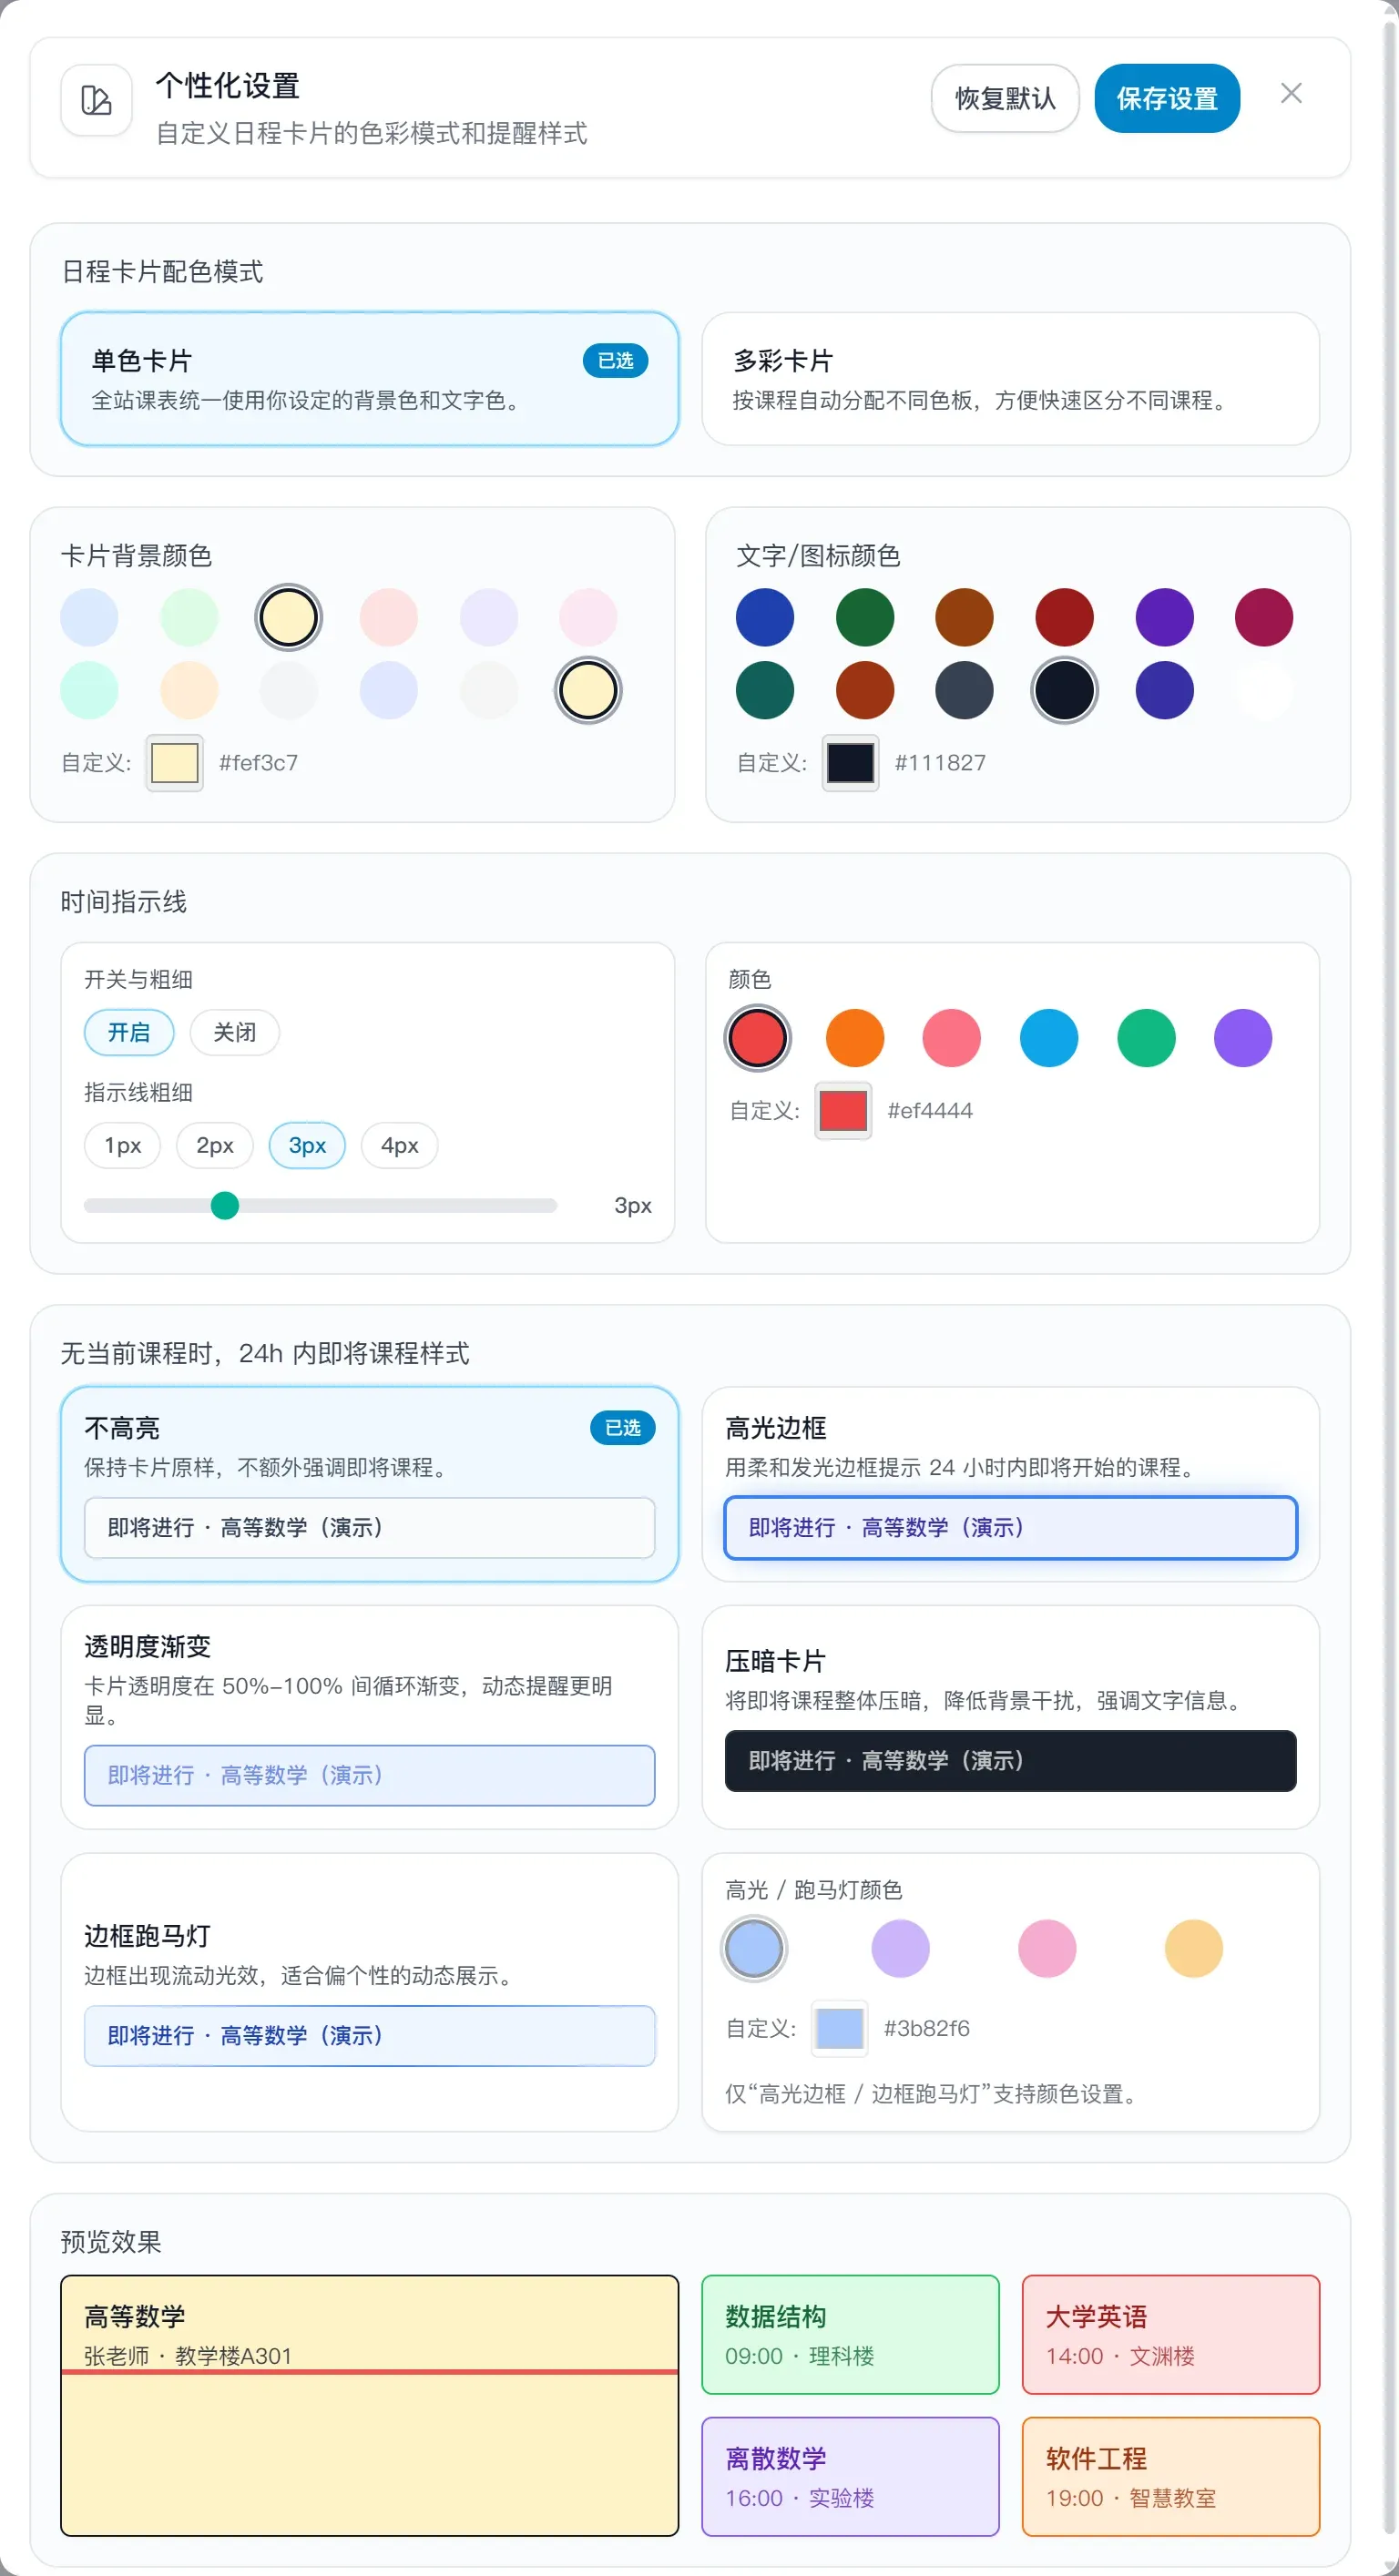
Entry point: `Schedule operations` → `Personalization`
If you want your schedule to look and feel the way you like it, personalization is where you do that.
Current options:
- Event card color mode
- Single-color cards
- Multi-color cards
- Background and text colors
- Current-time indicator line — toggle, color, and thickness
- Upcoming-class reminder style
If you spend a lot of time in the Gantt or weekly list views, these settings make a big difference.
### 8. Personalization
Entry point: `Schedule operations` → `Personalization`
If you want your schedule to look and feel the way you like it, personalization is where you do that.
Current options:
- Event card color mode
- Single-color cards
- Multi-color cards
- Background and text colors
- Current-time indicator line — toggle, color, and thickness
- Upcoming-class reminder style
If you spend a lot of time in the Gantt or weekly list views, these settings make a big difference.
 ---
## Part 3: Team collaboration
Whether it's a student club, a project group, or a whole class, the team features make it easy to keep everyone's schedules transparent and in sync.
### 1. Team cards at a glance
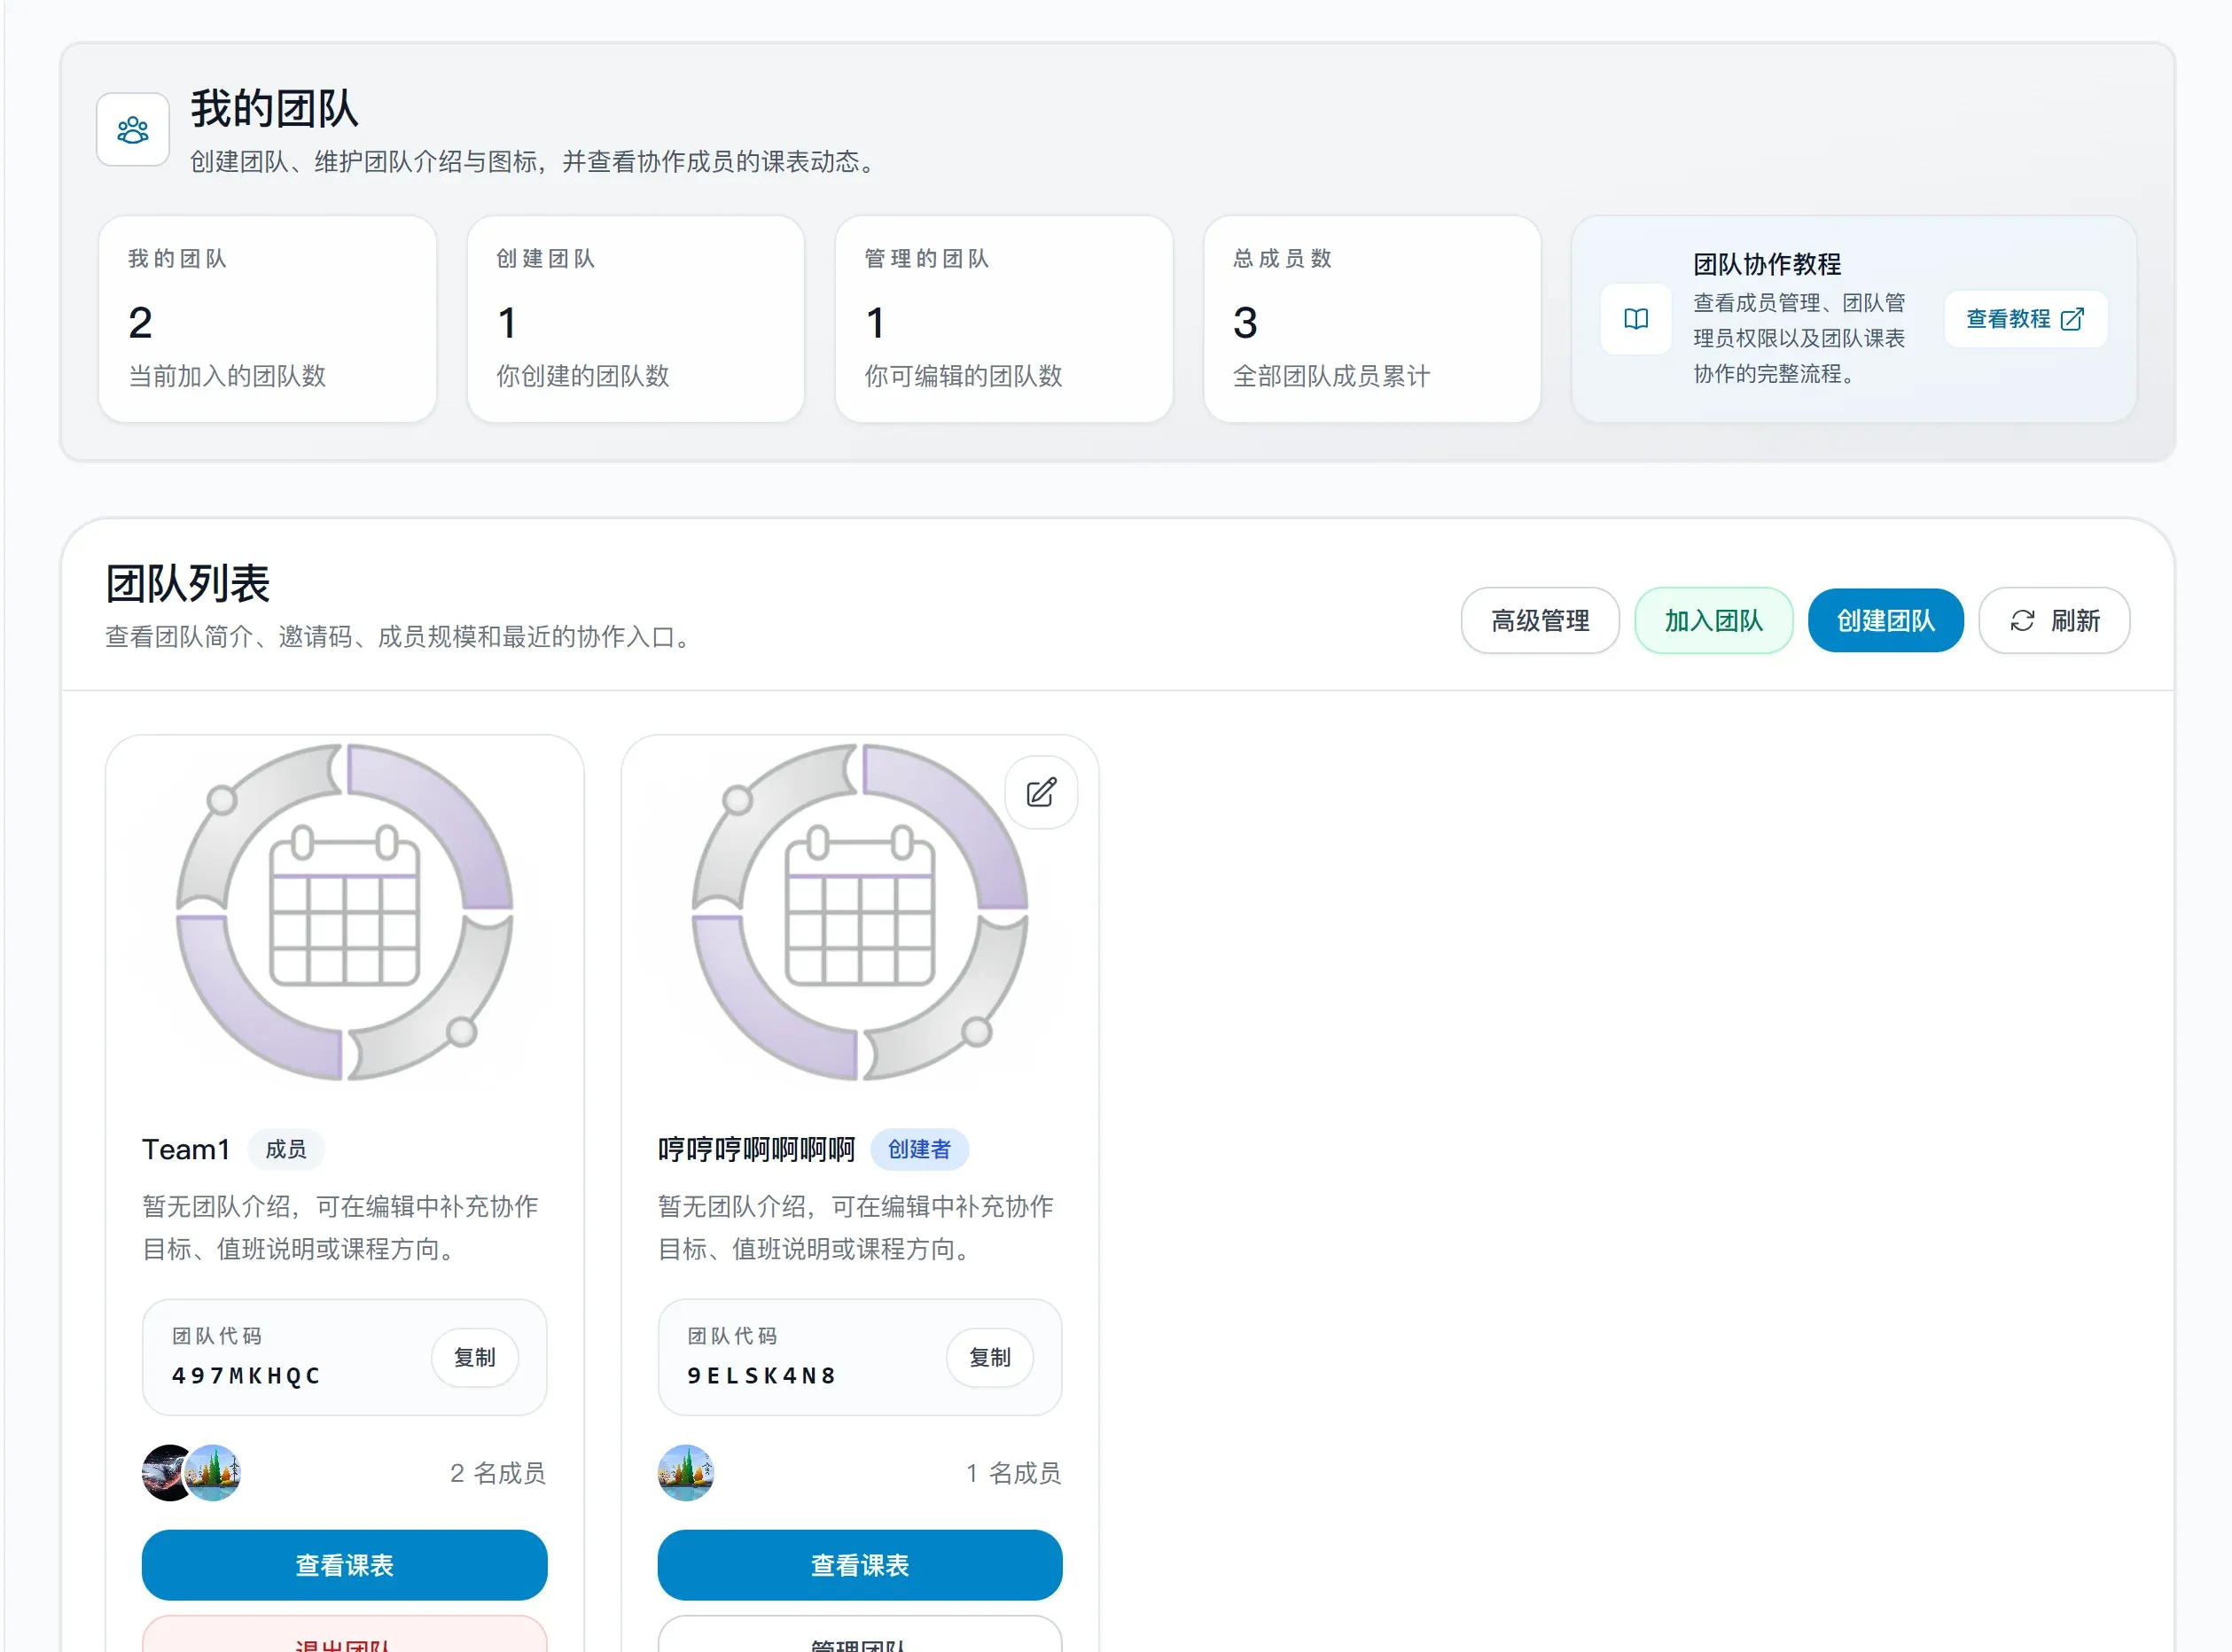
When you open "My Teams", the first thing you see are the team cards. Each card typically shows:
- Team icon
- Team name
- Your role (Owner / Admin / Member)
- Team description
- Team code
- Member preview
---
## Part 3: Team collaboration
Whether it's a student club, a project group, or a whole class, the team features make it easy to keep everyone's schedules transparent and in sync.
### 1. Team cards at a glance
When you open "My Teams", the first thing you see are the team cards. Each card typically shows:
- Team icon
- Team name
- Your role (Owner / Admin / Member)
- Team description
- Team code
- Member preview
 ### 2. For regular team members
If you've joined a team to view schedules and find free time, this section is all you need.
#### 2.1 Join a team
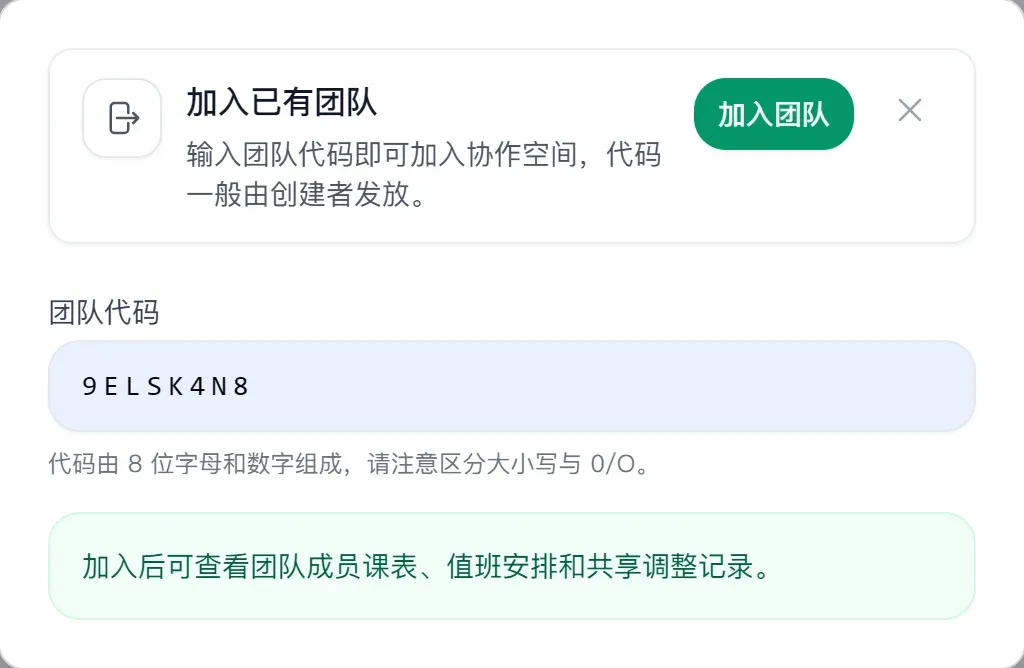
1. Get the 8-character team code from the team owner or an admin.
2. Open "My Teams".
3. Click "Join team".
4. Enter the team code and confirm.
### 2. For regular team members
If you've joined a team to view schedules and find free time, this section is all you need.
#### 2.1 Join a team
1. Get the 8-character team code from the team owner or an admin.
2. Open "My Teams".
3. Click "Join team".
4. Enter the team code and confirm.
 #### 2.2 View the team schedule
1. On the team card, click "View schedule".
2. The team schedule page shows an aggregated view of all members' schedules.
#### 2.2 View the team schedule
1. On the team card, click "View schedule".
2. The team schedule page shows an aggregated view of all members' schedules.
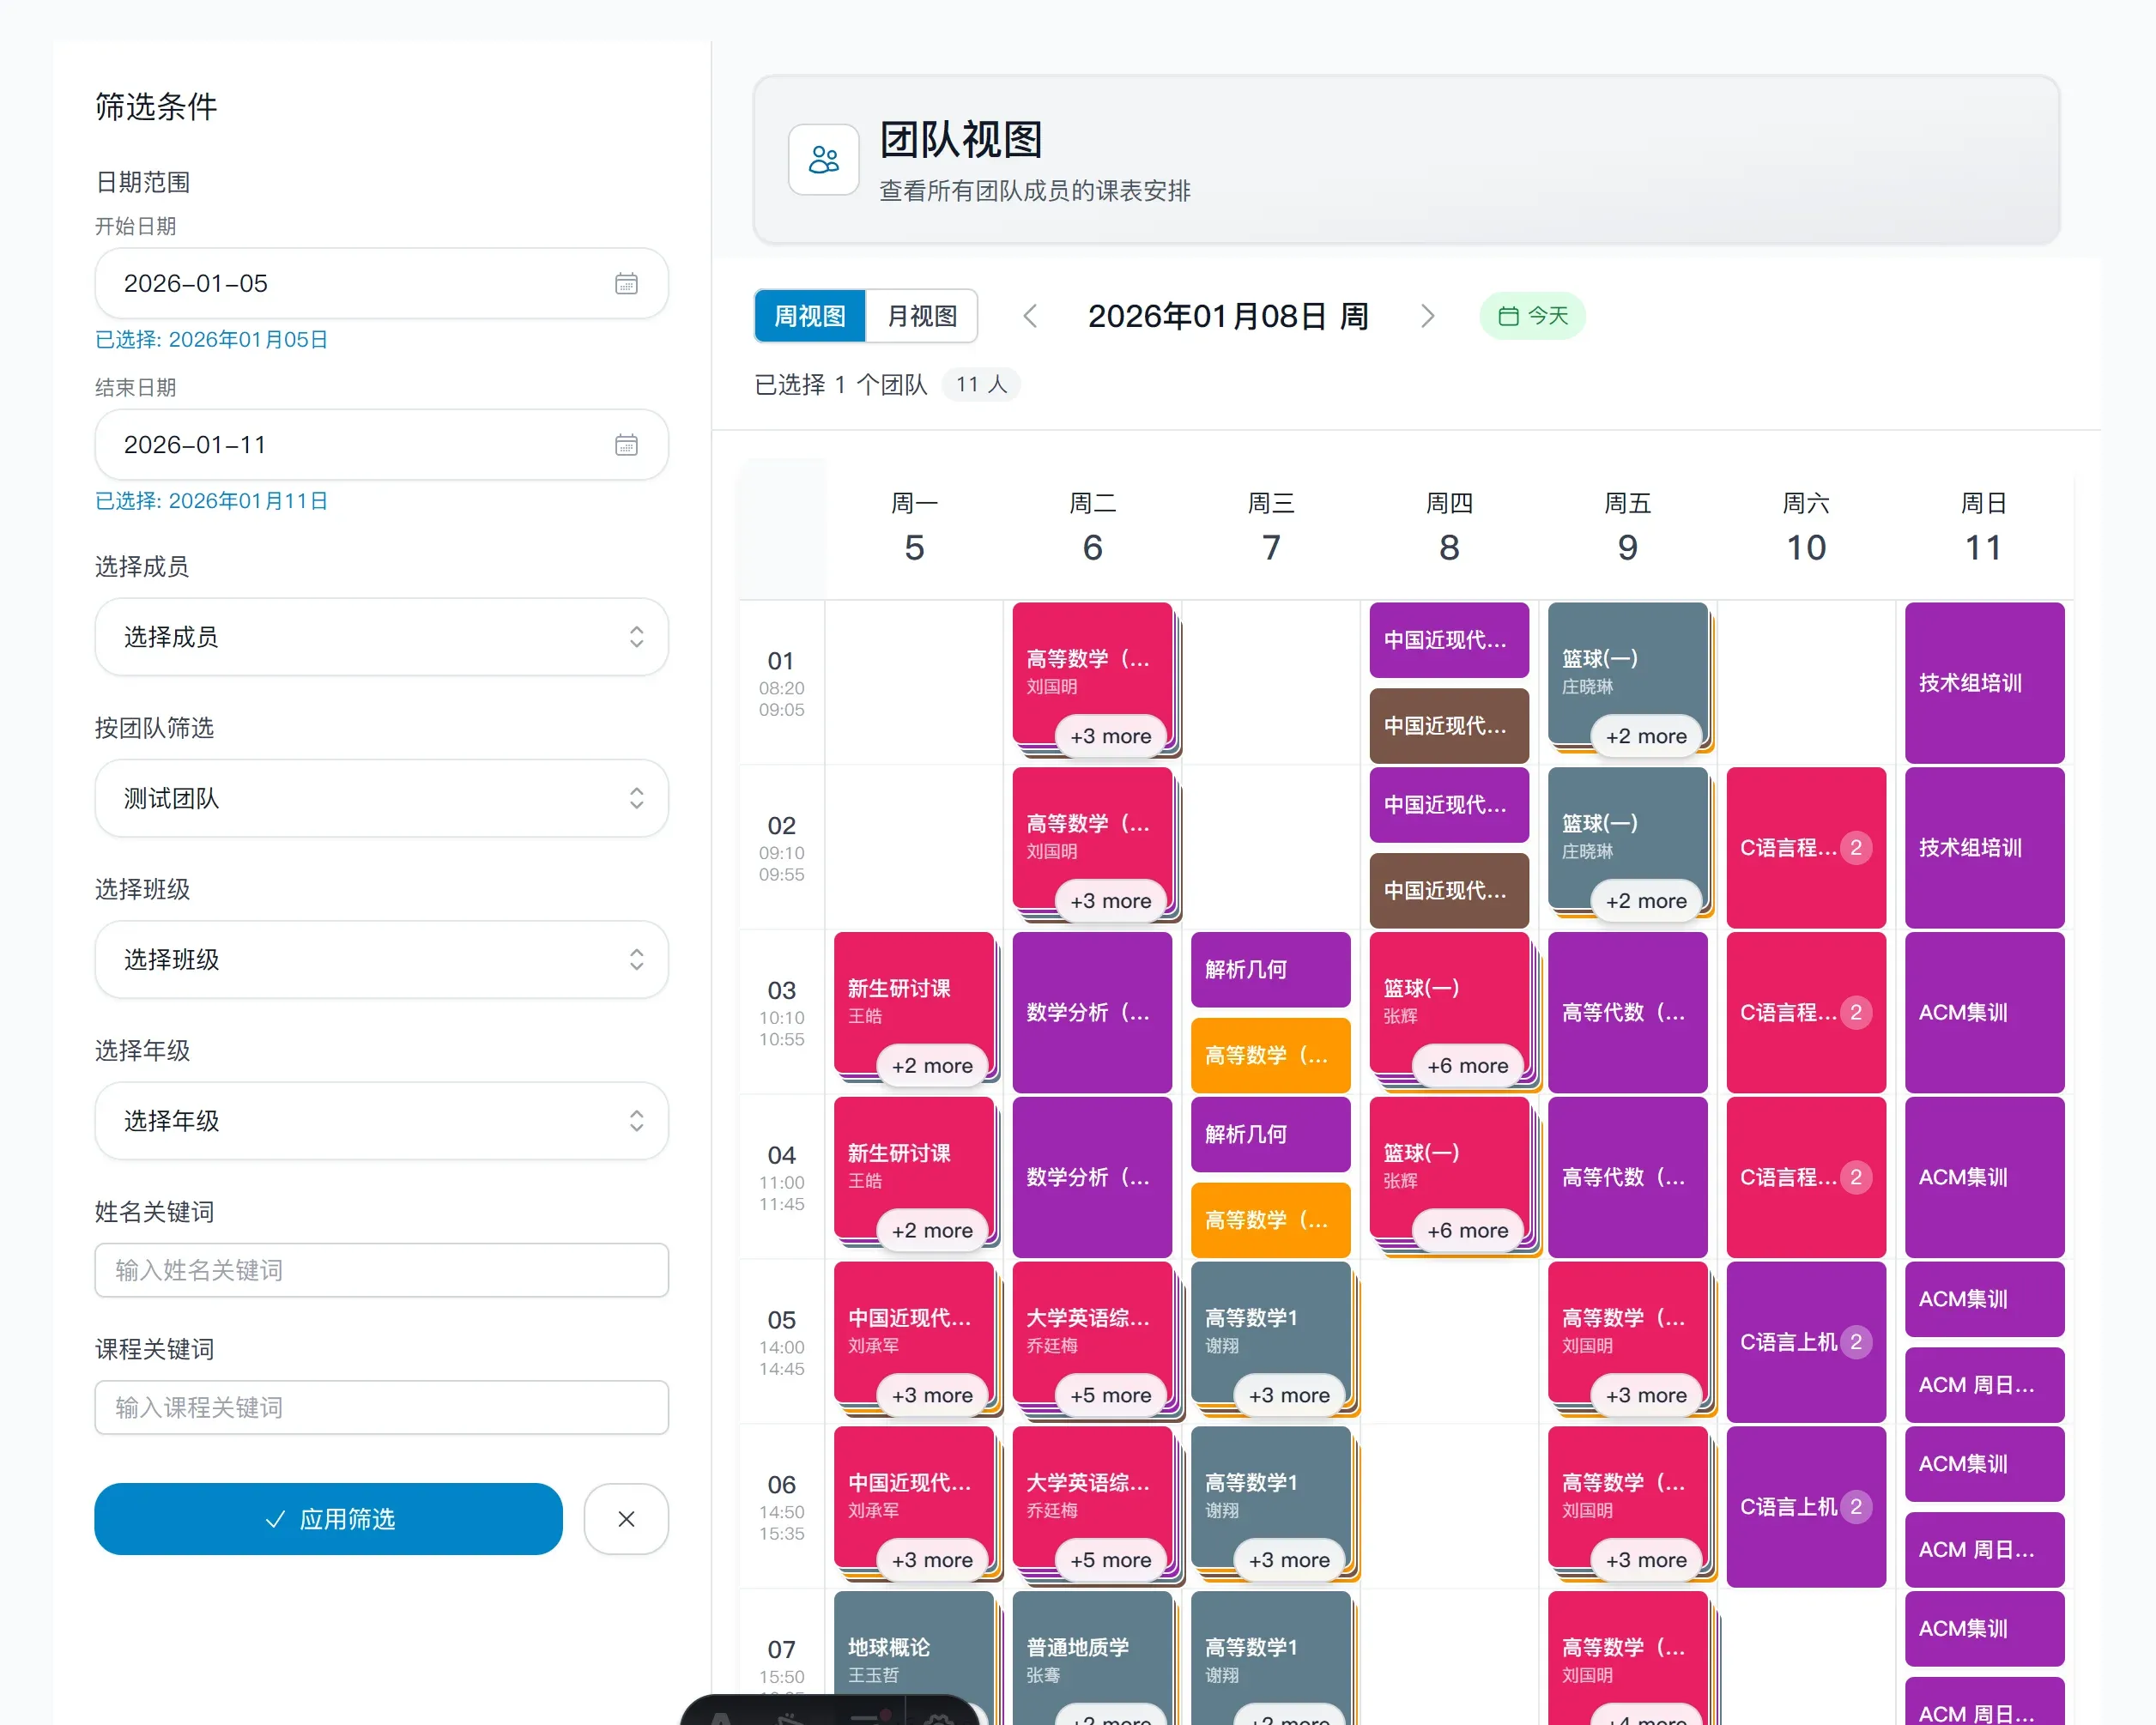 On the team schedule page you have:
- `Weekly view`
- `Monthly view`
- Filter sidebar
- Mobile filter drawer
How to read it:
- Events are color-coded by member, so you can tell at a glance whose class it is.
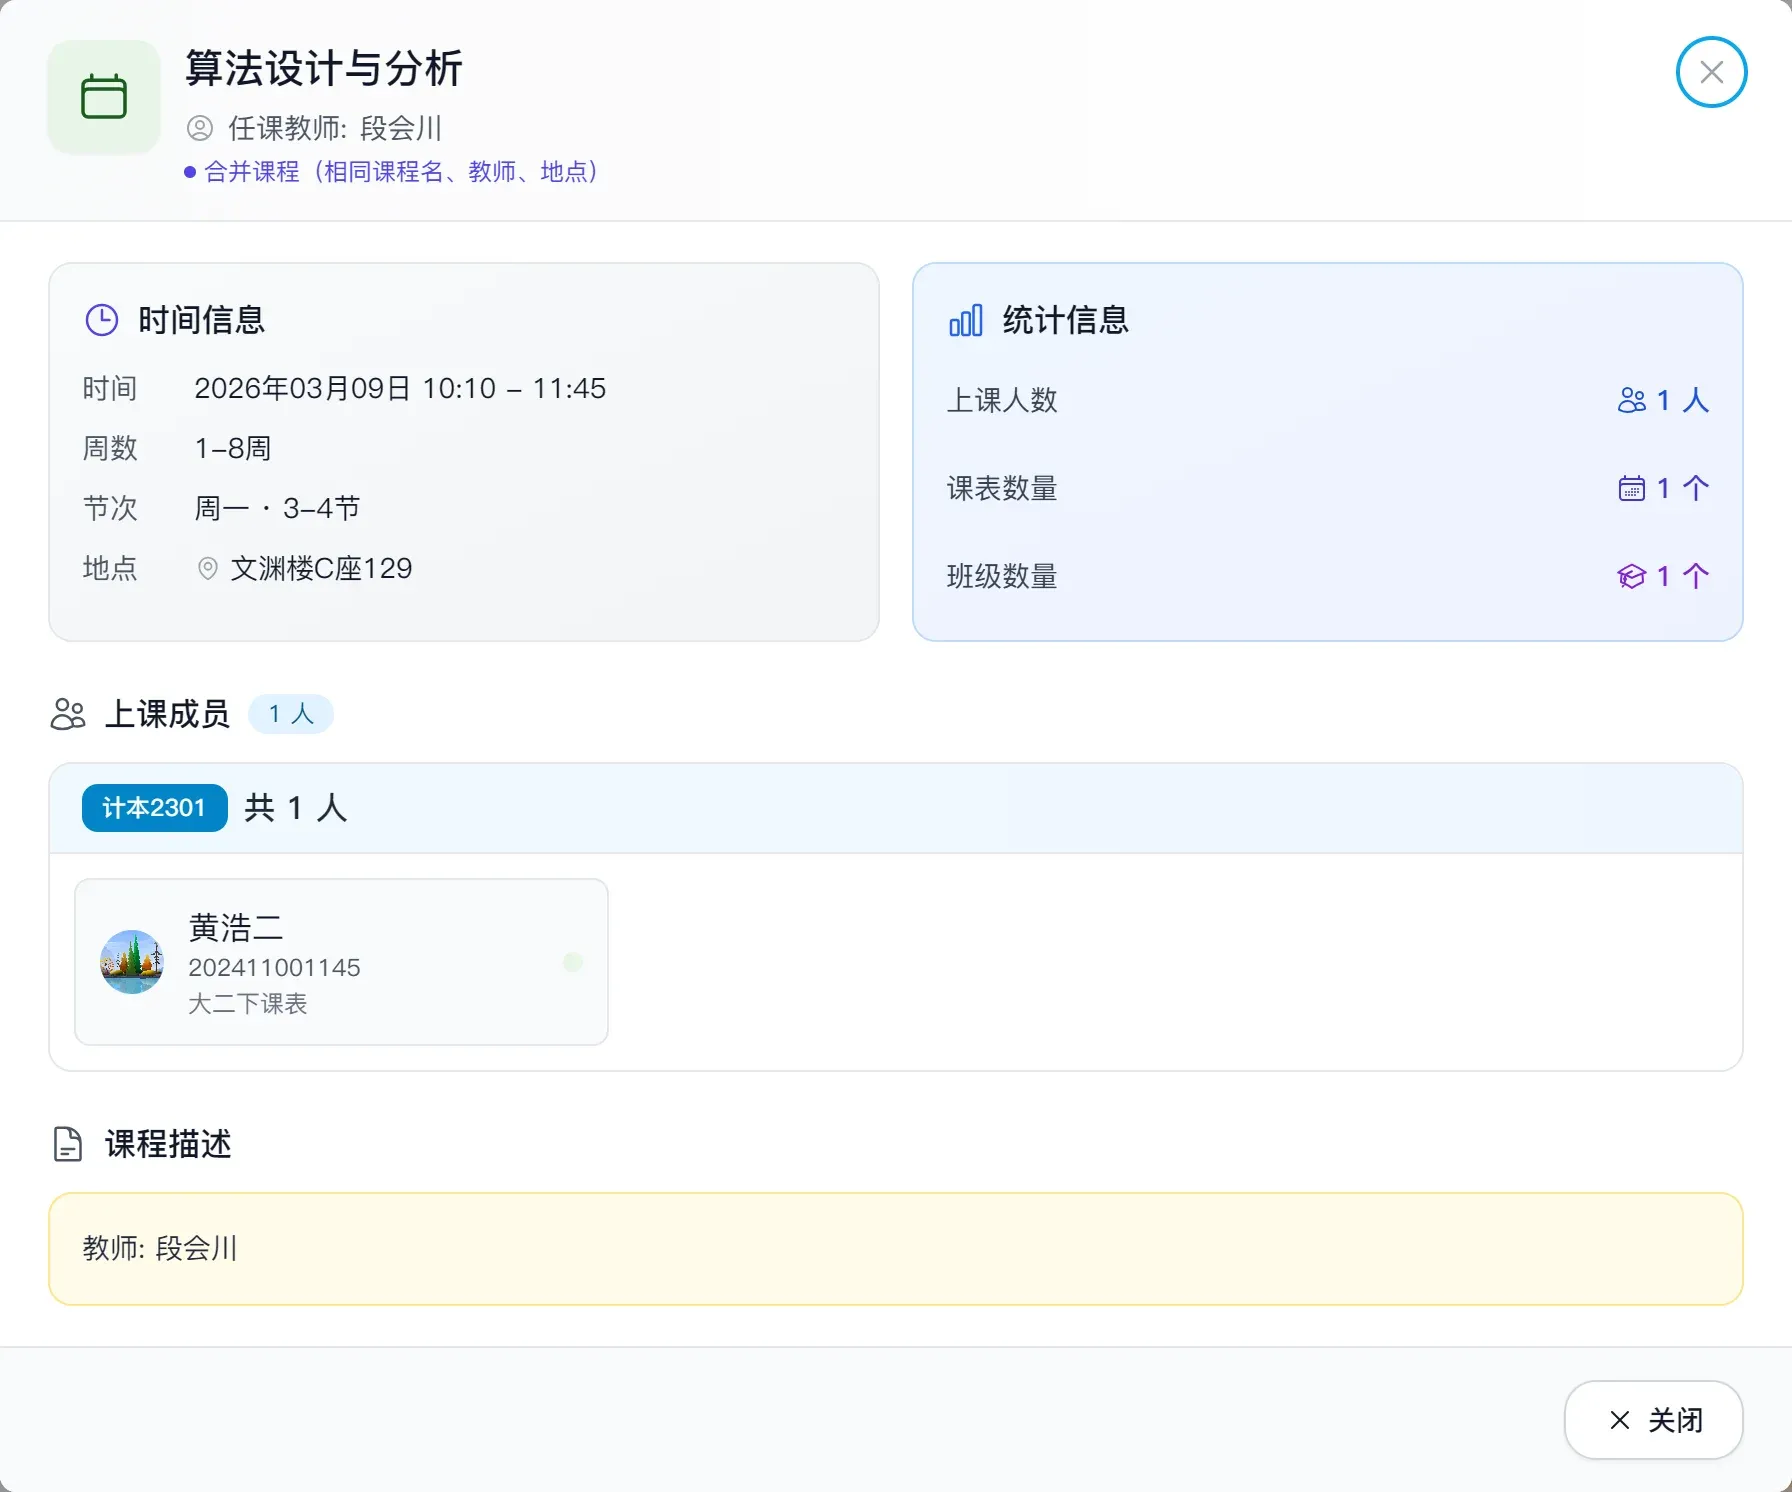
- Click an aggregated course block to see the course details and which members are attending.
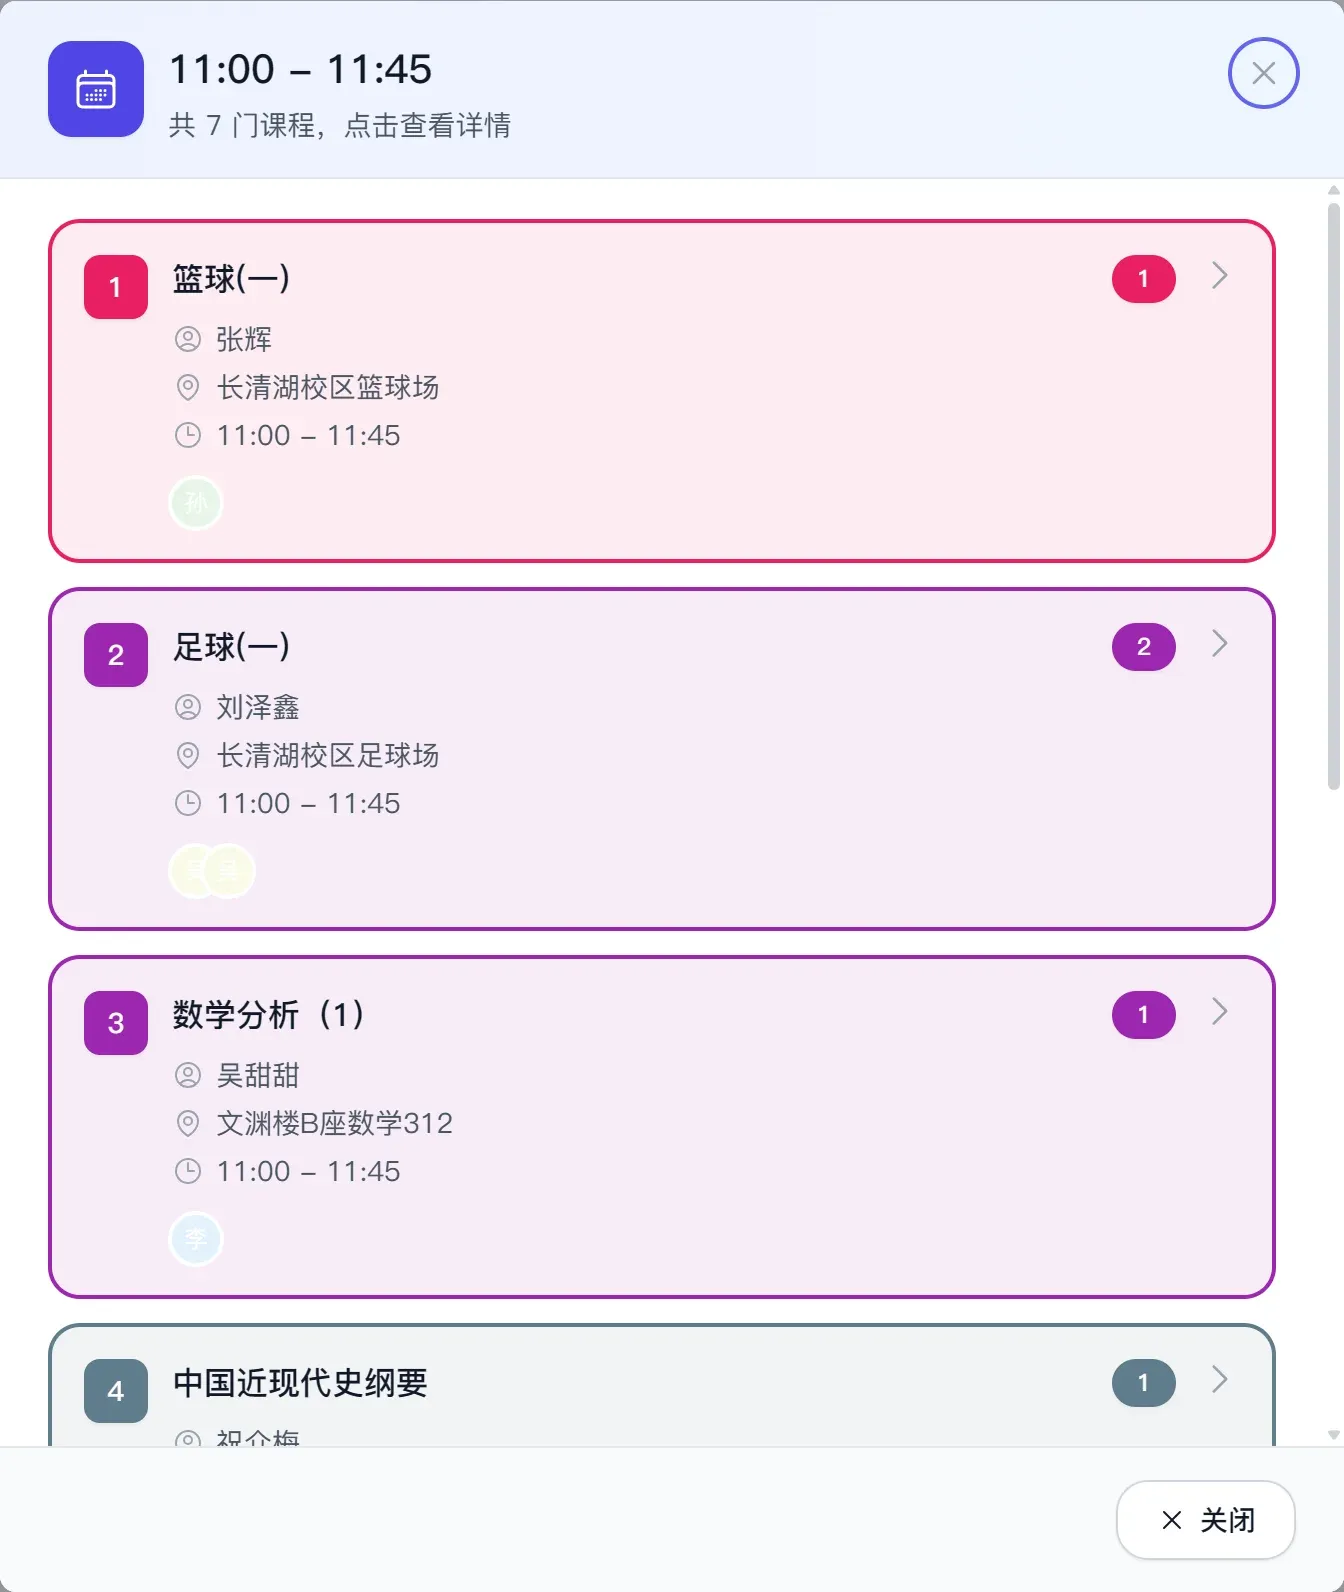
- If multiple classes overlap in the same time slot, you'll first see a list of that slot's courses, then you can drill into a specific course.
Overlap at a given time — who's in class and how many classes stack up — is clear the moment you click.
On the team schedule page you have:
- `Weekly view`
- `Monthly view`
- Filter sidebar
- Mobile filter drawer
How to read it:
- Events are color-coded by member, so you can tell at a glance whose class it is.
- Click an aggregated course block to see the course details and which members are attending.
- If multiple classes overlap in the same time slot, you'll first see a list of that slot's courses, then you can drill into a specific course.
Overlap at a given time — who's in class and how many classes stack up — is clear the moment you click.
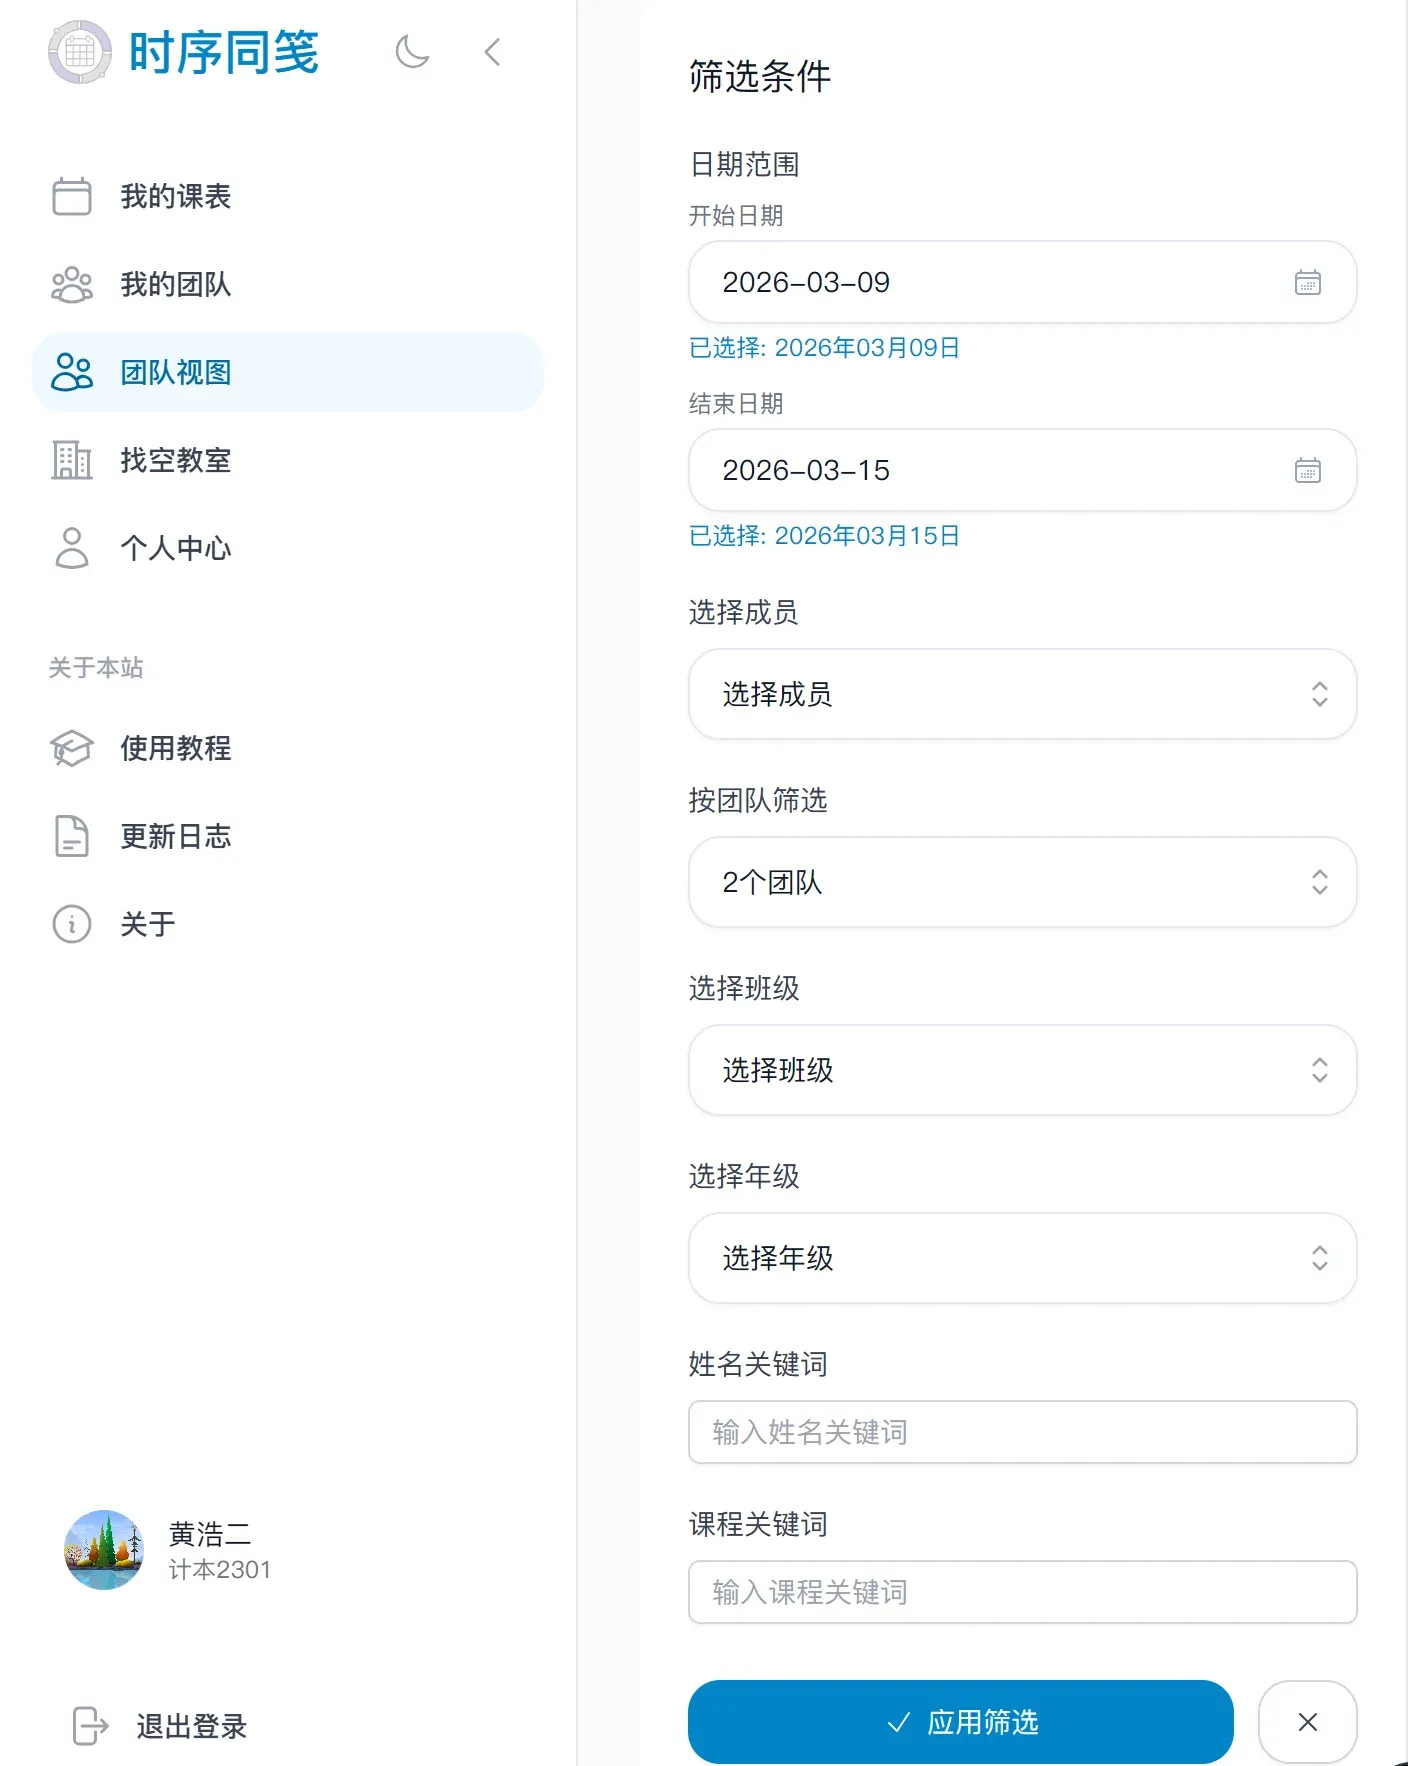
 #### 2.3 Use filters to find a time
When your team is large, filters help you zero in on what you need.
Common filters:
- Filter by member
- Filter by class
- Filter by grade
Typical use cases:
- Scheduling a meeting with a few people — filter by member first.
- Finding when a particular class or grade is free — filter by class or grade first.
#### 2.3 Use filters to find a time
When your team is large, filters help you zero in on what you need.
Common filters:
- Filter by member
- Filter by class
- Filter by grade
Typical use cases:
- Scheduling a meeting with a few people — filter by member first.
- Finding when a particular class or grade is free — filter by class or grade first.
 #### 2.4 Leave a team
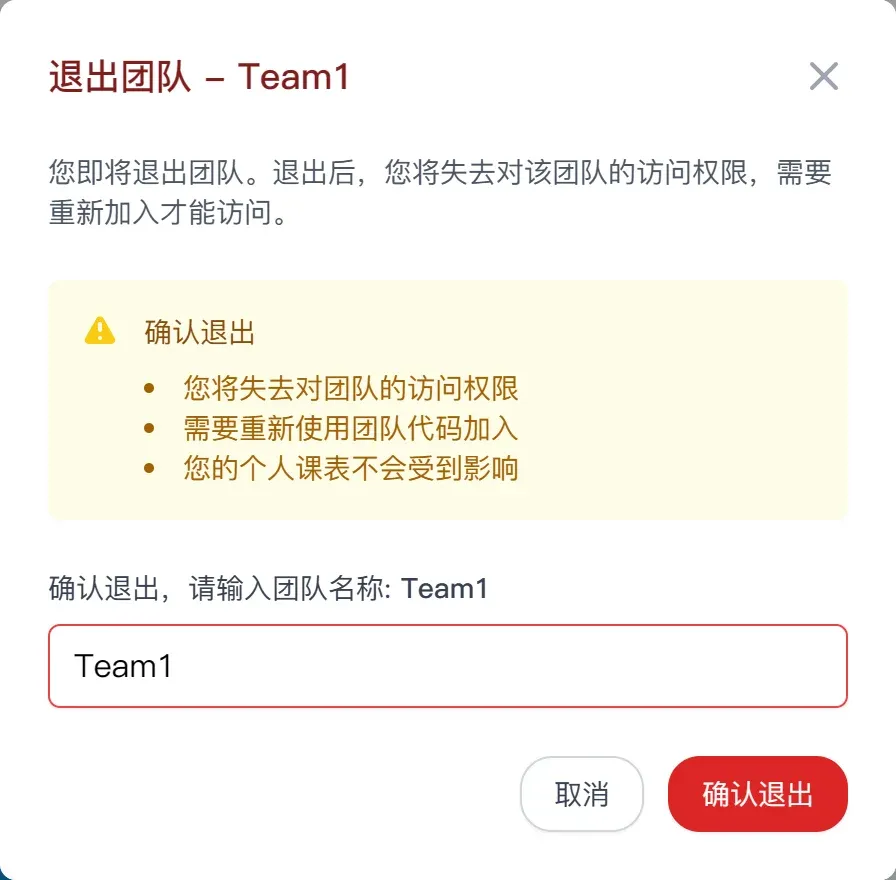
Both regular members and team admins can leave a team voluntarily.
Steps:
1. Find the team in "My Teams".
2. Click "Leave team".
3. Confirm in the dialog.
Things to note:
- Once you leave, you lose access to that team.
- If you want to rejoin later, you'll need the team code again.
#### 2.4 Leave a team
Both regular members and team admins can leave a team voluntarily.
Steps:
1. Find the team in "My Teams".
2. Click "Leave team".
3. Confirm in the dialog.
Things to note:
- Once you leave, you lose access to that team.
- If you want to rejoin later, you'll need the team code again.
 ### 3. For team admins
This section is for the people who keep things running day to day — club leaders, shift schedulers, event organizers.
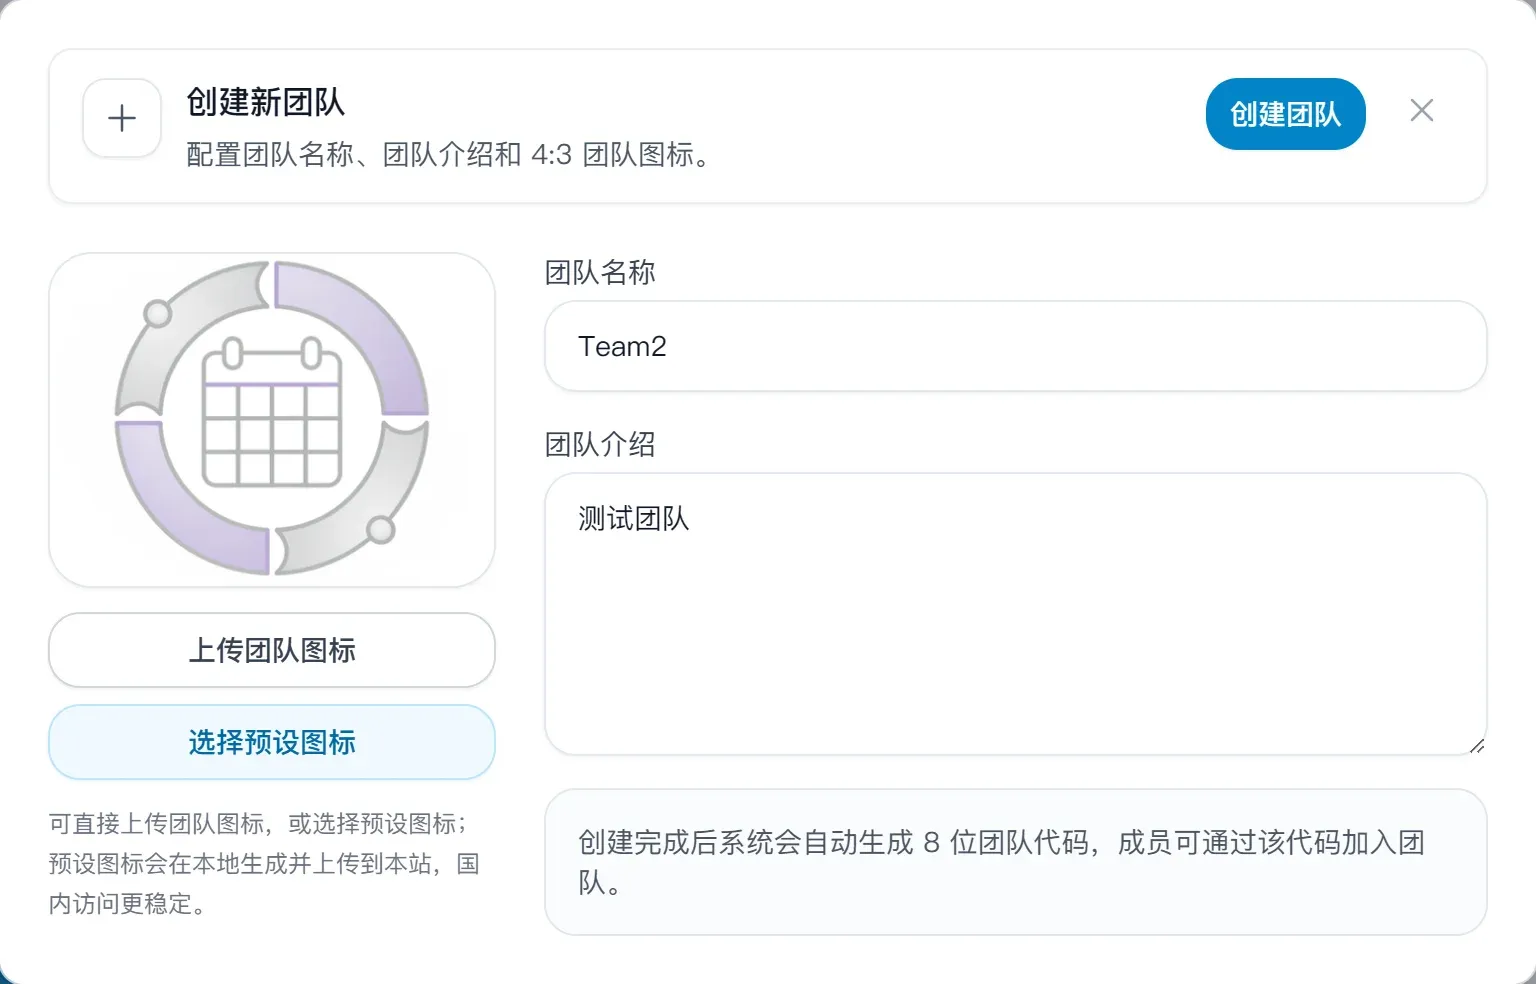
#### 3.1 Create a team
1. Open "My Teams".
2. Click "Create team".
3. Fill in:
- Team name
- Team description
- Team icon (upload your own or pick a preset)
4. Click "Create team".
5. Once created, the system generates an 8-character team code.
### 3. For team admins
This section is for the people who keep things running day to day — club leaders, shift schedulers, event organizers.
#### 3.1 Create a team
1. Open "My Teams".
2. Click "Create team".
3. Fill in:
- Team name
- Team description
- Team icon (upload your own or pick a preset)
4. Click "Create team".
5. Once created, the system generates an 8-character team code.
 #### 3.2 Manage team details and team code
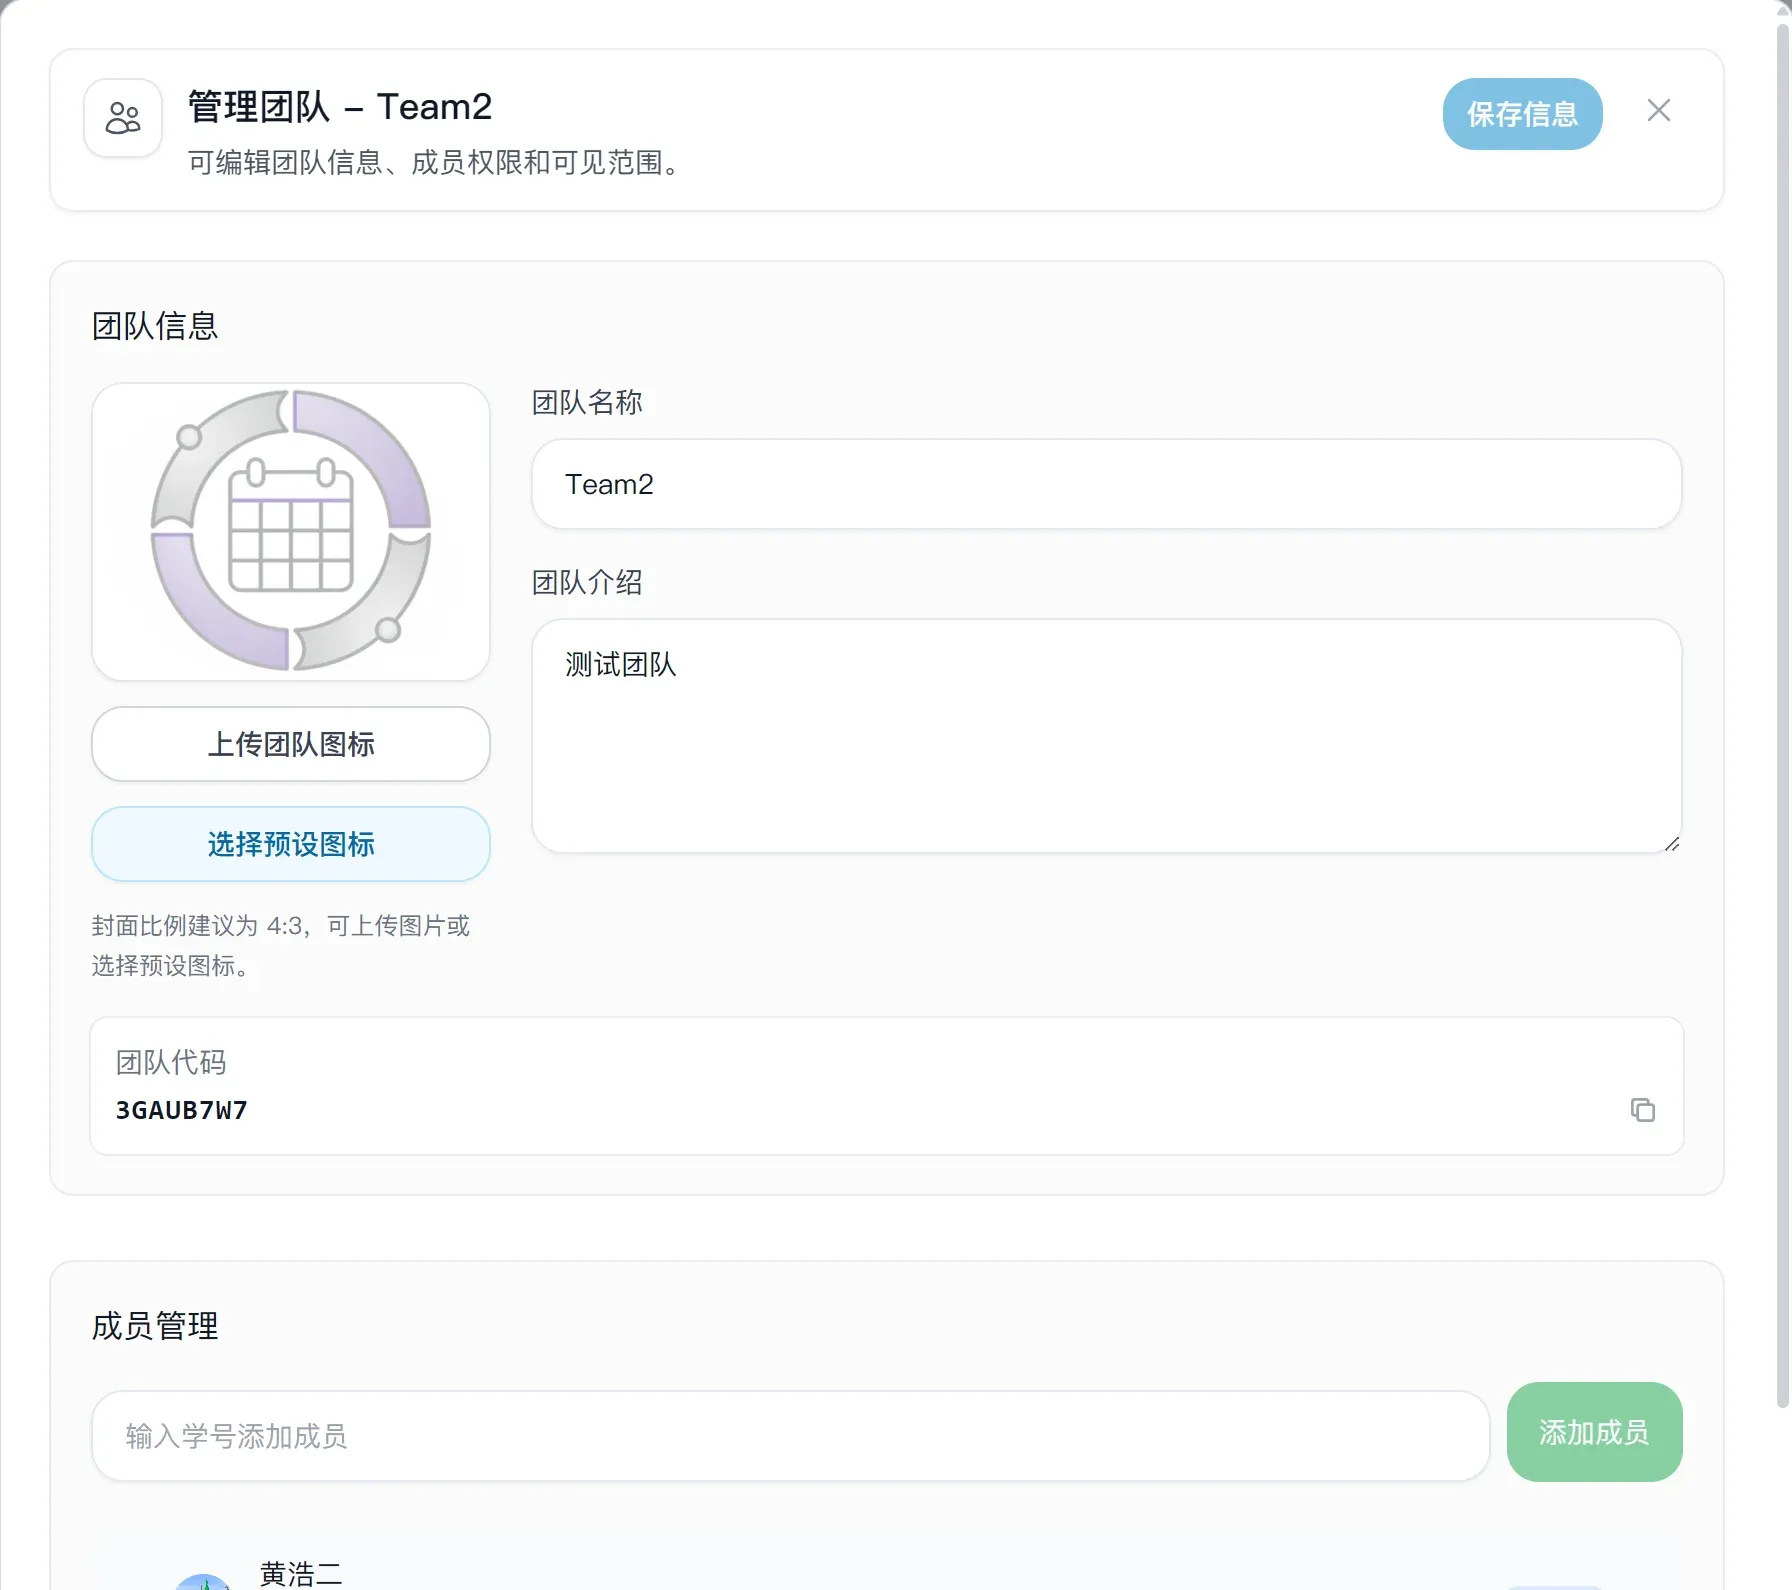
On the team card, click "Manage team".
From here you can:
- Edit the team name
- Edit the team description
- Upload or change the team icon
- Copy the team code
- View the member list
The team code is what you send to people you want to invite — just share it with them directly.
#### 3.2 Manage team details and team code
On the team card, click "Manage team".
From here you can:
- Edit the team name
- Edit the team description
- Upload or change the team icon
- Copy the team code
- View the member list
The team code is what you send to people you want to invite — just share it with them directly.
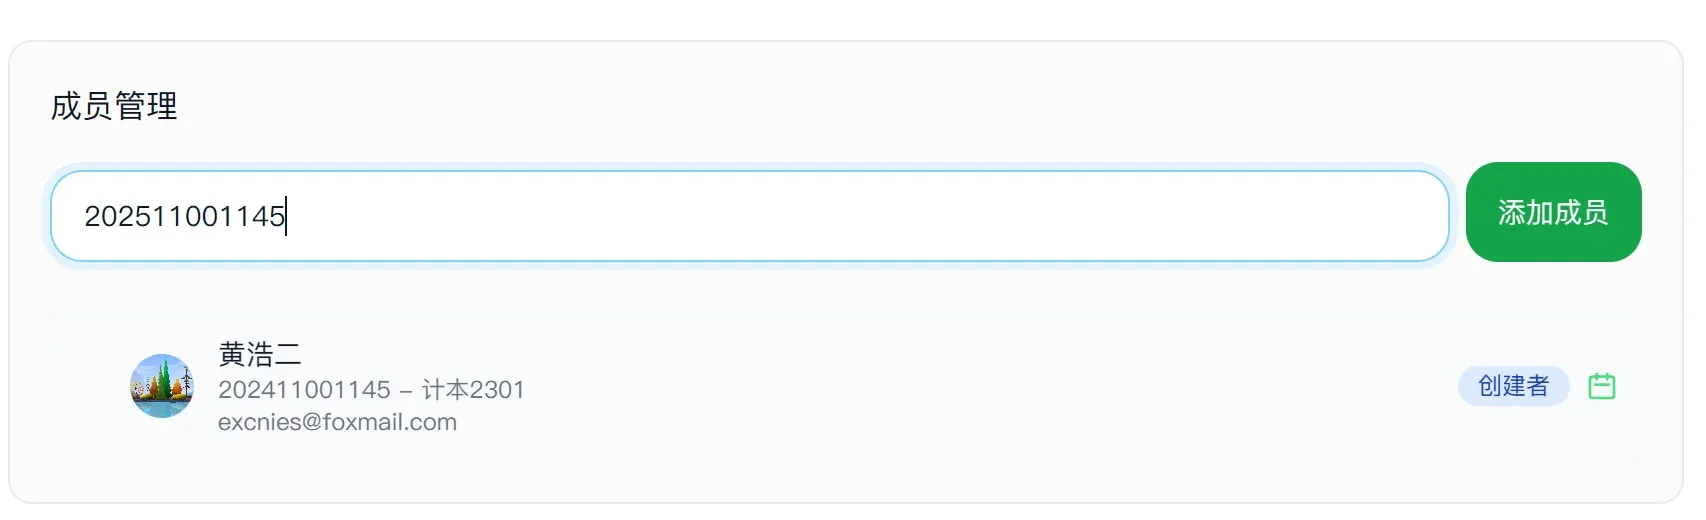
 #### 3.3 Add and remove members
Adding a member:
1. Open "Manage team".
2. Enter the person's student ID in the member management area.
3. Click "Add member".
Removing a member:
1. Find the member in the member list.
2. Click the remove action and confirm.
For day-to-day team management, these two actions are the ones you'll use most.
#### 3.3 Add and remove members
Adding a member:
1. Open "Manage team".
2. Enter the person's student ID in the member management area.
3. Click "Add member".
Removing a member:
1. Find the member in the member list.
2. Click the remove action and confirm.
For day-to-day team management, these two actions are the ones you'll use most.
 #### 3.4 Team admin permission boundaries
A team admin can do more than just view schedules. Regular members can also reach this management interface.
#### 3.4 Team admin permission boundaries
A team admin can do more than just view schedules. Regular members can also reach this management interface.
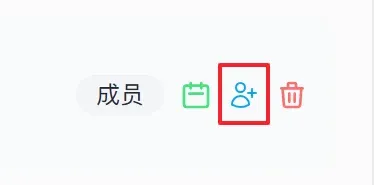 A team admin can:
- Edit the team name, description, and icon
- Copy the team code
- Add members by student ID
- Remove regular members
- View member schedules
A team admin cannot:
- Assign or revoke team admin status for other members
- Transfer team ownership
- Disband the team
Actions related to the permission structure are reserved for the team owner.
### 4. Team owner-only actions
If you're the team owner, you have three additional powers on top of the admin capabilities above.
#### 4.1 Assign or revoke team admin status
1. Open "Manage team" from the team card.
2. Find the target member in the member list.
3. Assign admin status, or revoke it.
Notes:
- Only the team owner can assign or revoke team admin status.
- The team owner already has the highest team permissions by default — no extra assignment needed.
#### 4.2 Transfer team ownership
1. Enter the transfer flow from "Advanced management" or the team management interface.
2. Select the new owner from the team members.
3. Enter the team name to confirm the transfer.
After the transfer, you are no longer the team owner.
#### 4.3 Disband a team
1. Enter the disband team flow.
2. Follow the prompt to enter the team name and confirm.
3. The team is deleted once confirmed.
Notes:
- Disbanding a team cannot be undone.
- Team admins cannot disband a team — only the owner can.
---
## Part 4: Empty classrooms
Entry point: `Empty classrooms` in the sidebar.
A team admin can:
- Edit the team name, description, and icon
- Copy the team code
- Add members by student ID
- Remove regular members
- View member schedules
A team admin cannot:
- Assign or revoke team admin status for other members
- Transfer team ownership
- Disband the team
Actions related to the permission structure are reserved for the team owner.
### 4. Team owner-only actions
If you're the team owner, you have three additional powers on top of the admin capabilities above.
#### 4.1 Assign or revoke team admin status
1. Open "Manage team" from the team card.
2. Find the target member in the member list.
3. Assign admin status, or revoke it.
Notes:
- Only the team owner can assign or revoke team admin status.
- The team owner already has the highest team permissions by default — no extra assignment needed.
#### 4.2 Transfer team ownership
1. Enter the transfer flow from "Advanced management" or the team management interface.
2. Select the new owner from the team members.
3. Enter the team name to confirm the transfer.
After the transfer, you are no longer the team owner.
#### 4.3 Disband a team
1. Enter the disband team flow.
2. Follow the prompt to enter the team name and confirm.
3. The team is deleted once confirmed.
Notes:
- Disbanding a team cannot be undone.
- Team admins cannot disband a team — only the owner can.
---
## Part 4: Empty classrooms
Entry point: `Empty classrooms` in the sidebar.
 ### First-time use
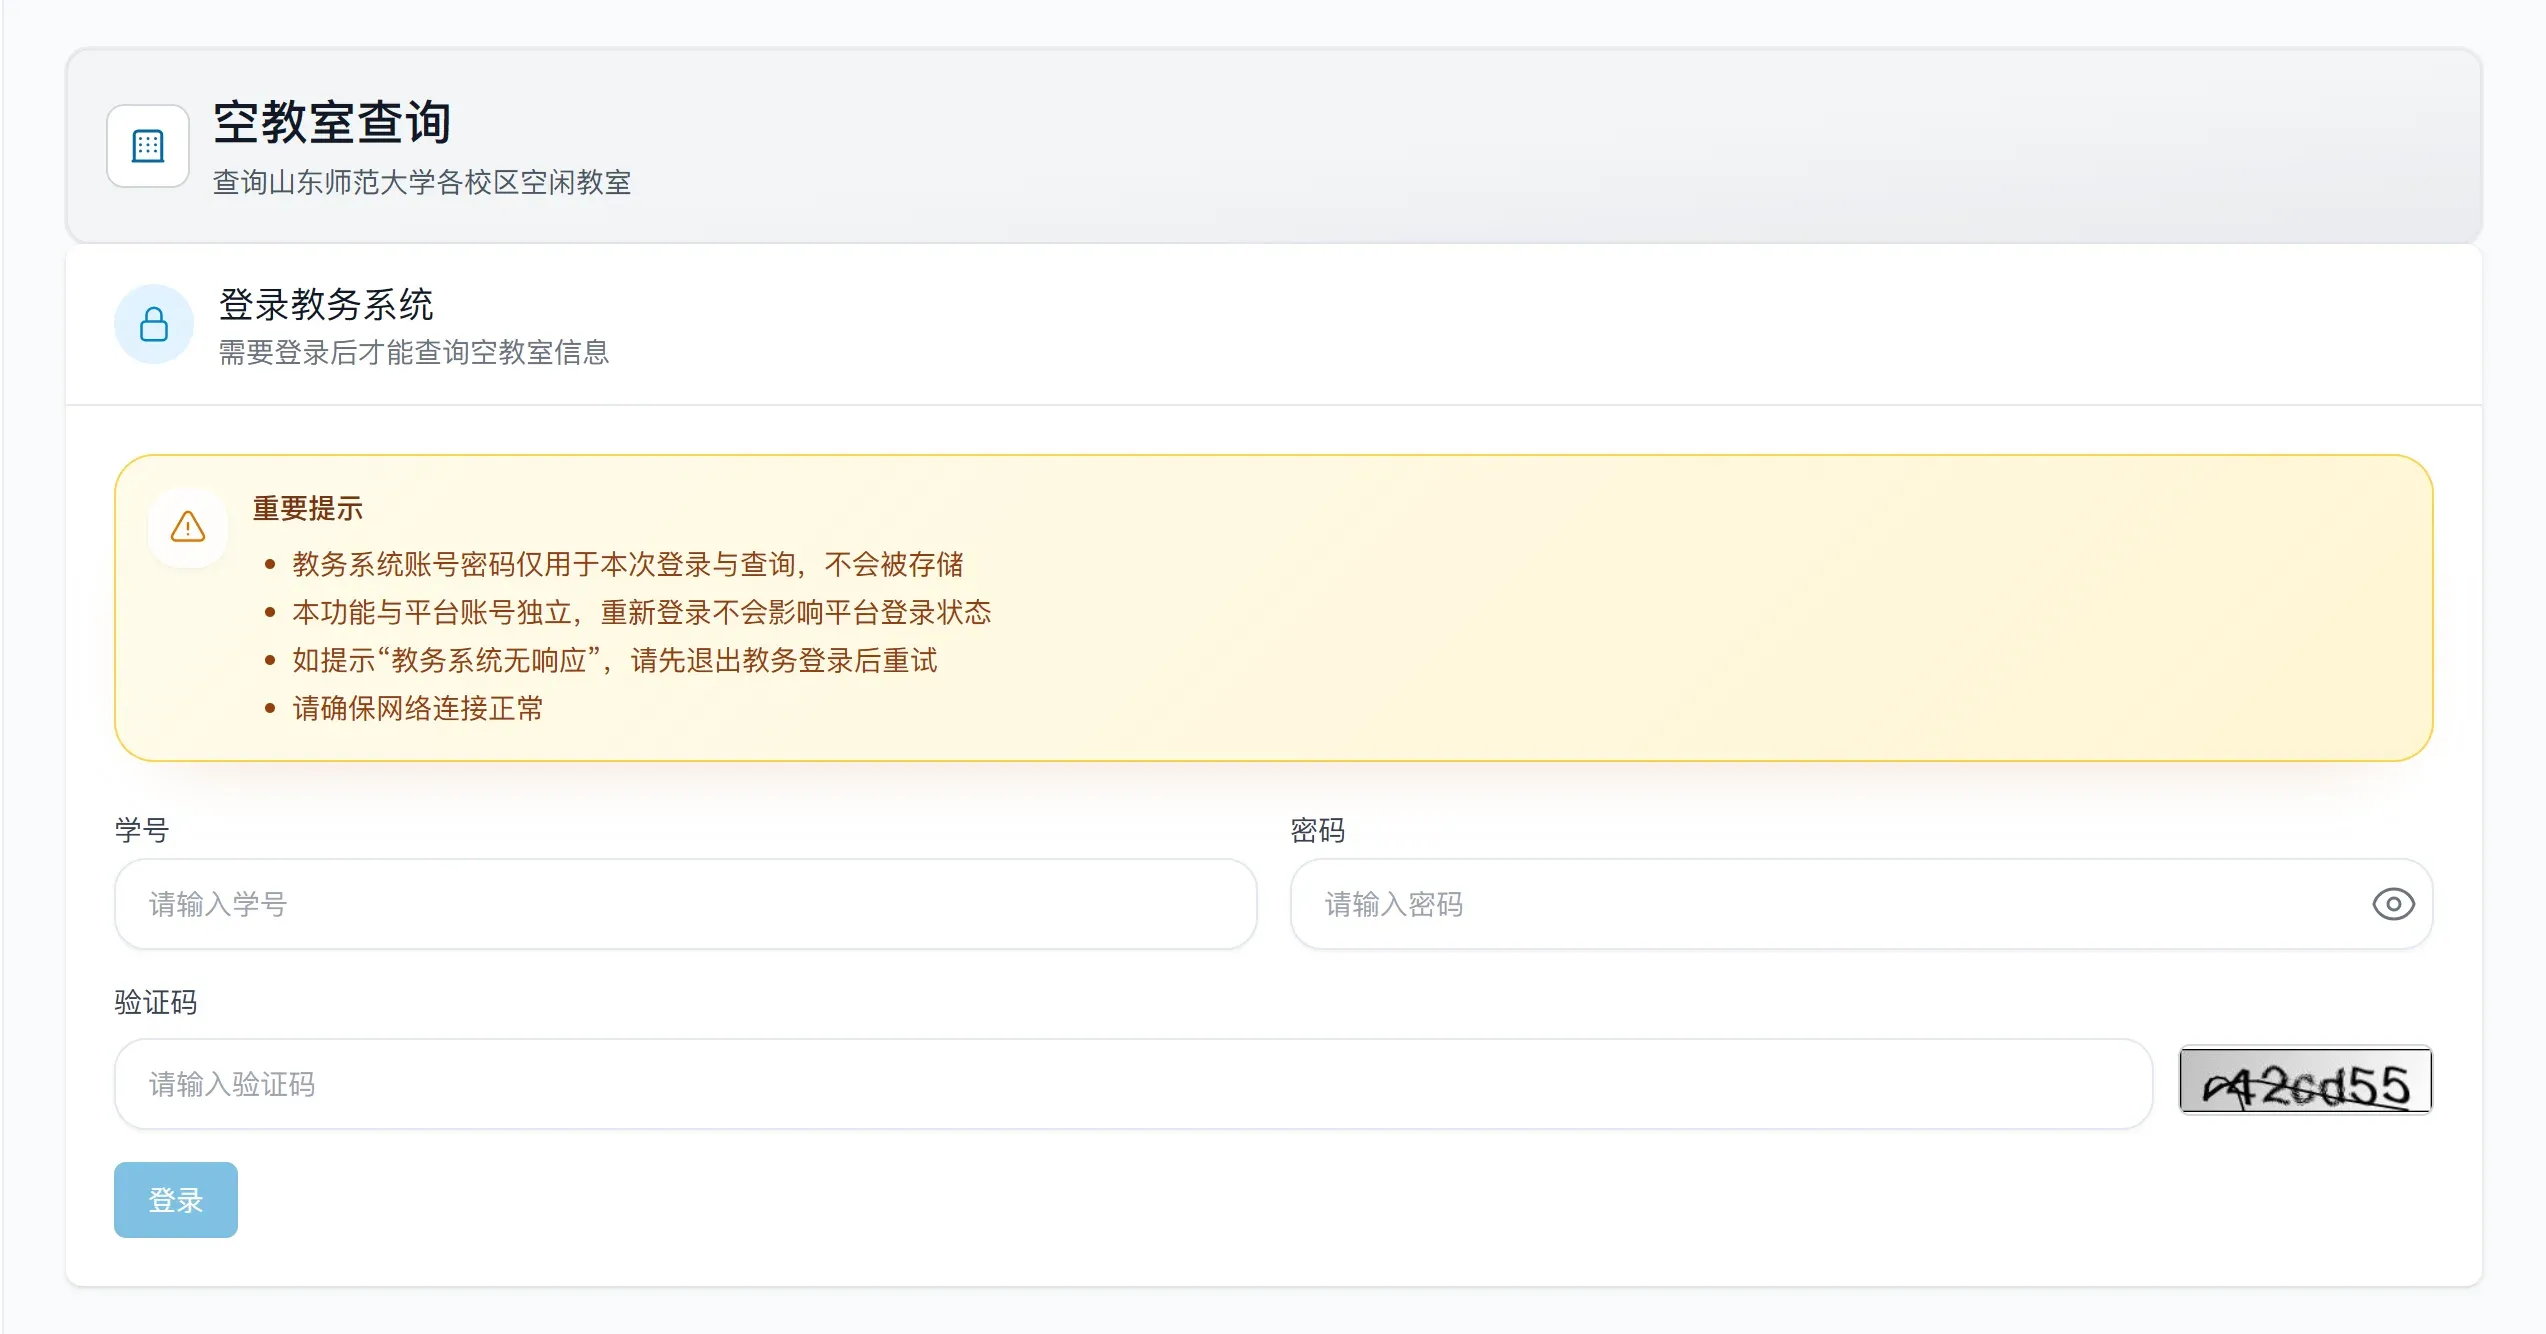
Empty classroom lookup uses an **independent academic system session** — it does not affect your platform login.
1. Open "Empty classrooms".
2. Enter your academic system student ID, password, and verification code.
3. Click "Log in".
Notes:
- Your academic password is used only for this login and query, and is not stored by the platform.
- This login is separate from your platform account login.
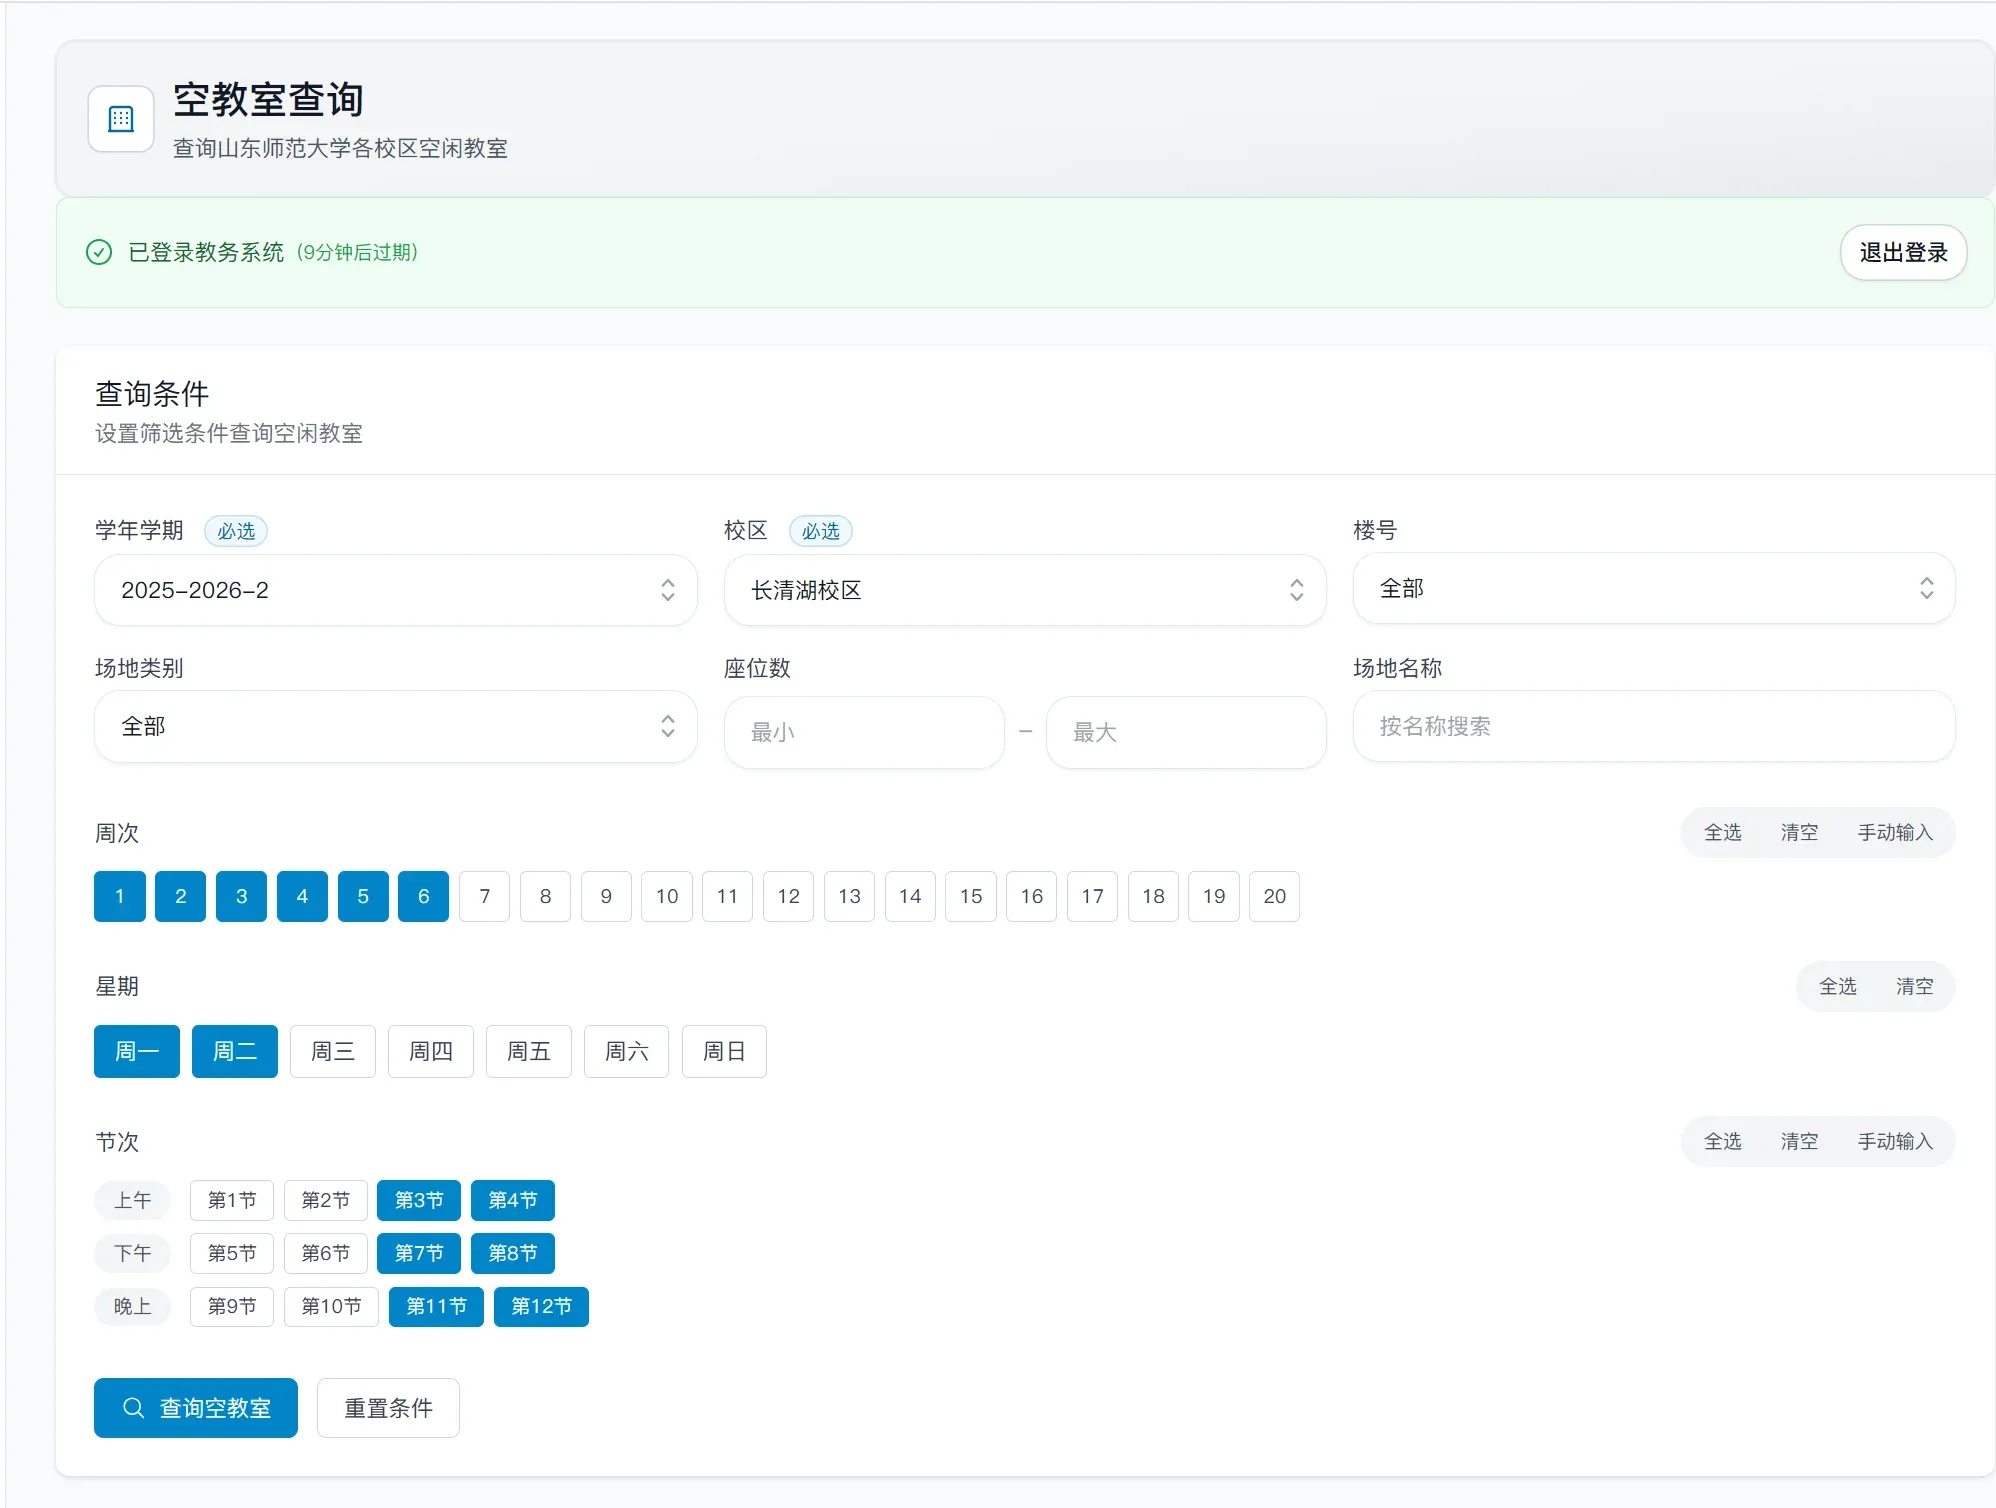
### Looking up empty classrooms
Once logged in, you can set the following criteria:
- Academic year and semester
- Campus
- Building
- Room type
- Seat count range
- Room name
- Week
- Day of the week
- Period
For week and period, you can:
- Select individually
- Select all / clear
- Enter a range manually, e.g. `1-5,7,9-11`
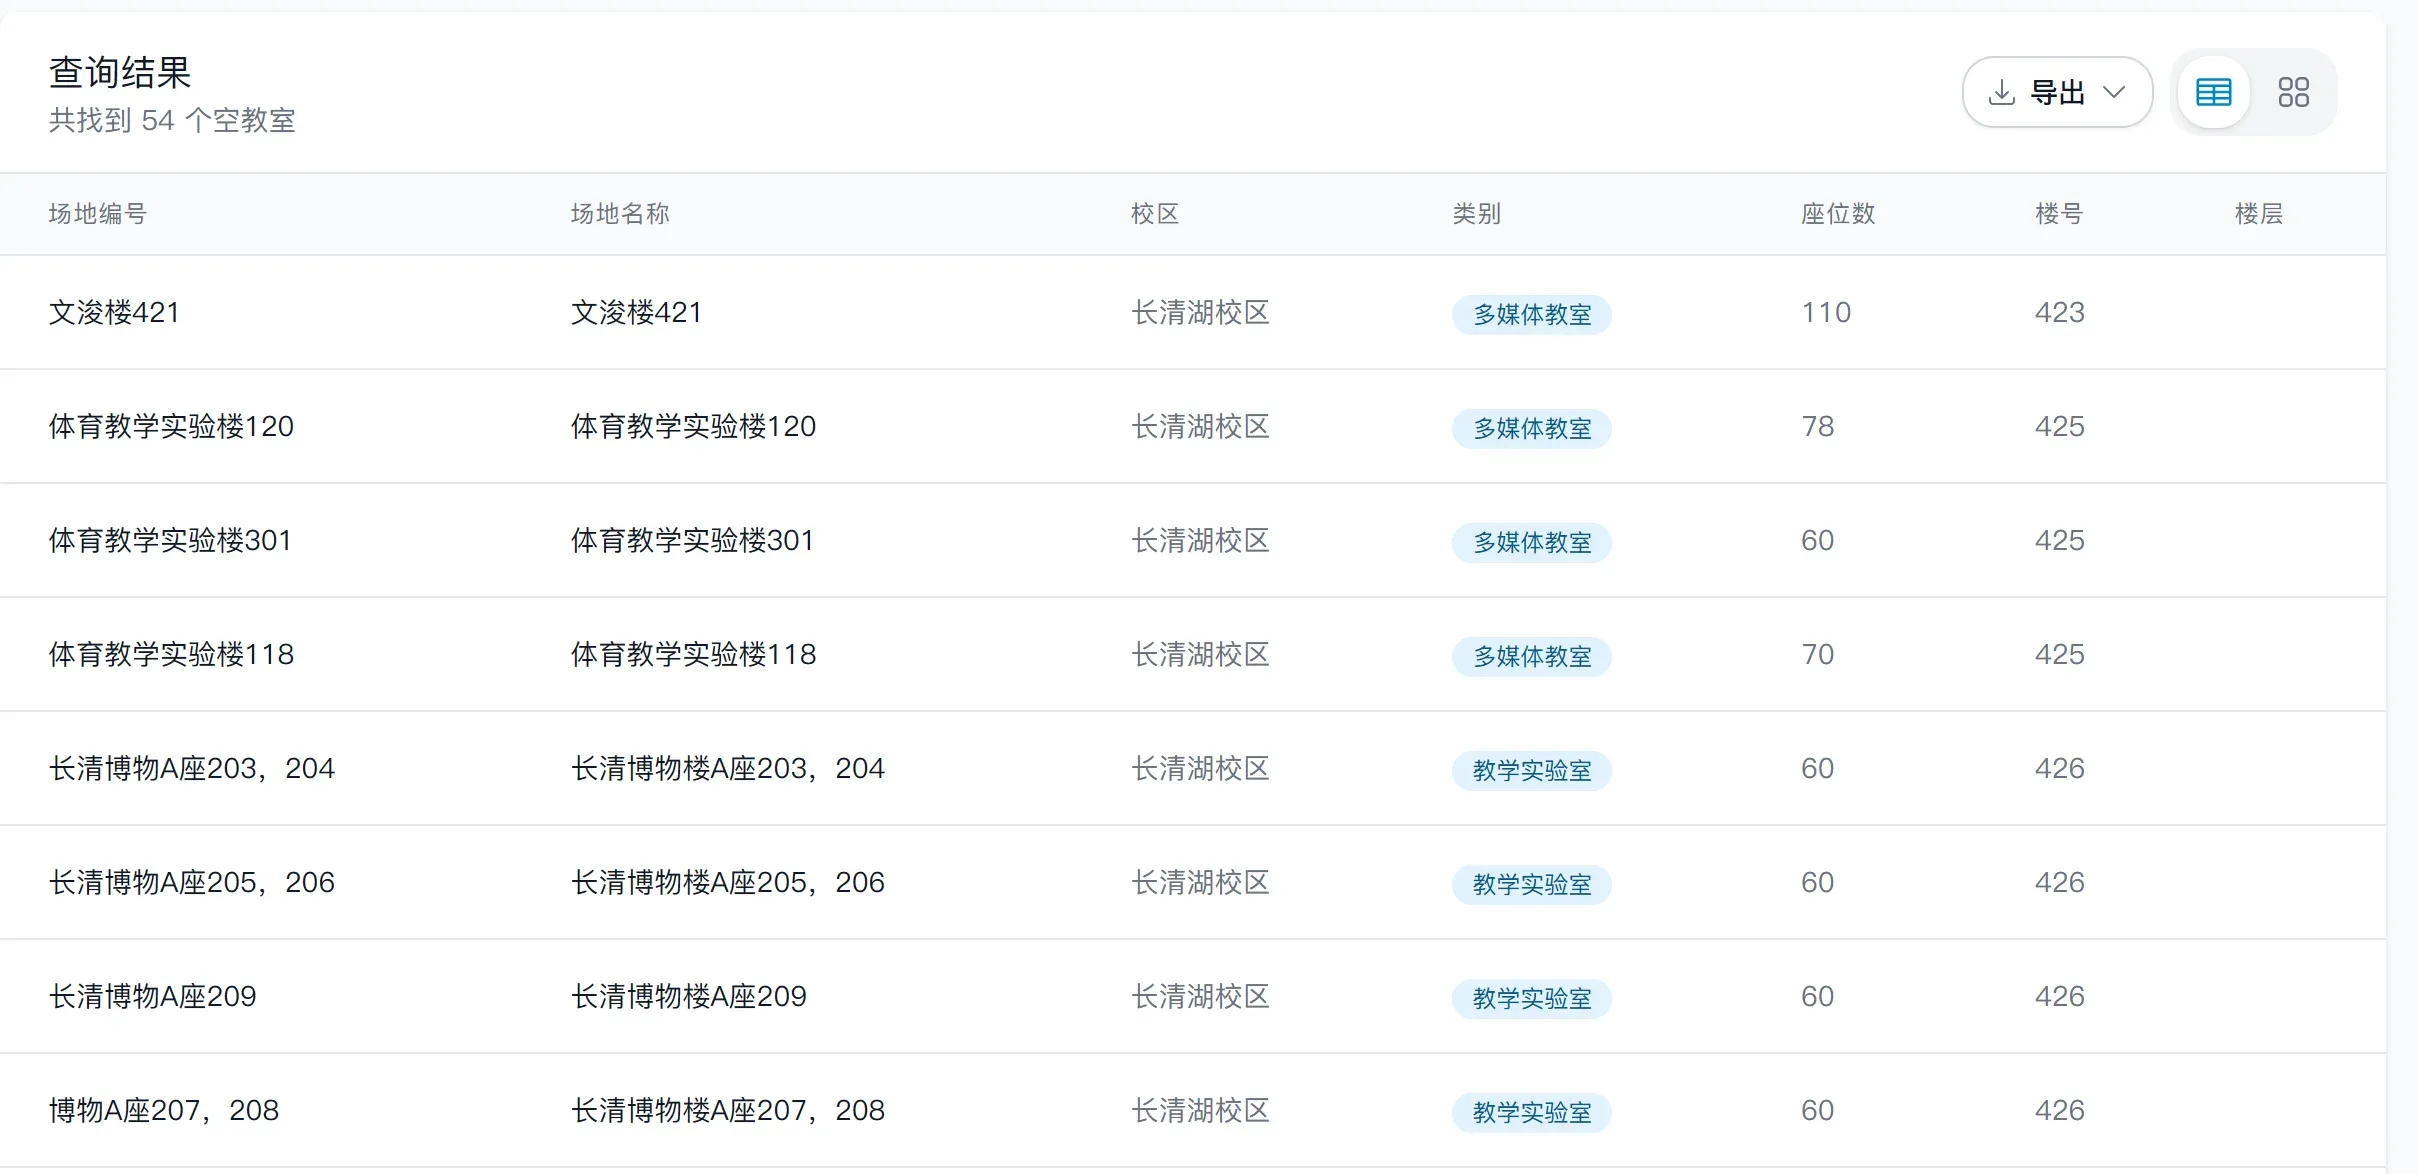
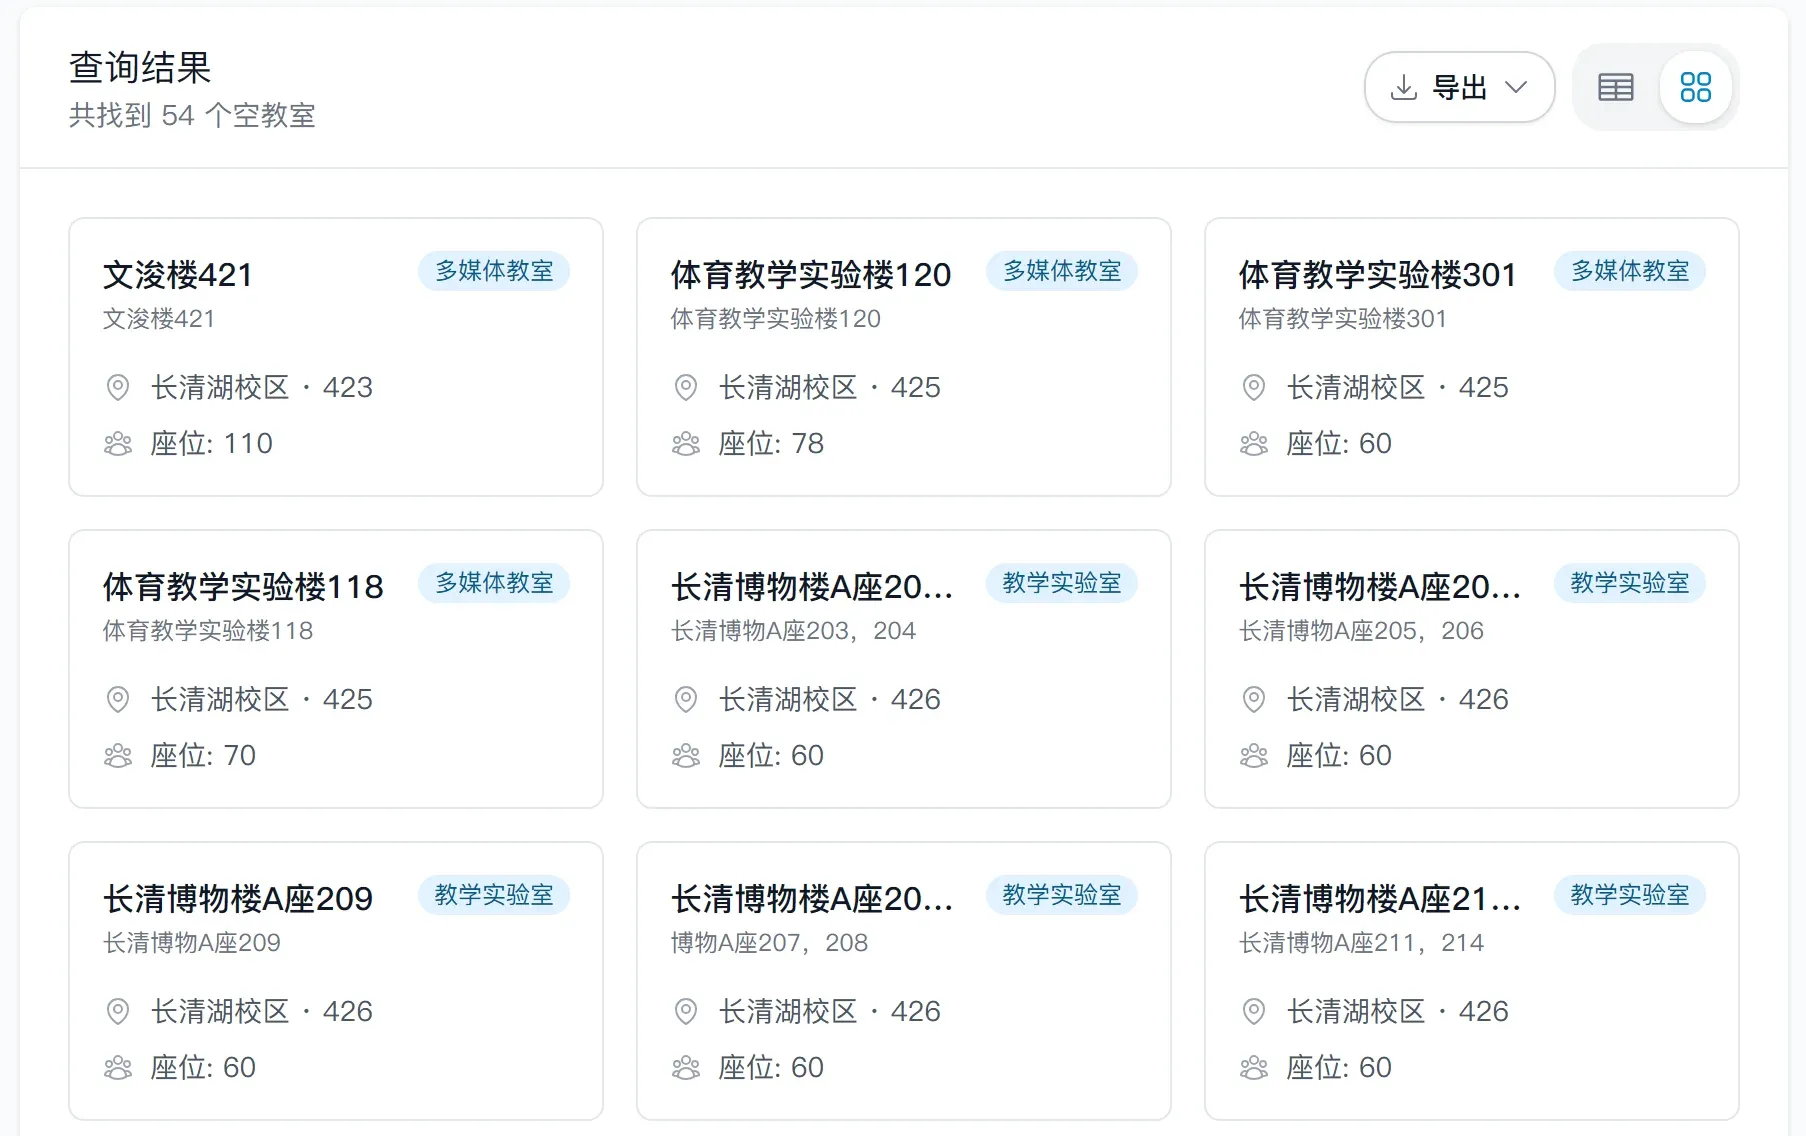
After clicking "Search empty classrooms", you can:
- View results in table view
- View results in card view
- Export as CSV / Excel / PDF
### First-time use
Empty classroom lookup uses an **independent academic system session** — it does not affect your platform login.
1. Open "Empty classrooms".
2. Enter your academic system student ID, password, and verification code.
3. Click "Log in".
Notes:
- Your academic password is used only for this login and query, and is not stored by the platform.
- This login is separate from your platform account login.
### Looking up empty classrooms
Once logged in, you can set the following criteria:
- Academic year and semester
- Campus
- Building
- Room type
- Seat count range
- Room name
- Week
- Day of the week
- Period
For week and period, you can:
- Select individually
- Select all / clear
- Enter a range manually, e.g. `1-5,7,9-11`
After clicking "Search empty classrooms", you can:
- View results in table view
- View results in card view
- Export as CSV / Excel / PDF
 ---
## Part 5: Profile settings
Entry point: `Profile` in the sidebar.
Profile settings now brings together your profile, security info, and login history in one place.
---
## Part 5: Profile settings
Entry point: `Profile` in the sidebar.
Profile settings now brings together your profile, security info, and login history in one place.
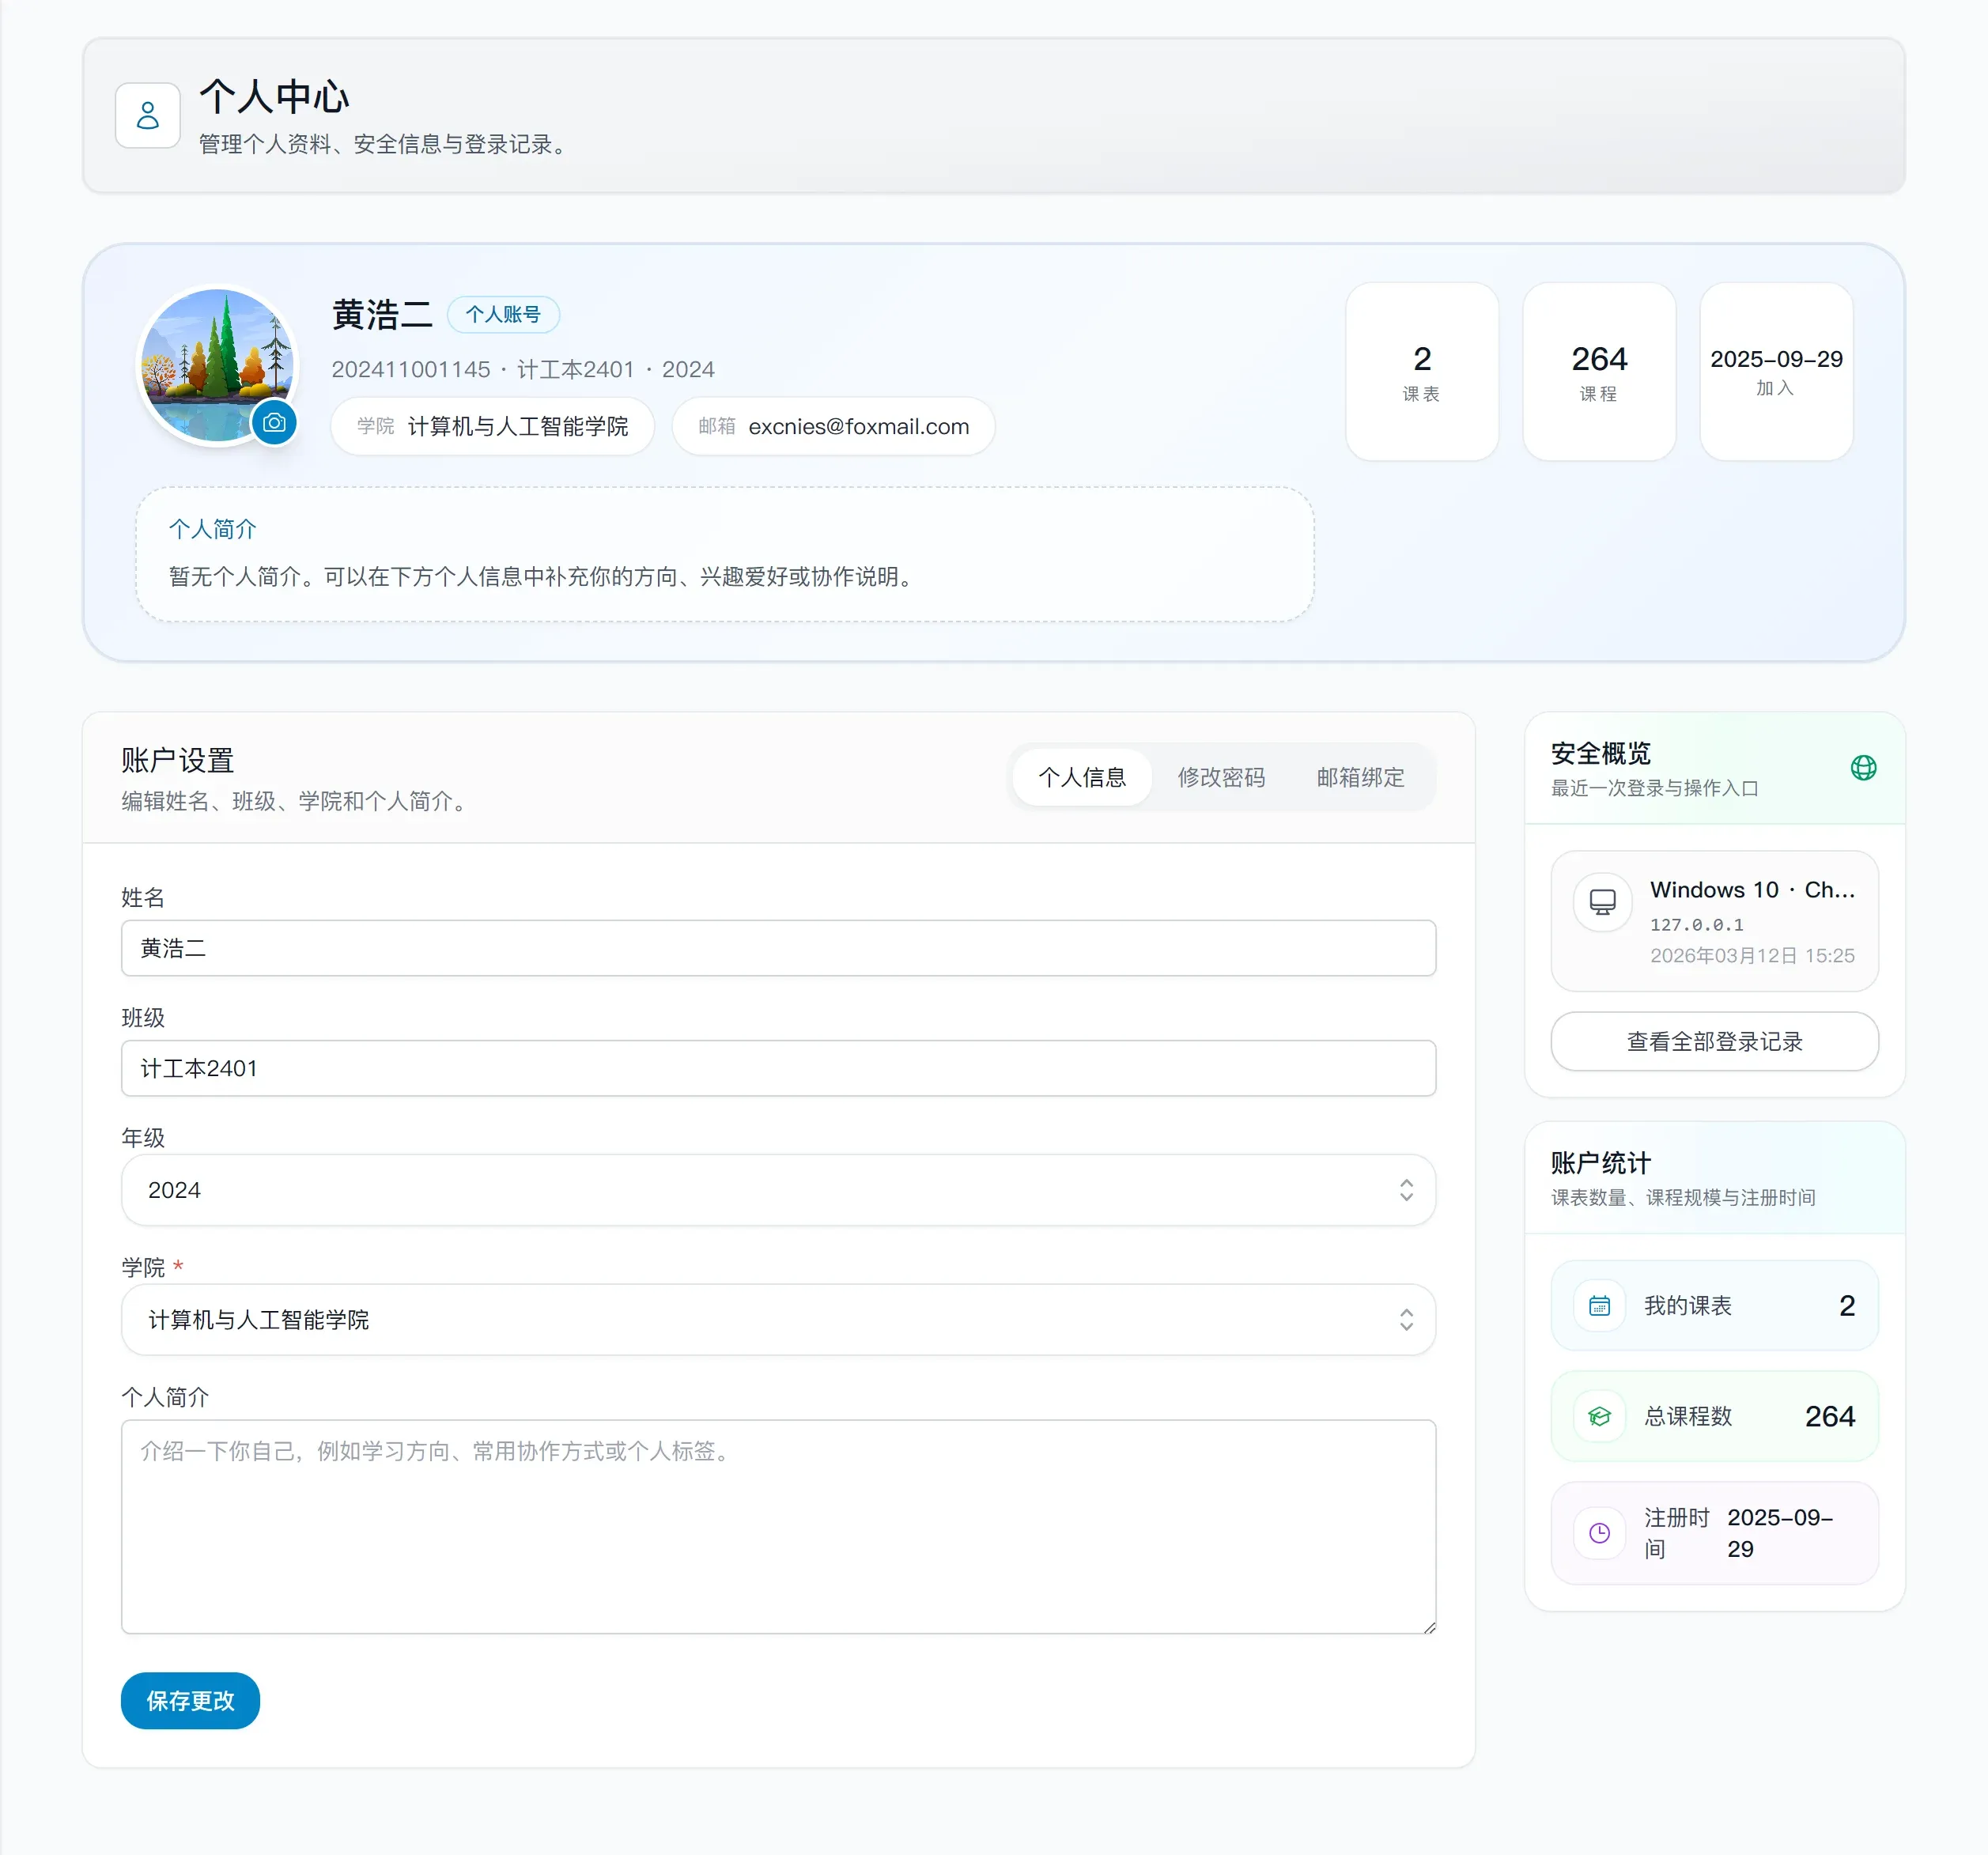 ### 1. Edit your profile
Under the "Profile" tab in "Account settings", you can edit:
- Name
- Class
- Grade
- Department
- Bio
Click "Save changes" when you're done.
### 2. Change your avatar
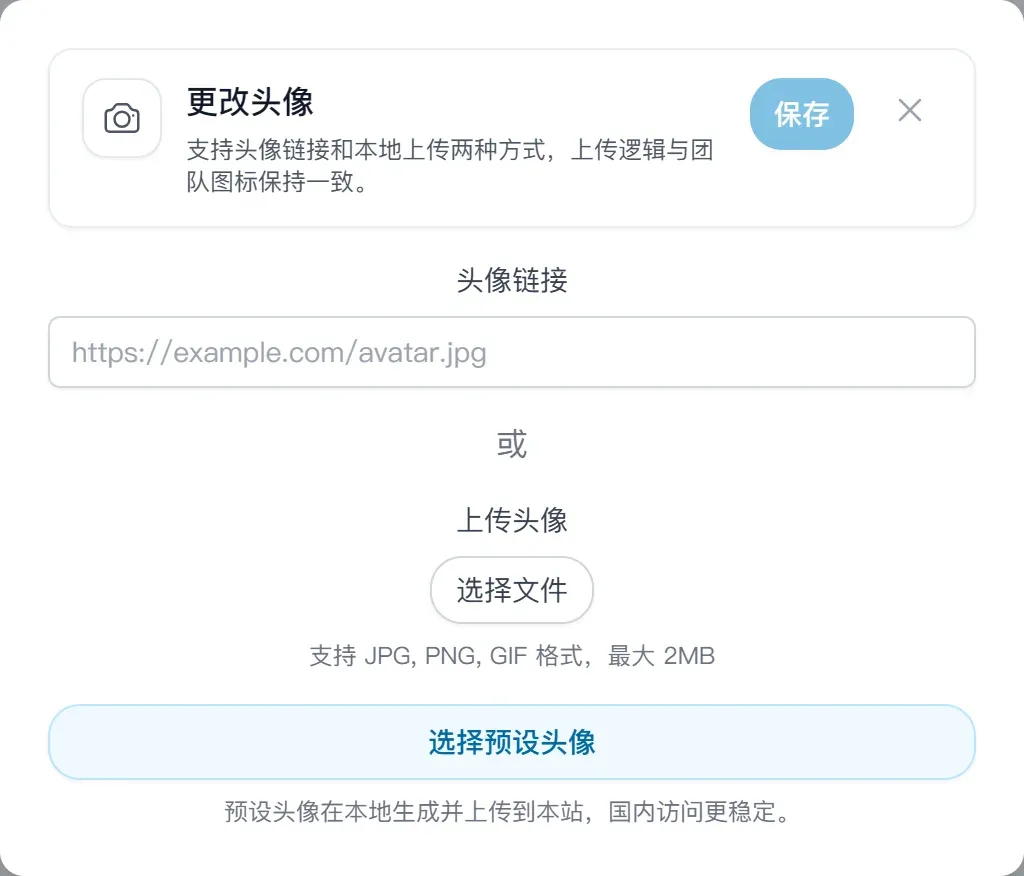
Click the camera button in the bottom-right corner of your profile picture to open the avatar settings.
Three options are available:
- Enter an avatar URL directly
- Upload a local image
- Use a preset avatar
### 1. Edit your profile
Under the "Profile" tab in "Account settings", you can edit:
- Name
- Class
- Grade
- Department
- Bio
Click "Save changes" when you're done.
### 2. Change your avatar
Click the camera button in the bottom-right corner of your profile picture to open the avatar settings.
Three options are available:
- Enter an avatar URL directly
- Upload a local image
- Use a preset avatar
 ### 3. Bind or change your email
It's a good idea to bind your email early — you'll need it for password recovery and password changes.
Steps:
1. Go to the email tab in "Account settings".
2. Enter the new email address.
3. Click send verification code.
4. Enter the code you receive.
5. Click "Confirm binding" or "Confirm change".
Once your email is bound, it can be used for:
- Password recovery
- Receiving important notifications
- Stronger identity verification when changing your password
### 4. Change your password
Go to the "Change password" tab in "Account settings".
The current flow:
1. Enter your current password.
2. Enter your new password and confirm it.
3. If you've already bound an email, you'll also need to enter the email verification code.
4. Click "Change password".
Notes:
- If you've bound an email, the security requirements for changing your password are higher.
- If you haven't bound an email, you can still change your password, but binding an email first is recommended.
### 5. View login history
The "Security overview" panel on the right side of the profile page shows your most recent login at a glance.
To see the full history:
1. Click "View all login records".
2. In the popup you can see:
- Login time
- IP address
- Browser
- Operating system
- User Agent
---
That's the end of this tutorial. We hope this guide helps you get the most out of ChronoSync. If you run into any issues along the way, feel free to reach out through the contact info on the project homepage.
Happy scheduling!
### 3. Bind or change your email
It's a good idea to bind your email early — you'll need it for password recovery and password changes.
Steps:
1. Go to the email tab in "Account settings".
2. Enter the new email address.
3. Click send verification code.
4. Enter the code you receive.
5. Click "Confirm binding" or "Confirm change".
Once your email is bound, it can be used for:
- Password recovery
- Receiving important notifications
- Stronger identity verification when changing your password
### 4. Change your password
Go to the "Change password" tab in "Account settings".
The current flow:
1. Enter your current password.
2. Enter your new password and confirm it.
3. If you've already bound an email, you'll also need to enter the email verification code.
4. Click "Change password".
Notes:
- If you've bound an email, the security requirements for changing your password are higher.
- If you haven't bound an email, you can still change your password, but binding an email first is recommended.
### 5. View login history
The "Security overview" panel on the right side of the profile page shows your most recent login at a glance.
To see the full history:
1. Click "View all login records".
2. In the popup you can see:
- Login time
- IP address
- Browser
- Operating system
- User Agent
---
That's the end of this tutorial. We hope this guide helps you get the most out of ChronoSync. If you run into any issues along the way, feel free to reach out through the contact info on the project homepage.
Happy scheduling!